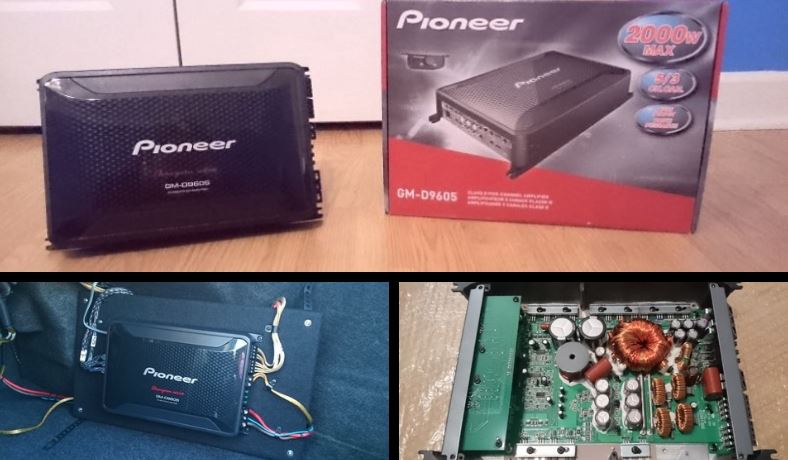
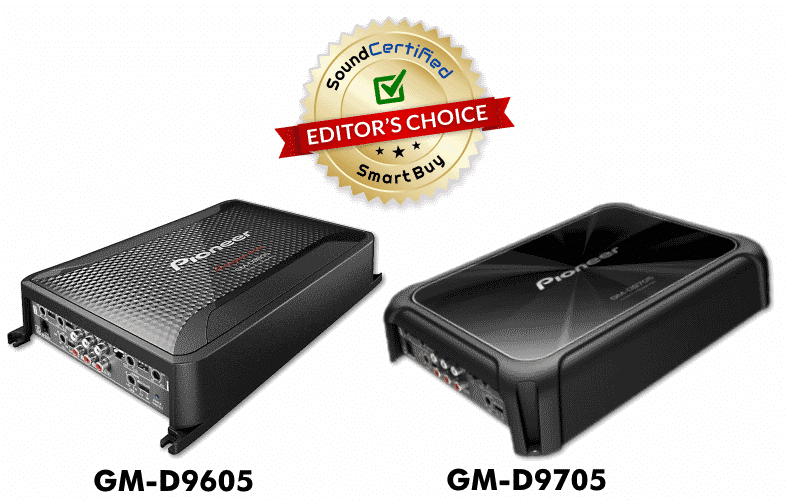
Looking for a 5 channel car amp to drive your whole system? You’re in luck: while you’ll run across a lot of bad buys out there, there are a few that are worth the money!
In my detailed review of the Pioneer GM-D9605/GM-D9705 5 channel amplifier, I’ll show you what I found from hands-on, real-world testing and why they’re good values and great-sounding amps you’ll love.
Contents
- Basics first – The GM-D9605 / GM-D9705 5 channel amp explained
- Unboxing and first impressions
- What’s in the box?
- Build quality and close-up evaluation
- The GM-D9605/9705 amp guts revealed! Checking out the electronics
- Specifications
- My test setup and installation
- More about the bass remote
- How does it sound? Real music and test tracks
- GM-D9065 vs GM-D9705: Are there any differences?
- Review summary – Should you get one?
Basics first – The GM-D9605 / GM-D9705 5 channel amp explained
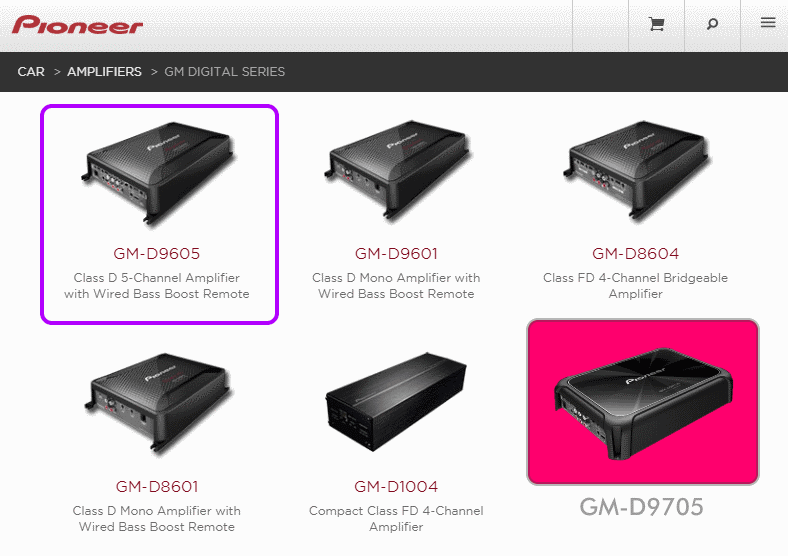
The Pioneer GM line of amplifiers consists of several different power levels and channel configurations. All are class D-type amplifiers and competitively priced. (Note that the GM-Dx6xx models are now renamed the GM-Dx7xx models). The GM-D9705 is the newer version of the GM-D9605, although they’re functionally the same (aside from different looks).
The GM-D9605/GM-D9705 is one of the company’s line of midrange priced amplifiers in the Classic GM series. GM amplifiers are all class D amps, meaning they using a modern high-efficiency design based on high-speed switching amplifier technology.
The Pioneer GM series class D car amp family
Class D amplifiers are a relatively modern approach to car audio and offer several benefits.
The biggest advantages are reduced size and cost, higher power efficiency (less power wasted as heat), and running cooler during high power output.
Much like other 5 channel amps, the GM-D9605/9705 offers flexible use that’s installation-friendly. You can run an entire great-sounding system from a single amp that can fit under a car or truck seat.
Several configurations are possible:
- 4 main channels (full-range front & rear) + 1 subwoofer output (bass only)
- 3 main channels (2 standard + 1 bridged) + 1 subwoofer
- 2 main channels (2 bridged for more power) + 1 subwoofer
In all cases, you can drive rear speakers even if you only have 1 pair of RCA outputs as a 2/4 channel input switch is provided.
It’s a great feature and saves you the cost of Y adapters and really expands your options.
Until fairly recently 5 channel amps (especially at the power level of the GM-D9605/9705) were some of the largest amps sold. They were fairly tough at times to fit into a vehicle.
Thankfully the class D design makes it possible to get the same power and flexibility in a smaller size and with less power draw, too.
Signal input options
The great news is that it’s very flexible not only in the number of channels available but it’s great for factory stereos as well. There’s a handy 4-channel speaker level connection provided (wiring harness included).
When using a stereo without subwoofer outputs, you can use the subwoofer input switch set to “A/B” to derive low-pass bass from them instead.
Either way, it’s great for nearly any system you can dream up for your vehicle in my opinion.
Unboxing and first impressions
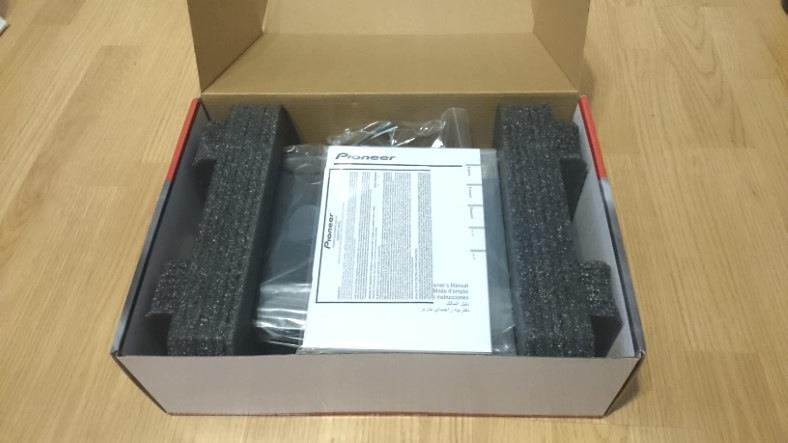
My Pioneer 5 channel amp (GM-D9605) arrived safe and sound. The amp is well-packaged with great foam inserts everything is nicely bagged and tucked inside. I was expecting good things from Pioneer and I’m happy to say I wasn’t disappointed!
Finally, it came! As a Pioneer car audio owner & product installer in the past, I had high expectations for the Pioneer 5 channel amp. This was a wonderful opportunity to test their modern car amp design.
My amp arrived well-packaged with a smart, professional design just like you’d expect from a leader in the car stereo industry. Right away I got a good feeling.
Everything was put together nicely and the included accessories were tucked away neatly inside.
What’s in the box?
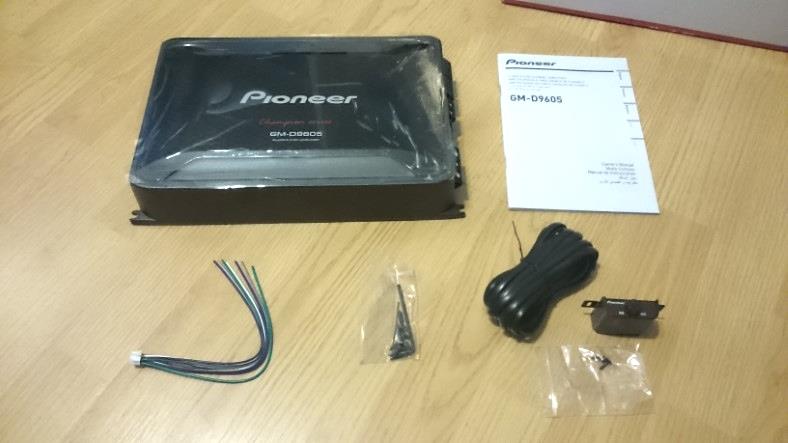
Pictured: Everything included with the Pioneer GM-D9605. Aside from an amp wiring kit and installation-specific accessories, you’ll have everything you need to install the amp itself and mount it. Note: I do recommend some double-sided tape for the bass remote if you’d like to avoid screw holes when mounting.
After opening up the box and removing the amp here’s what you’ll find inside:
- Owner’s manual and warranty info
- Bass remote knob assembly and cable (16 ft long) + mounting screws
- Amp mounting screws, black, 1/2″
- Speaker and power terminal Allen (hex) wrenches
- Front/rear speaker level input harness
Note that you’ll need a good amp wiring kit like in my amp kit buying guide to make your installation easier & with great results.
It’s especially important to have good quality wire and the little bits and pieces that make the work much less of a hassle!
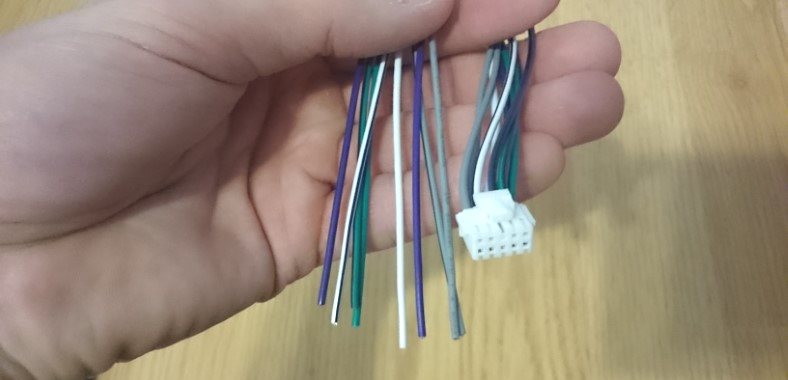
For factory stereos or aftermarket stereos with no RCA jacks, you’re covered! The included speaker-level (“high level”) wiring harness connects to the speaker wiring from your stereo and plugs into the amp. Industry-standard color codes are used to make wiring clear.
The included speaker level input harness is very compact and easy to understand. Not only clearly spelled out in the owner’s manual (which is very nice, by the way) but also it uses industry standard colors.
Positive and negative wiring is marked by the use of 1 striped wire for each pair of input wires for a total of 8 wires (4 inputs for both front and rear options).
For my test setup, the included hardware (screws, hex wrenches, and remote cable) worked great and I had no complaints at all.
Build quality and close-up evaluation
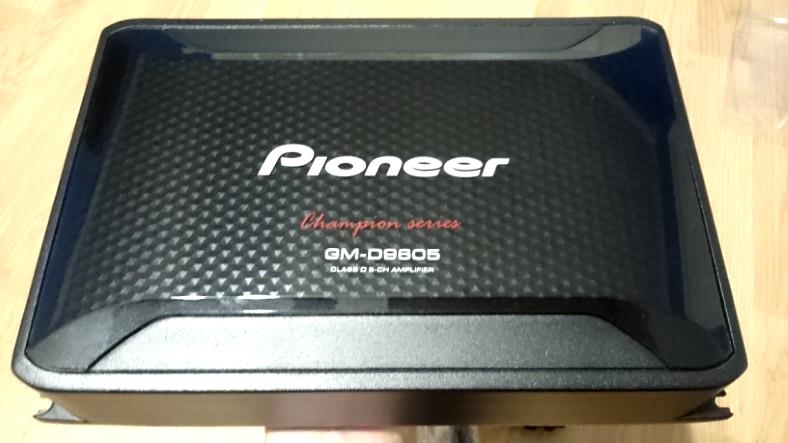
The GM-D9605 is a great-looking amp that has a nice glossy finish on top. The sides, edges, and surrounding areas feature a lovely matte black style. Overall, it’s a great design and everything is put together nicely.
As I like to do, I gave the amp a close-up and thorough inspection to check build quality, fit and finish, and to find any defects in assembly.
I’m happy to say the build quality is great, the cosmetic looks are excellent, and I found no defects to be aware of.
I especially like how it looks on top: somewhat resembling a carbon fiber material. There’s a glossy coating over a metal pattern designed into the single-piece heavy-duty metal shell.
The amp feels great in the hand and is definitely not a lightweight by any means! When you pick up the GM-D9605, at about 7lbs in weight, you can quickly tell it’s well-made and designed for handling some big power output.
Front and rear panel details
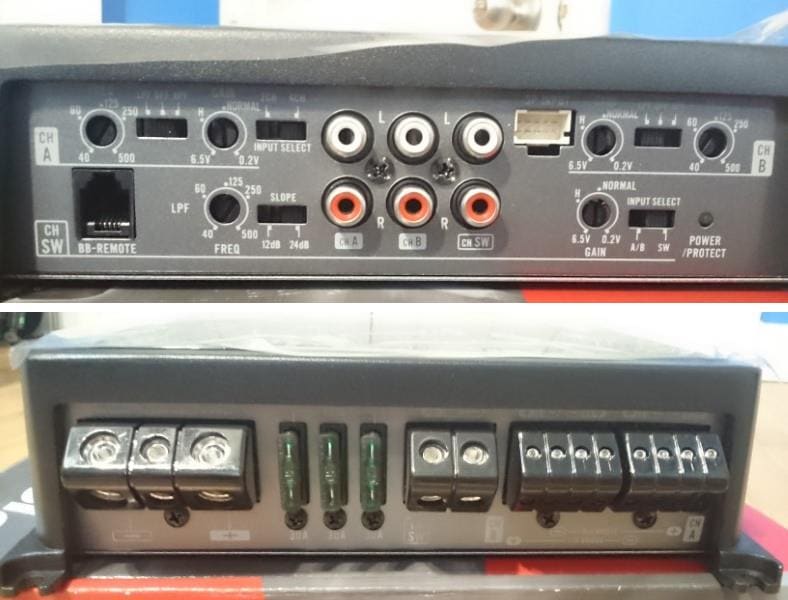
Front and rear view of the amp’s controls and wiring terminals. A very compact amp for its power class at only 12.4 x 2 x 7.87″ in size, the company had to fit a lot into a small area. Controls are well laid out and work well in my experience. The wiring terminals are interesting (I’ll cover that later) but very high-quality, too.
The front and rear panels, like other class D amplifiers, have to fit in a smaller size than the amps of days gone by. Because of this, you’ll often find similar amps have controls and labels very close together.
However, no complaints here. The crossover controls, bass remote jack, RCA input jacks, and much more are nicely done. The lithography (label printing) is nice and clear, although the topmost labels are harder to see at times.
I checked the switches and dial controls and everything felt nice and tight – no signs of cheap, low-quality parts being used.
Wiring terminals (and my thoughts on them)
Close up: the wiring terminals where you’ll connect power, ground, remote, and speaker wiring. They’re very high quality and offer an excellent, reliable connection as I discovered during installation. Note, however, that the openings are angled downward slightly.
Similarly, I can say the same for the wiring terminals. Unlike cheaper amps, Pioneer uses a high-quality machined metal wiring block in the design.
Within each wire terminal is a single machine screw that uses one of the 2 included hex wrenches. You’ll use the included metal wrenches to tighten down the screws and secure wiring.
Don’t sweat it, though – you can tighten them down firmly but there’s no need to get them super tight. Once tightened down firmly by hand the wire isn’t going anywhere!
A note on the terminals
There is one little detail that caught my attention, however. The wiring terminal openings are angled downward and not perfectly horizontal.
In practice, it wasn’t a problem for me, but I can see how some people might find it a bit harder to insert wiring during installation.
After installation using proper lighting (yes, I installed it outside at night!) the job went fine and I can’t really complain much.
The GM-D9605/9705 amp guts revealed! Checking out the electronics
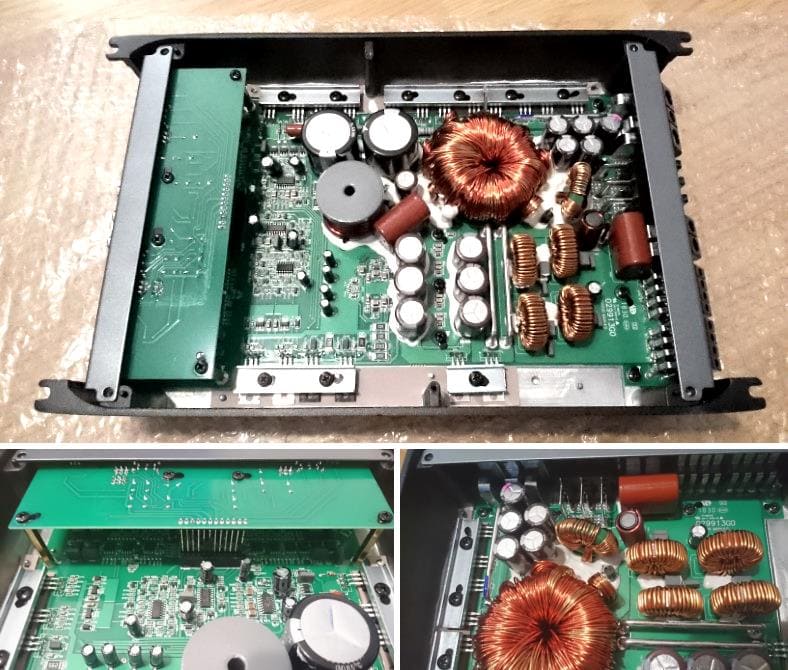
To be 100% sure about the build and design quality I opened up the amp. Inside is a smartly designed, well laid-out printed circuit board (PCB) with miniaturized components and good build quality. There’s a very beefy power transformer. Components are high-quality and the assembly is well done. The 9705’s internal components are very similar as well (not shown)
I wasn’t kidding earlier when I mentioned I’d be digging deep into the details! One great way to really find out about the quality of an amp is to open it up and give it a more thorough look.
As you can see above in the images, Pioneer uses miniaturized surface mount technology (SMT) components to keep circuit space to a minimum and optimize sound quality.
Additionally, I noticed the capacitors and transformers that make up the power supply are into place for added durability and vibration resistance. That’s something you don’t always see, sadly.
It’s important to remember that the GM-D9605 & D9705 sit in a “sweet spot” in terms of cost vs quality & performance: not cheap, but not too expensive, either.
What I found inside reflects that as well: a well-made, well laid-out circuit board with good fit and great assembly quality.
Specifications
- Channels: 5 (4 full-range + 1 subwoofer channel)
- Amp class type: class FD (custom class D design)
- Signal inputs: 6 RCA inputs (4 front/rear “A/B” + 2 subwoofer) + 4 ch. high-level inputs
- 2/4 RCA input switch
- Subwoofer: Dedicated inputs or derived from main channels
- Bass boost level: 0 – 18dB, adjustable
- High-level input sensing auto-on feature
- Crossovers:
A/B ch.: High/low pass, -12dB/Oct, 40-500Hz adjustable
Subw.: Low pass, -12dB/-24dB/Oct selectable, 40-500Hz adjustable
Bass boost center freq.: 50Hz - CEA-2006 continuous RMS power ratings:
75W x 4 + 350W x 1 @ 4 ohms
100W x 4 + 600W x 1 @ 2 ohms
Bridged: 200W x 2 @ 4 ohms (Front/rear ch.) - Speaker terminals: Channels A, B (front, rear) stereo + single subwoofer out
- Freq. response (A/B): 10Hz ~ 50kHz (+0dB, -3dB)
- Freq. response (sub): 10Hz ~ 500Hz (+0dB, -3dB)
- Total Harmonic Distortion (THD): A/B CH: <0.05% (1kHz) / SUB CH: <0.05% (100Hz)
- Signal-to-Noise (SNR): > 94dB
- Fuse Rating: 30A x 3
- Includes bass remote knob + 6 wire, 6 position telephone cable
- Includes mounting screws for amp, remote, and hex wrenches for terminals
- Wiring terminal type: insulated high current hex screw solid block machined
- Owner’s manual with detailed instructions
- Protection circuit for shorts, thermal overload, low voltage
- Warranty: 1 year
- Size: 12.4 x 2 x 7.87 ” (31.5 x 5 x 20 cm)
- Weight: 7lbs 2 oz (3.2kgs)
If you’re not familiar with car amplifier ratings, it’s important to understand that power ratings in the mobile electronics industry are a huge source of confusion and are often used to mislead buyers.
Fortunately, the industry established a good (although, voluntary) set of standards in the 2000s which reputable manufacturers use to assure you of what you’re getting. Amplifiers sold today that provide Consumer Electronics Association 2006 (CEA-2006) power specs guarantee the amp will perform as advertised.
Like several other top car audio companies, Pioneer’s GM line of amps is no different.
The GM-D9605/D9705’s CEA-2006 compliant power ratings are guaranteed correct. In fact, the GM line of amps has actually be proven to exceed their ratings by a small margin!
My hands-on experience reflects this as well. I can definitely tell you that there’s NO shortage of power with this guy!
My test setup and installation
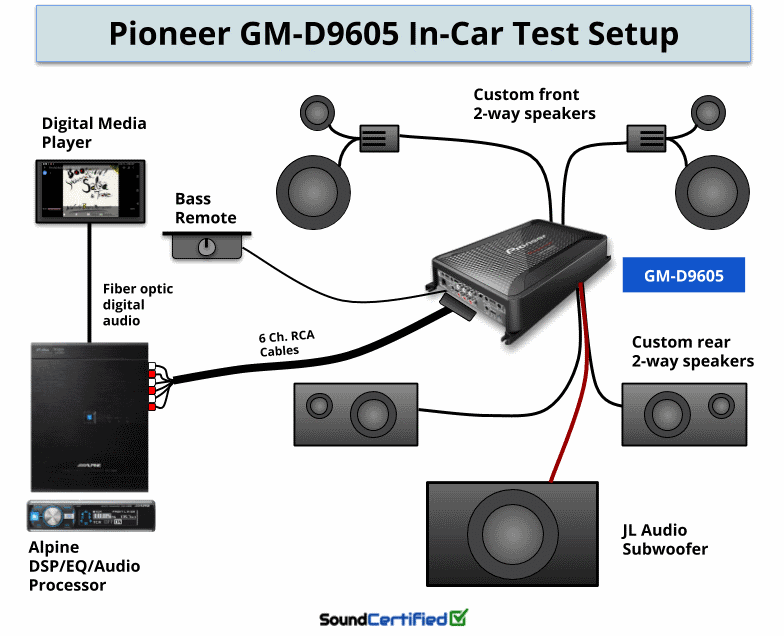
A diagram showing the general setup used for testing the Pioneer 5 channel amplifier. I replaced my high-spec reference amplifiers and tuned my system to correct any problematic frequency response behavior in order to best test the amp’s sound performance.
Now comes the part where things get real! How would the Pioneer stand up against my class A/B reference amps that are 40% bigger in size?
And is the GM-D9605 really a great value like I thought, or just another average, mid-tier amp?
It’s time to find out!
Installing the GM-D9605
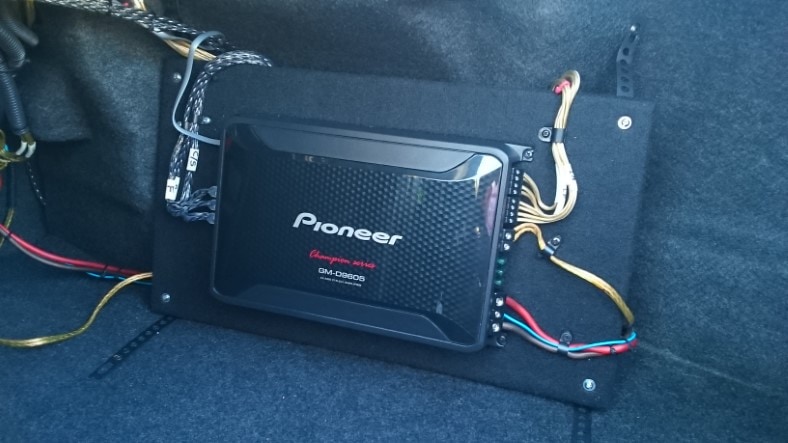
For my test setup I at times enjoy real-world use of an amp using an amp rack and everyday listening. Here’s the Pioneer amplifier mounted on an amp rack for a reliable, neat installation.
Using the same method found in my guide on how to make your own car amp rack, I set up my test installation and installed the amp in my test car.
One thing’s for sure – if I’m going to give an amp a fair test the installation quality is definitely important. Professional installation with neat wiring and everything secured in place isn’t just good-looking but is a requirement for reliability.
Setup and wiring connections
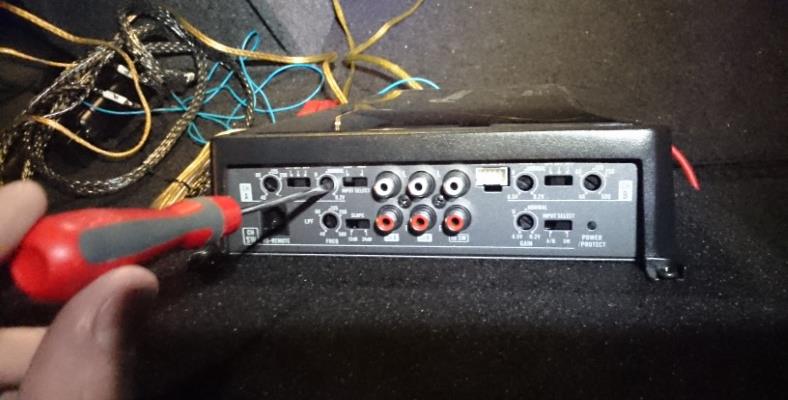
Getting the amp gain and crossover settings ready during installation. The controls work well and are easy to use. Additionally, what helps set the amp apart from others is how the gain level control is labeled with “Normal”, “0.5V”, and “6V”, giving you a better idea of the general range & position the dial should be at.
I set up the baseline gain, crossover, and other controls adjustments (like for the subwoofer) when mounting the amp rack into place. In my cases, the high-pass crossovers weren’t needed so I left them set to flat (off).
This allows an unrestricted audio range as my Alpine digital signal processor (DSP)/EQ already provides filtering.
For the subwoofer control, I started with an initial gain setting somewhat bit higher as from experience in my setup it’s needed. Normally I’ll fine-tailor them later once the system is powered and working ok.
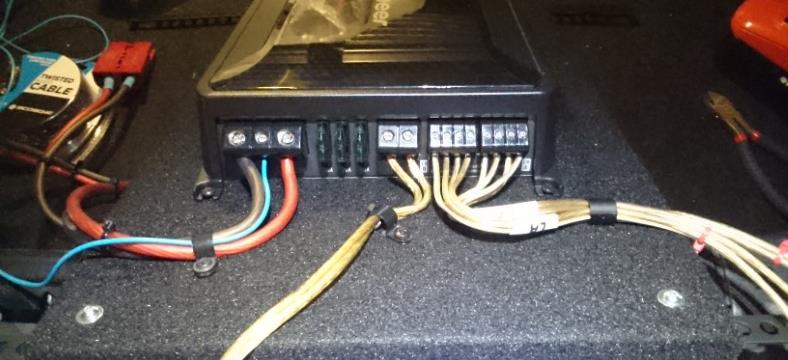
Connecting power & speaker wiring to the amp. All went well as planned, even though the downward-angled terminal openings are a bit new to me. In the end, the terminals work very well and you’ll get a nice, tight, and great-conducting connection!
Finishing it up, I wired up the amp, carefully inserting the power and speaker wiring as these types of terminals are a bit new to me. The slightly down angled openings turned out to not really be an issue at all.
They worked well, and despite the wiring openings being less visible immediately, the design is actually quite good. Using the hand wrenches supplied in the box I carefully tightened the connections to avoid stripping or any other issues.
Note: I strongly recommend against using a cordless drill or screwdriver when working with terminals like this. It’s easy to overpower the screw and strip out the inset shape, leaving them rounded out and much hard to work with.
My advice is to always do delicate or fine fasteners by hand.
I also sometimes do things by hand to check the “feel” of parts – poorly designed or manufactured connections sometimes show themselves when they feel cheap or loose. That wasn’t the case here.
The connections were excellent and it only took a few moments for each connection point to get a highly secure & tight clamp.
System EQ setup
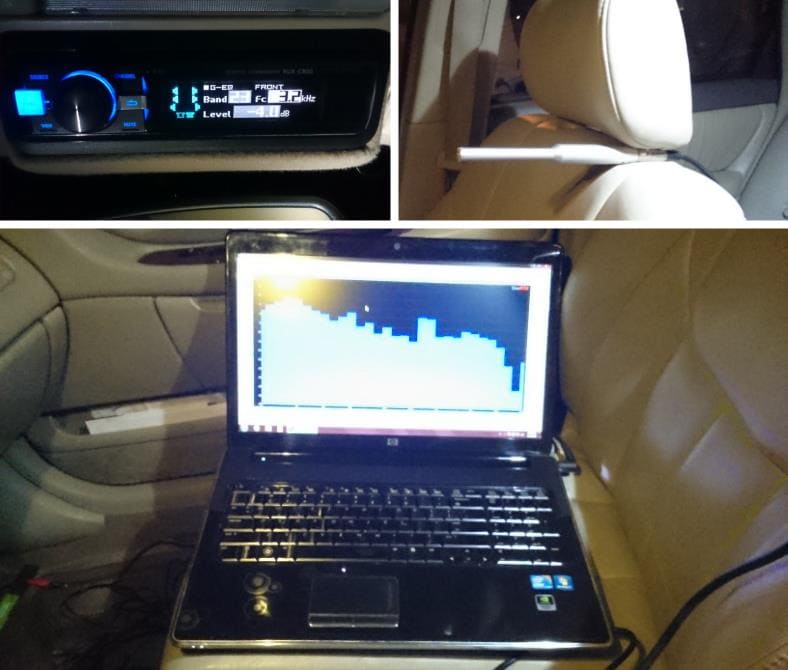
To keep things “fair” during test evaluation I made sure to remove any nasty sound peaks or dips that would give my ears a false impression about the Pioneer amp. Using my calibrated microphone and real-time analyzer (RTA) software I smoothed out any problem areas. This lets me test the amp on a “level playing field.”
Of course, it’s never a good idea to compare apples to oranges, so to speak. After installation, I used my real time analyzer (RTA) software and calibrated microphone for equalization adjustments.
This lets me do critical listening of the amp’s sound reproduction by removing any nasty peaks or dips in the sound system’s response that might influence what my ears hear.
Firing up the laptop I got to work taming any areas by adjusting my Alpine DSP/equalizer processor’s 31 bands as needed for the main channels and the subwoofer output.
More about the bass remote
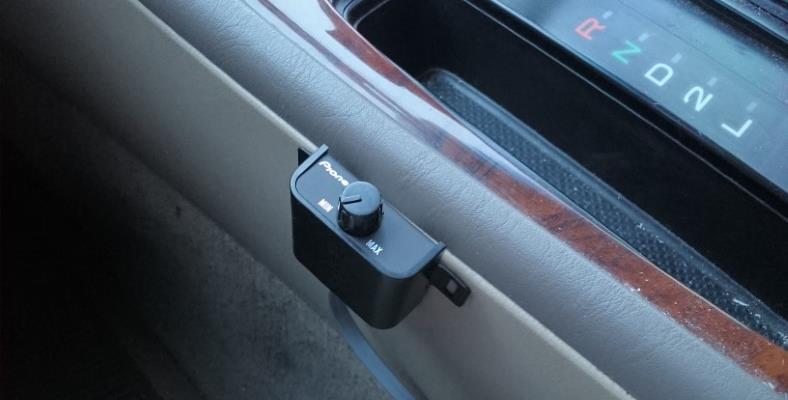
The bass remote installed using double-sided tape for avoiding drill screw holes for test purposes. I do recommend the screws if you’re ok with permanent holes, but for many people using an alcohol prep pad and then sticking on adhesive tape is a great option.
The bass remote is pretty easy to install and works great, although the knob is a bit small. However, it lets you easily dial in as much slamming bass as you like with the 0-18dB boost provided.
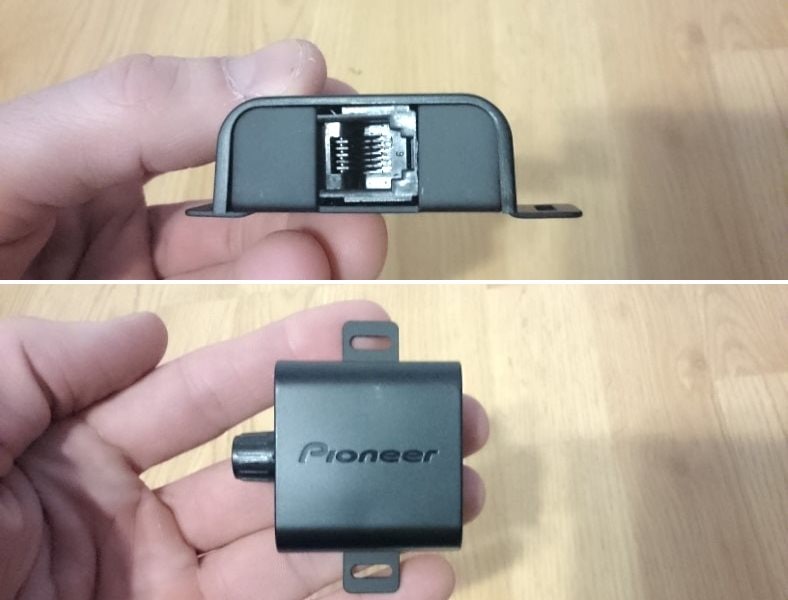
Basically, it’s a very small assembly with a 6 pin, 6 conductor jack on the rear that installs by connecting the provided black telephone cable. At 16 ft 5″ (5m) in length, it works well in most vehicles.
Alternatively, you can also pick up a longer cable of the same type if the original isn’t long enough for you.
Closeup of the bass remote, a small dial control that uses a 6 pin phone cable to allow you to boost the subwoofer output’s level any time. It works great and is a really handy (and fun) way to get more enjoyment out of your music.
I especially like that it’s included at no extra charge, as some competitors charge up to $25-$30 for theirs when sold separately.
How does it sound? Real music and test tracks
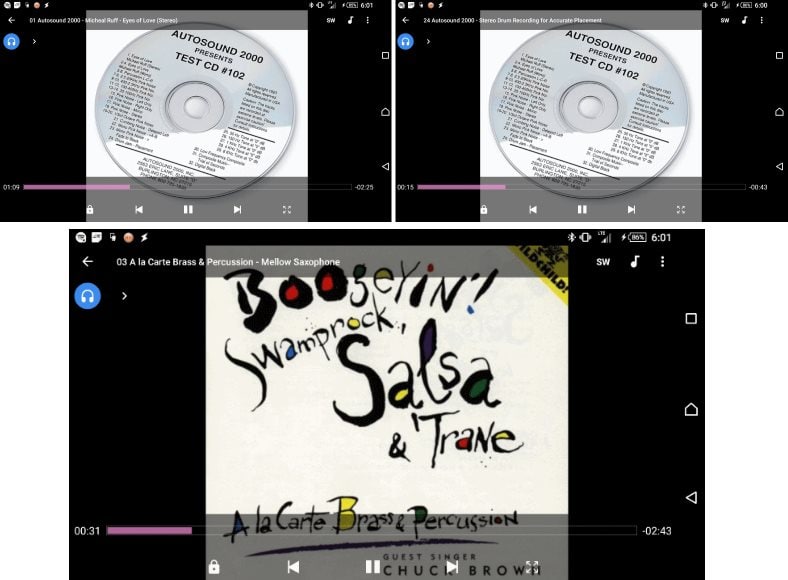
Some reference car audio test tracks I used for testing the amp and verifying sound quality. Top: Autosound 2000 Test CD #102. Bottom: A high-fidelity album from Mapleshade Music featuring unprocessed, excellent sound quality used in some high-end car audio demos.
Using my reference test CDs (as well as music I enjoy and I’m familiar with very well) I ran the amp through a series of tests to check some important characteristics:
- Sound quality & clarity
- Stereo imaging
- Bass sound quality
- Power output with real music
The result? The GM-D9605 had spot-on imaging in my test setup as with my class A/B reference amps. No problems there! The left, center, and right placement of the instruments was exactly spot-on.
Listening to everyday music like your favorite tracks on Spotify (or whatever music source you like!) is enjoyable and fun with the Pioneer. Music is crisp, clear, and can really jam hard when you crank the volume. Clear, well-recorded songs like Ne-Yo’s Miss Independent come through great and have an excellent low-end bass sound!
The music sound quality was great, with crisp, dynamic highs and punchy bass. While there is a tiny bit less detail than my original (and much less efficient) reference amplifiers, that’s to be expected of a midrange class D amp.
It’s important to understand that unless you’re spending absolute top-dollar money for a higher-end amp like No products found. it’s a compromise that comes with an amp in this price range.
I have to say, however, that unless you’re one of the pickiest audiophile listeners, you’ll enjoy it. It’s a very clear, musical amp that has a ton of power just waiting to perform.
Cranking up the bass anytime you like thanks to the bass remote is fun! It’s a great little feature to have and I definitely recommend installing it. The knob is a bit small so I would have liked a slightly larger size to make it even more convenient to use.
Should you choose not to install the bass remote, however, be aware that there’s no bass boost feature on the control panel. In that case, you’ll have to live without a boost adjustment on the amp.
Fun music, mucho bass!
All in all, I enjoyed the sparkling, crisp highs, and especially the subwoofer output. This is an amp that can really put out some serious power when you’re jamming hard.
It’s hard to believe how much power you get from such a little size: 350W x 1 at 4 ohms and 600W at 2 ohms (the minimum Ohms/subwoofer rating supported).
Never was there a problem with running out of power – this little amp is excellent for systems using subs and I got bass that hits hard any time I wanted it.
GM-D9065 vs GM-D9705: Are there any differences?
While you might be a bit nervous about the possible differences, you’re in luck – there aren’t any. The 2 models are different only in the outside of the amplifier. The internal design, connectors, inputs & controls, and all specs are the same.
There are only 2 very small differences between the two models. They’re functionally the same amp inside.
As often happens in the industry both models are almost identical aside from a new look:
- Internal components, power, sound quality, and specs are the same
- The same bass remote is included with the D9705 as pictured with the D9605
- Both the input connectors, controls, and wiring terminals are exactly the same
Some minor differences I found are the following:
- The GM-D9605 has a glossy finish over a simulated carbon fiber pattern; the GM-D9705 has a slightly shorter top with a machined metal finish
- The GM-D9605’s screw mount feet are a bit easier to access than the GM-D9705, giving a slight advantage at installation time
- The 9705 has the same general internal electronics and many of the same components, but a slightly different circuit board (same power & performance specifications)
Other than that, there’s nothing worth mentioning.
Review summary – Should you get one?
After testing for some time and putting it through its paces, I have to say I’m very happy with the quality, sound, and power I got for the money. It’s a definite YES!
There are a lot of choices out there when it comes to 5 channel amps but the Pioneer GM-D9605/D9705 delivers some of the best all-around performance and value you’ll find anywhere. It’s an excellent choice for all but the most discriminating listener.
As an installer and audio fanatic, I really like how flexible it is, too. The features really let you tailor your sound a lot. The included bass remote adds that extra bit of fun when it comes time to crank up the bass.
While they’re almost the same aside from minor differences, I prefer the more modern style of the GM-D9705 over the 9605 model. I wouldn’t hesitate to recommend the 9605 if you like carbon fiber accents though.
These are affordable, solid amps that have all the power most people could want – with the sound quality that you usually expect from more expensive amps. Even better, they can fit under a seat since they’re so compact.
Head over now to No products found.
Overall
-
Overall quality - 9.5/10
9.5/10
-
Sound quality - 8.8/10
8.8/10
-
Power & performance - 9.2/10
9.2/10
-
Installation ease - 8.9/10
8.9/10
-
Features - 9/10
9/10
Mid-priced 5 channel amps that really deliver, the Pioneer GM-D9605 & GM-D9705 offer an excellent - and affordable - way to power a whole system
While competitively priced, the GM-D9605/D9705 delivers serious power at 2 and 4 ohms. Bass fans won’t be disappointed, and neither will you if you want dynamic, crisp sound with plenty of power. Full-range sound is excellent, although it can’t match the detail level of competitors at twice the price. Bass is powerful, punchy, and enjoyable.
As a full-range system amp, it’s great for music and offers nice flexibility from an efficient & compact class D package. Quality is excellent, and the bass remote makes jamming hard even more fun. Try one on for size and you’ll love it too!
Pros
- Good sound quality and clarity
- Excellent power/CEA-2006 proven ratings
- Bass remote & cable included
- Bass boost feature works well
- Great crossover flexibility
- 2/4 ch front/rear input switch
- High-level inputs w/ harness
- Auto-sensing remote feature for high-level inputs
- Bass signal input from RCA or derived from main chs.
- Solid machined wiring terminals work well
- Great looks
- 0-18dB bass boost range
- 12/24dB/Oct. sub crossover switch
- Protection circuitry
- Runs cool during use
- Clear, detailed owner’s manual
Cons
- No accent lighting on logo or body
- Bass boost feature only works with remote
- No separate protection indicator lights
- Speaker and power terminals angled down slightly
- Sound quality can’t match higher priced amps
- 16′ 5″ (5m) remote cable may be short for some vehicles
- Bass remote knob is small
- No double-sided tape included
- Top adjustment labels are harder to see
