Making your own DIY car amp rack may seem like something that’s out of reach. Or maybe you don’t know where to begin and you’re worried you’ll have to pay someone else a lot of money to make one.
Here’s an affordable way to build a do it yourself (DIY) car amp rack in one day.
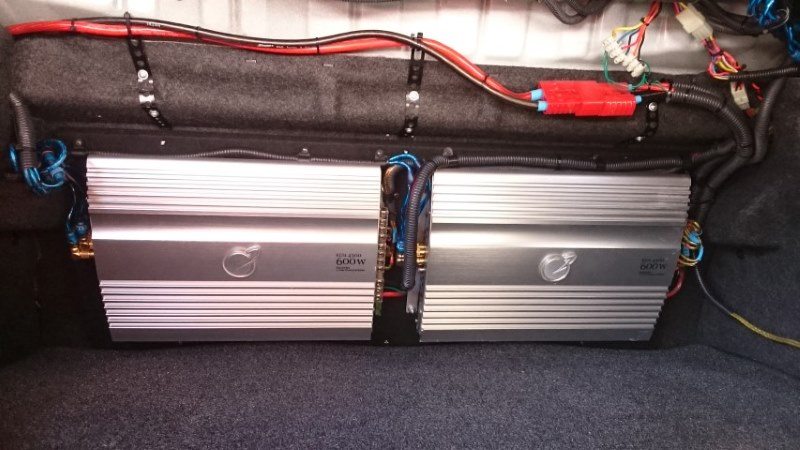
I still use these same car amp rack plans in not just customer vehicles but my own, too! I love how simple but professional looking they are. It’s pretty cool getting compliments on how great and pro-level it looks.
Now you can build your own car amp rack that looks great and is affordable, too!
Contents
- Infographic – Basic amp rack how-to guide
- Getting your tools & supplies ready – what to know first
- Measuring installation space
- Planning your amp rack setup
- Your shopping list and tips
- Making your amp rack – covering the board
- Putting it all together
- Installation – Mounting your rack
- Taking your amp rack to the next level…on the cheap!
- DIY car amp rack plans cost estimate
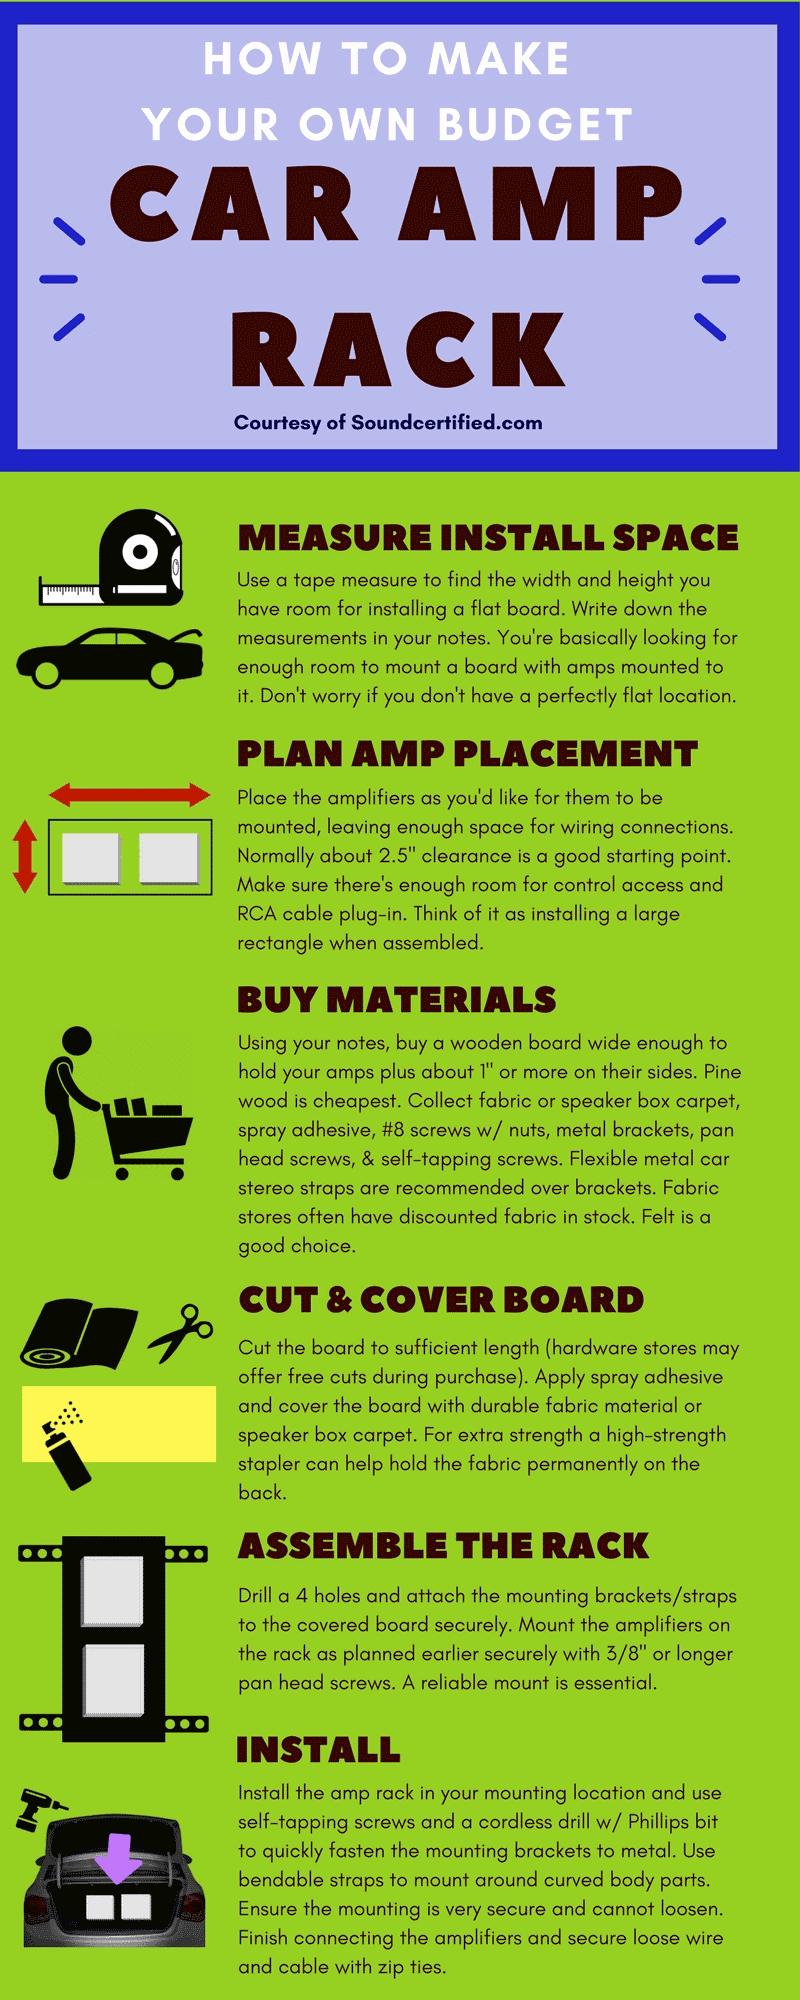
Infographic – Basic amp rack how-to guide
Getting your tools & supplies ready – what to know first

Tools you’ll need
You’ll need a number of tools to do the job well:
- Phillips screwdriver
- Cordless drill + Phillips bit (not essential but highly recommended) or standard electric drill
- Pliers – I recommend square-jaw, locking, or other types but needle nose can work, too
- Scissors for cutting material + utility razor (optional)
- Staple gun (optional)
- 1/8″ drill bit suitable for metal
- Basic tape measure or measuring tape
- Something to take notes with
- Permanent marker
As you can see you won’t need many tools. That’s part of the reason this approach works well. I’m hoping to help you carry out this with as little money and hassle as possible.
If you can, borrow any tools you don’t have from others to save money and time.
For many basic items you can get great deals at stores like Harbor Freight Tools, Wal-Mart, or even the Dollar Tree $1 store. If you shop carefully things like pliers can be found for around $2 a pair.
![]()
A staple gun can be bought when you go shopping for the materials you need, but it’s completely optional. They can drive strong staples into wood unlike a standard stapler and they’re great for stapling fabric securely. You can pick up a staple gun for close to $15 or so.
Will I need a power saw?
Fortunately, most likely you won’t need a saw. In the sections that follow you’ll need to shop for wood, but if your city has a Home Depot or Lowe’s hardware store, the great news is that they offer free wood cutting when you buy wood! And that’s also that much less work you have to do, too.
Parts to pick up before installation time
Metal mounting brackets (straps)
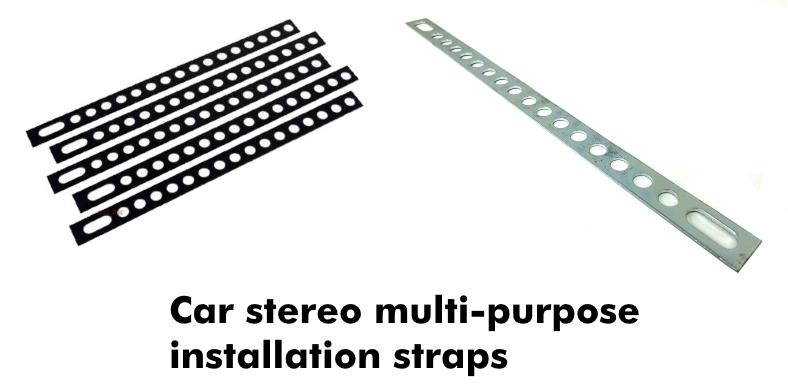 Car stereo metal mounting straps are fantastic for installation and will make building & installing an amp rack much easier. You can buy them finished in black, which I highly recommend, or with the standard metal finish. 9″ straps are fine in most cases, and you can buy a 5 pack or similar to save money. You’ll need at least 4 straps if using these.
One item I highly recommend is excellent metal mounting straps like these Metra BS9BK. They’re FANTASTIC for many types of car audio installations and are used very often by professional installers.
They’re strong enough for mounting an amp rack securely but are flexible enough to bend into odd shapes for more challenging installations.
I’ve used these for years to install almost anything in places you would think were impossible to put a sound system in!
It may or may not be possible to find some at your local stereo shop or electronics store that carries car stereo accessories, so you really need to check beforehand. Expect to pay $10 or less including shipping, although some can be found for around $7-8 for 2-4 straps.
Speaker carpet vs. fabric

Black automotive-grade speaker carpet (left) is great looking and durable. There’s no backing on it so it can be stretched and cut easily. However, you may have to order it, and it may cost more than regular fabrics like black felt (right) that you can find locally.
To finish your amp rack you’ll also need a good-looking & durable material to cover it with.
Backless automotive carpet (often call speaker box carpet) tends to be very durable and offers a great look. Colors like charcoal, dark gray, or mixed black colors are often available.
Otherwise, I recommend buying a good black fabric like felt. You can expect to spend $10 or so in that case, as it’s usually sold in 1 or 1/2 yards (1 yard = 36″). You may also find a different soft black cloth on sale while you’re there.
Suitable fabric can be bought often for a discount price locally from arts & crafts stores like Joann, Michael’s, and sometimes Wal-Mart.
Measuring installation space
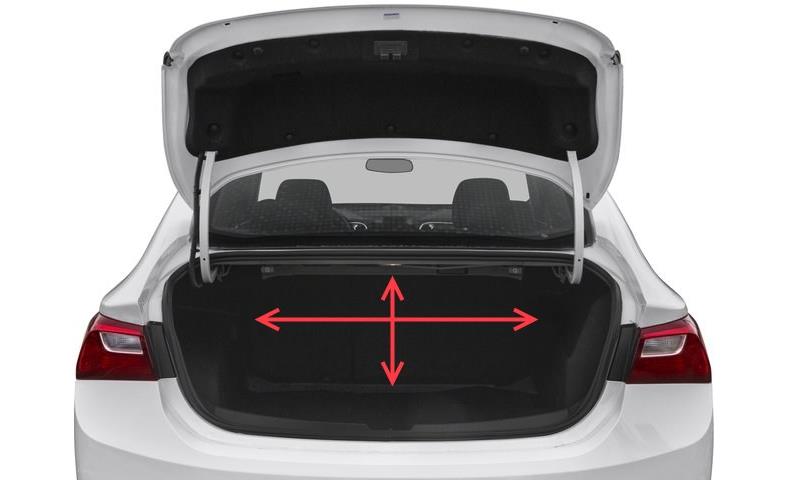
Get basic measurements for the best place you find for installing an amp rack in your vehicle. Think in terms of fitting a large rectangle there, even if you don’t think a flat amp rack can be mounted on some areas that are curved or stick out. Don’t stress if there’s not a perfectly flat area available – that’s actually very common! We’ll cover dealing with curved or unusual surfaces later.
Begin by using your tape measure to find out how much space you have in your trunk (or cargo area, depending on your vehicle) where you can install a rectangular board.
The measurements don’t have to be super-exact but a close estimate of how much space you have available horizontally and from top to bottom. For example, measure from several inches below the rear deck of your trunk to about 1″ to the base of the trunk near the interior carpet or trim.
That should give you a good estimate of what to work with. Be sure to save in your notes the measurements you took.
Don’t forget the weight
As an assembled amp rack will be heavy so you need to be sure to measure the available space as if the assembled rack is resting on its bottom in the vehicle. T
Check for good places to mount the amp rack brackets
While you’re measuring, look for good places where you can fasten your mounting brackets when the amp rack is installed in the car.
Look for a section of the car’s metal body where:
- It’s safe to drill a hole without damaging anything underneath (always check!)
- The metal is sufficiently thick & strong enough.
In most vehicles, the sheet metal in the rear is the same thickness throughout, so that’s usually not a problem.
Planning your amp rack setup
 Planning your amp rack setup: place your amps on your floor and use your tape measure to estimate how much room your amps will need for clearance with wiring & cables installed. Also allow some spacing beside the amplifiers (the top and bottom of the amp rack).
Put your amplifiers on the floor and line them up as you’d like them to be placed on your amp rack. Place them next to each other with enough space so that there’s enough clearance to connect power wire, speaker wire, and RCA cables as needed.
If you’re tight on space you may need to consider using 90-degree bends for the wiring and right-angle adapters for the RCA connections.
When you’ve got the amplifiers lined up with enough space, measure a rectangle with enough clearance before and after the ends of the amps and a little extra clearance from the top to bottom.
Keep enough space!
Don’t make the amp rack spacing too small – you don’t want it right up against the sides of the amplifiers.
You’ll want to allow 2″ space or more at the sides of the amps if your installation measurements earlier will allow for it.
Write down the measurements in your notes as you did earlier.
Your shopping list and tips

You’ll be able to buy nearly everything you’ll need in only a few trips, but planning ahead as much as possible will save money and keep the problems to a minimum.
I hate being stressed out and running into problems right in the middle of a project or installation, so take my advice and try to get what you need the day before if you can.
Be organized and write down or print out what you need before you go. Don’t be sloppy and cost yourself extra time, gas, and stress.
Materials list
Hardware:
With your notes, head out to your local hardware store for the following:
- Spray adhesive
- Metal brackets (if not using metal car stereo straps)
- #8 Phillips head machine screws, 4-pack or similar
- #8 washers, small package
- #8 machine screw nuts
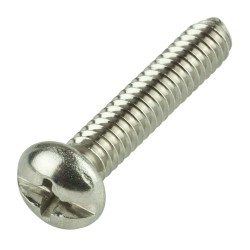
- 3/8″ pan head Phillips screws
- 3/8″ length self-tapping screws
- Wooden board
3M Super 77 is a great spray adhesive. There are lower-cost adhesives available but in my experience, I’ve had problems with the adhesive being weak and the fabric can come off by itself. Super 77 usually costs close to $10.
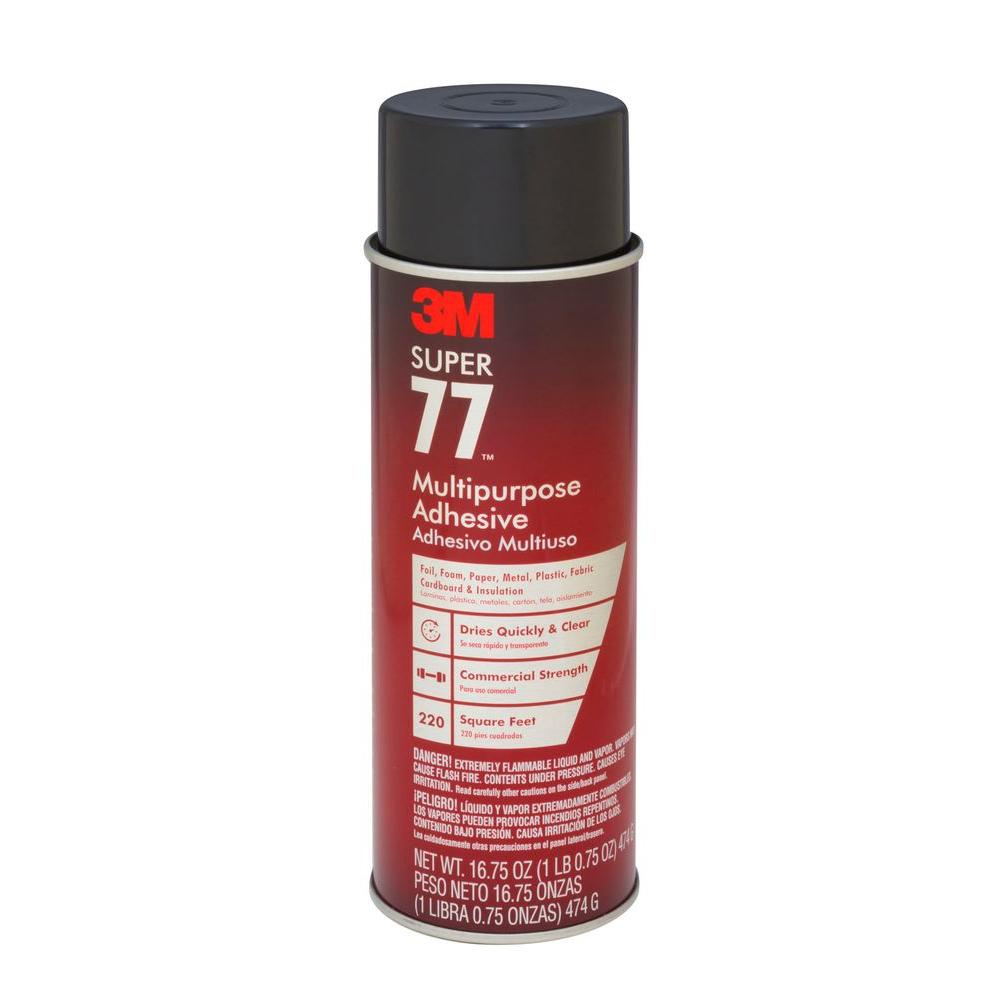 I recommend this one for car audio projects. It provides a strong adhesive and it’s reliable unlike cheaper brands that fail or aren’t very strong. You do have to be careful to not get it on you or nearby objects when using it, however. You can 3M Super 77 Multipurpose Permanent Spray Adhesive Glue, Paper, Cardboard, Fabric, Plastic,...
Choosing a wooden board
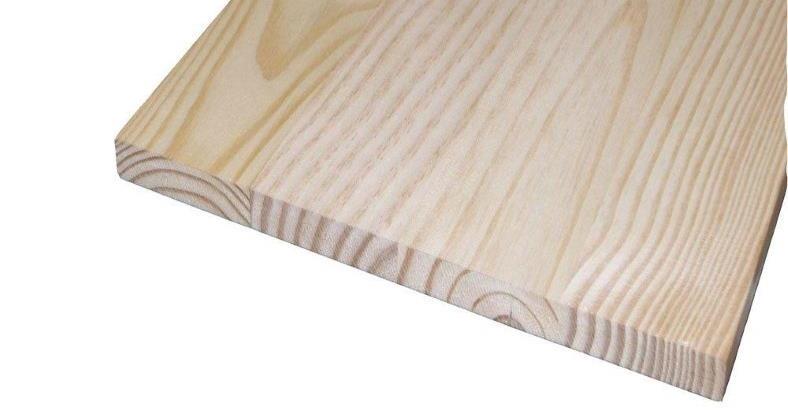 You’ll need a wooden board like this to build your amp rack. In the building materials section of your hardware store you’ll find wooden boards that are about 1/2″ or so thick and usually come in lengths of 4 ft. or longer. Pine is the cheapest but is more prone to warping and is weaker than others, but it’s suitable if you’re on a budget. It’s not suitable for installations exposed to a lot of humidity or moisture.
Using the measurements you wrote down from planning your amp rack, buy a wooden board that’s the same or close width to what you measured. To save costs buy one with length closes to your length measurements for what you need.
More about metal brackets
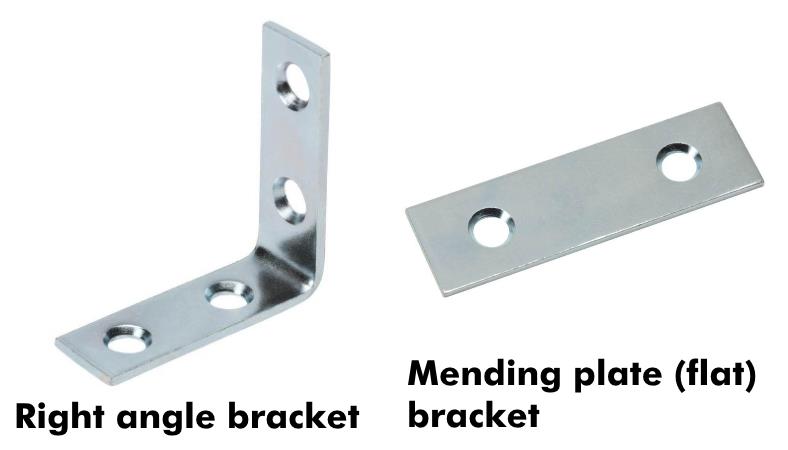 Mending plates and other metal brackets are sold in pairs or 4 packs for smaller sizes and individually or in pairs for the larger sizes.
As I mentioned earlier, if you’re not able to use (or buy) car stereo metal installation straps you might be able to get but with hardware store brackets.
Right-angle brackets and “mending plate” (flat) brackets are also helpful for assembling and installing your amp rack.
Unlike metal car stereo straps, mending plates are nearly impossible to bend. They’re very strong but the drawback is that they’re fixed in length and not suitable for curved or more difficult installation needs.
You can usually find them sold in packs of 2, 4, or 8 for a few dollars.
Fasteners
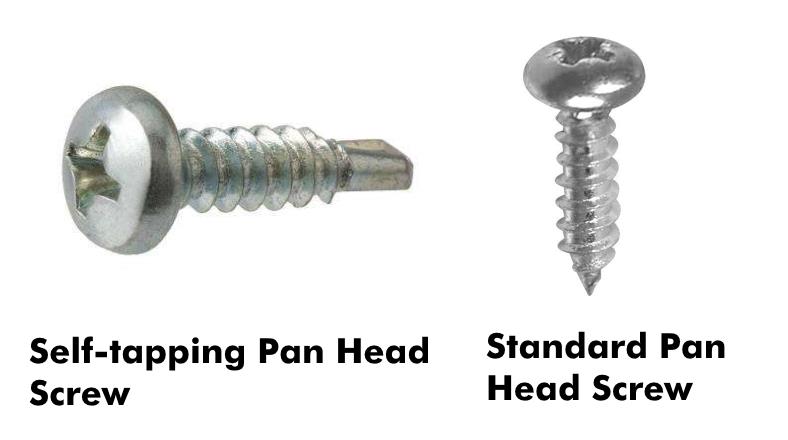 Self-tapping screws (left) make mounting brackets fast and easy if you have a cordless drill as they simultaneous drill a hole then screw into metal quickly. Regular pan-head screws (right) will work well for mounting your amps to the amp rack. Use #8 machine screws (below) and nuts with washers to fasten your mounting brackets to the rack securely. They’re better suited for this than using only pan head screws.
Machine screws work with nuts and washers. They’re great for attaching brackets to your amp rack board, for example. They come in packs with standard sizes. I normally use #8 machine screws for many projects.
Fabric/covering material
If you’re going to get fabric locally instead of ordering it, arts & crafts stores are where I’ve often found discounted black material I could use for building amp racks.
Ideally, try to get a material with a dark color that’s durable and stretchy. I recommend a strong felt material or similar basic fabric.
Be sure to ask the cashier or attendant for suggestions about what you’re planning to build. Honestly, sometimes they’re helpful and other times they’re fairly clueless when it comes to good suggestions, but at least if something is on sale they’ll normally let you know.

If you’re planning to buy fabric instead of backless speaker box carpet, try checking the clearance tables while you’re shopping. I’ve often gotten fabrics at a MUCH lower price by doing this. There’s a good chance you’ll find a deal! Black fabric is very common and should be easy to find.
Remember that fabric is normally sold in units of 1 yard (36″ in length) or 1/2 yard (18″ length) in many craft stores.
You’ll need to do just a bit of math to figure out how much you need. Try not to get exactly the same length as your measurements.
I strongly recommend you have a bit extra if it’s your first time working on a project involving fabric and a spray adhesive. Typically I use about 2 yards of material and have a small amount left over when I’m done.
The height is nearly always much more than I need.
Making your amp rack – covering the board
After having your board cut to the length you need and planned for its time to put the finishing touch on it and assemble the amp rack.
Now that the board is a length that will fit into the installation space you have and that will allow enough space for your amp wiring & cables its time to cover it and make it look nice.
Find a good place to work where glue overspray won’t get on surrounding things indoors.
Place your board on the fabric and trim it to a good size, allowing several inches past the board of extra fabric on each side. I recommend allowing at least 6″ or so, which you’ll trim as needed.
Follow the rest of the steps in the diagram below.
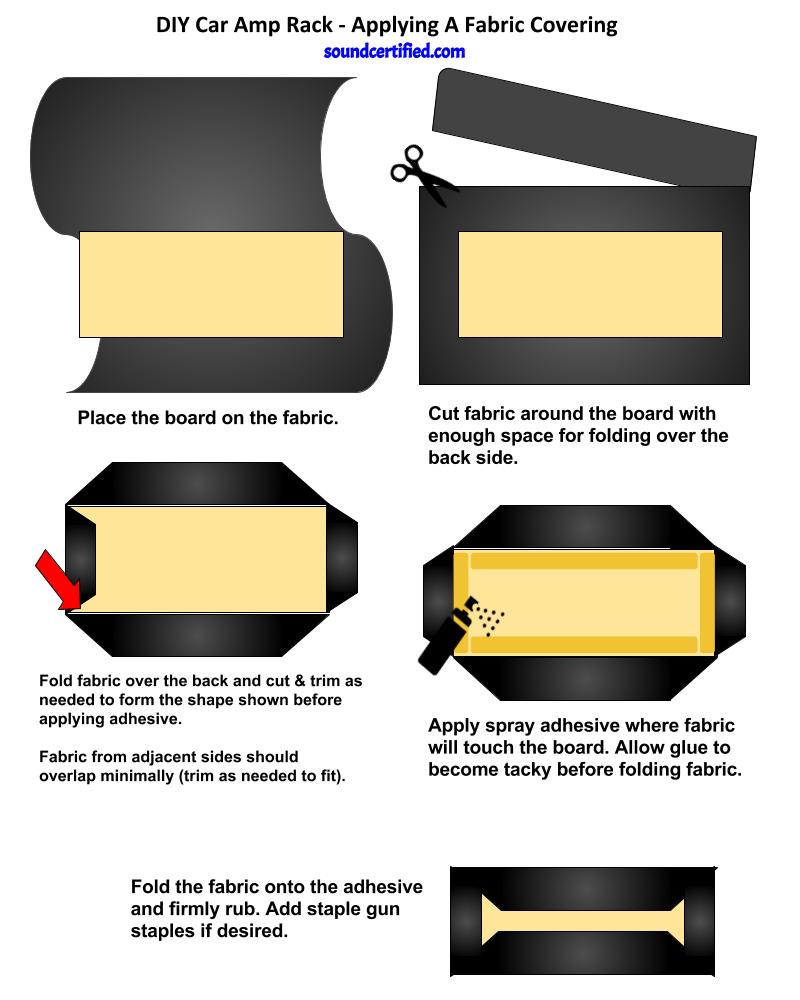
Spray adhesive is very hard, if not impossible, to remove from your clothes and other materials so be very careful when using it. Use light, consistent spraying strokes. You don’t need to use a tremendous amount, but it does help to spray some on both the wood surface as well as the fabric you want to glue.
Using adhesive on both surfaces gives an even stronger bond. After spraying, waiting about 15-30 seconds and lightly touch the glue to see if it is tacky.
If so, tightly pull the fabric over and onto the wood area you sprayed. Then rub the fabric firmly with your palm for a few moments to make sure there’s good adhesion.
The fabric, no matter how well you tried to trim it, will likely overlap each other a lot. If you have a utility knife with a sharp blade that makes trimming a bit easier than using scissors.
Otherwise, slightly pull up edges where needed, cut with the scissors, and place it back into place.
You may need to reuse the adhesive spray on some parts. It’s a bit tough to do in small sections but by quickly and gently tapping the spray nozzle you should eventually get the hang of it.
Putting it all together
Now that you have the board covered it’s time to assemble it.
Drill a 1/8″ (or close) hole in each corner and mount a bracket/strap to each hole using a #8 machine screw + washer on the top (amp) side and on the backside use a washer and nut.
Tighten securely using pliers while keeping the machine screw from turning by holding a screwdriver.
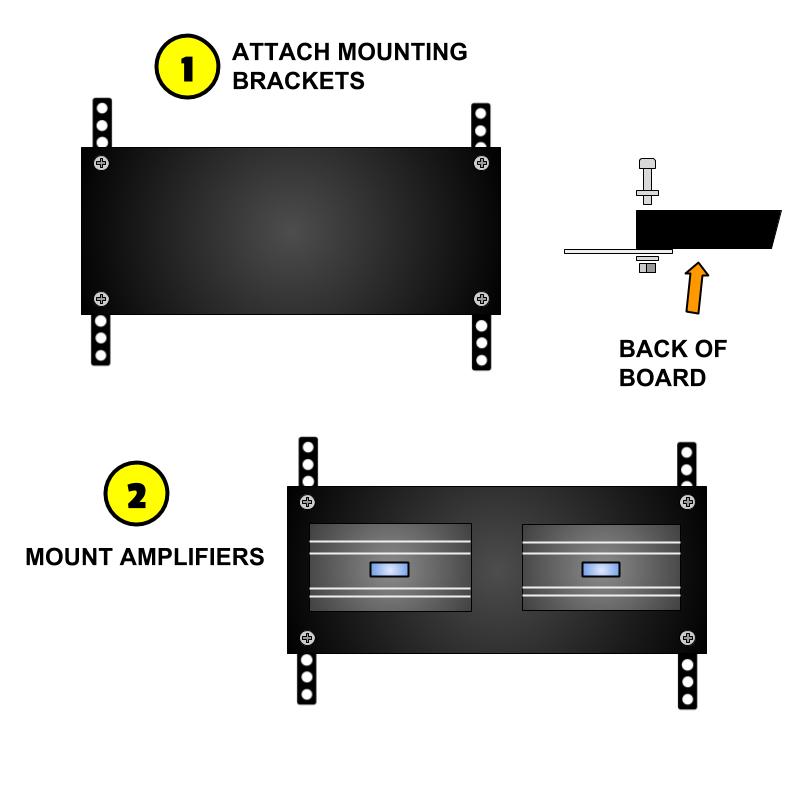 Once all the mounting brackets are in place and facing the direction you need them to be, place the amps on the board and mount them using the measurements for spacing you wrote down earlier.
Be sure to leave enough length for the mounting brackets to reach the mounting points in your vehicle that you found during the first steps.
Excess bracket length can remain hidden behind the amp rack for less hassle when installing and for a neater appearance.
Installation – Mounting your rack
Ok, it’s time for the “fun” part! Carefully put your assembled amp rack in the vehicle and begin the “fitting” process.
If you’re mounting it vertically, put as much of the weight at bottom of the vehicle and begin seeing how your brackets will fit to try to get the brackets parallel to sheet metal for mounting.
If you’re using bendable metal straps as I recommended, bend those such that they will allow the amp rack to rest on the straps when in the car.
When that’s done, hold the amp rack in place and begin doing the same for the top. Keep using trial and error until you have a pretty good way for the amp rack to rest securely in the vehicle and to have enough attachment points for the mounting brackets.
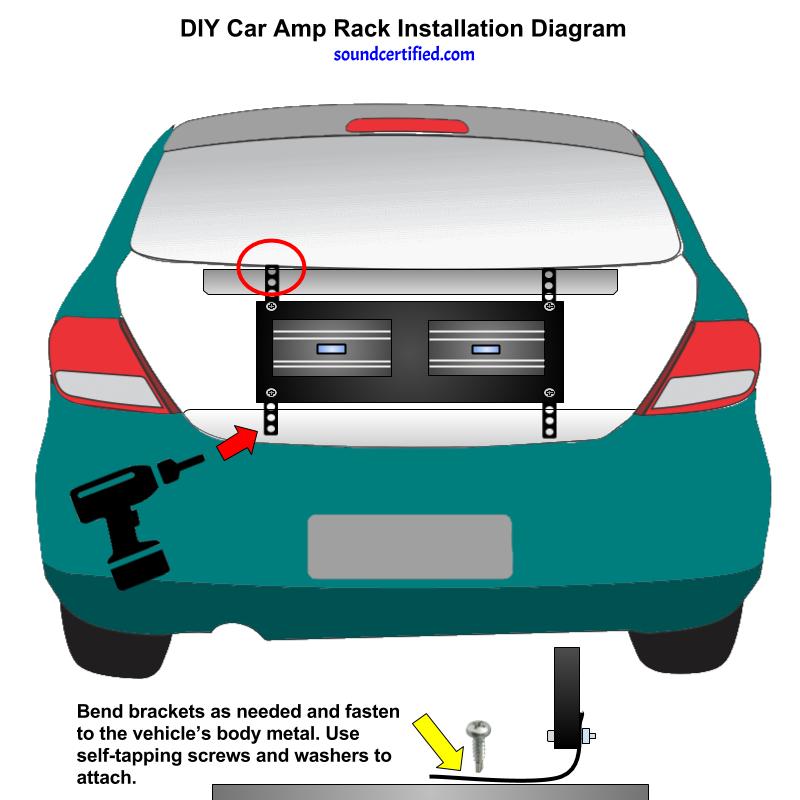
Once that’s finished, begin trying to use your cordless drill to drive the self-tapping screws through the brackets and into the body.
I highly recommend using washers on the screws to fit well over the bracket’s hole and keep the fit very tight. This is especially important in a moving vehicle as they vibrate quite a bit and screws may loosen over time.
If you’re having difficulty doing this step while holding the amp rack in place, then use a permanent marker to mark the bracket holes where you’d like to use the screw, remove the amp rack, then drill the screw holes alone.
Then you can return to place the amplifier rack and more easily fasten the screws either with the cordless drill & bit or with a screwdriver.
Taking your amp rack to the next level…on the cheap!

Want something truly unique? You can use an LED light kit (often below $20) to add accent lighting to your cool amp rack. It’s pretty simple to do and will really get compliments from anyone who sees it.
A fantastic idea is adding accent lighting to your sweet-looking new car amp rack.
No products found. mounted above the amp rack in order to glow down on them will give an incredible look and really make it shine.I’ve done this several times (including putting an acrylic clear window in front) and people gave me lots of compliments!
Neon and LED lighting systems are lightweight so you should be able to install them using only zip ties. Overall, it’s usually very easy and it can be done on a budget if you shop carefully.
Wiring is simple as many kits can be powered by +12V directly and wired to a relay to switch on and off with your car stereo using the remote-on wire.
DIY car amp rack plans cost estimate
Here’s a good estimate of what you can expect to pay for all materials (not counting tools) depending on where you shop. Don’t forget to check your amplifier packages for screws you can use, as some include a 4-piece set.
| Item Est. | Cost |
|---|---|
| Wood | $10.00 |
| Fasteners | 6.50 |
| Metal straps | 9.50 |
| Fabric | 12.00 |
| Spray glue | 9.75 |
| TOTAL: | $47.75 |