Good sound in your car audio system depends a lot on the equipment you’re using – and how you’re using it. Equalizers and crossovers are some of the most helpful investments you can make for your system.
In this article, I’ll explain how to wire an EQ and crossover for car audio systems. Inside you’ll find helpful diagrams, the basics you need to know, and some other really helpful info!
Contents
- What goes first EQ or crossover? Equalizer vs crossover differences
- How do you hook up an equalizer to a car stereo? (DIAGRAM)
- How to wire an EQ and crossover for car audio (DIAGRAM)
- Can I use a separate crossover and my amp’s crossover?
- What are good crossover frequencies for car audio?
- What are some good EQ settings for the best sound?
What goes first EQ or crossover? Equalizer vs crossover differences
When using both an equalizer and a crossover the equalizer is connected before the crossover. There are several reasons for this – one of which is the role of an equalizer versus what a crossover does.
Equalizers (even those that may include optional crossover features) adjust the content of the audio signal while crossovers are used to separate portions of the audio signal directed to one or more amplifiers.
- We use equalizers to improve the sound frequencies in music and adjust the audio signal itself.
- Crossovers are used to control the sound sent to one or more amplifiers based on the speakers we’ll be using and to set up installations like 2-way or 3-way component speaker systems.
What does an equalizer do for car audio?
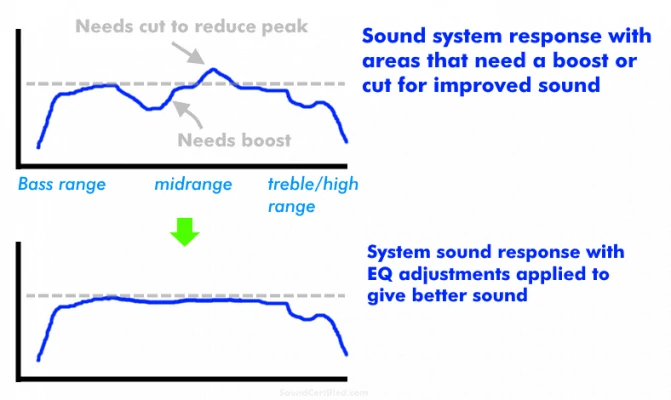
Diagram showing the basic idea behind an equalizer. An equalizer is useful for increasing, or reducing, small ranges of sound in your audio system to improve the sound. For example, a “peak” (higher volume area) in some frequencies can be reduced while others can be boosted.
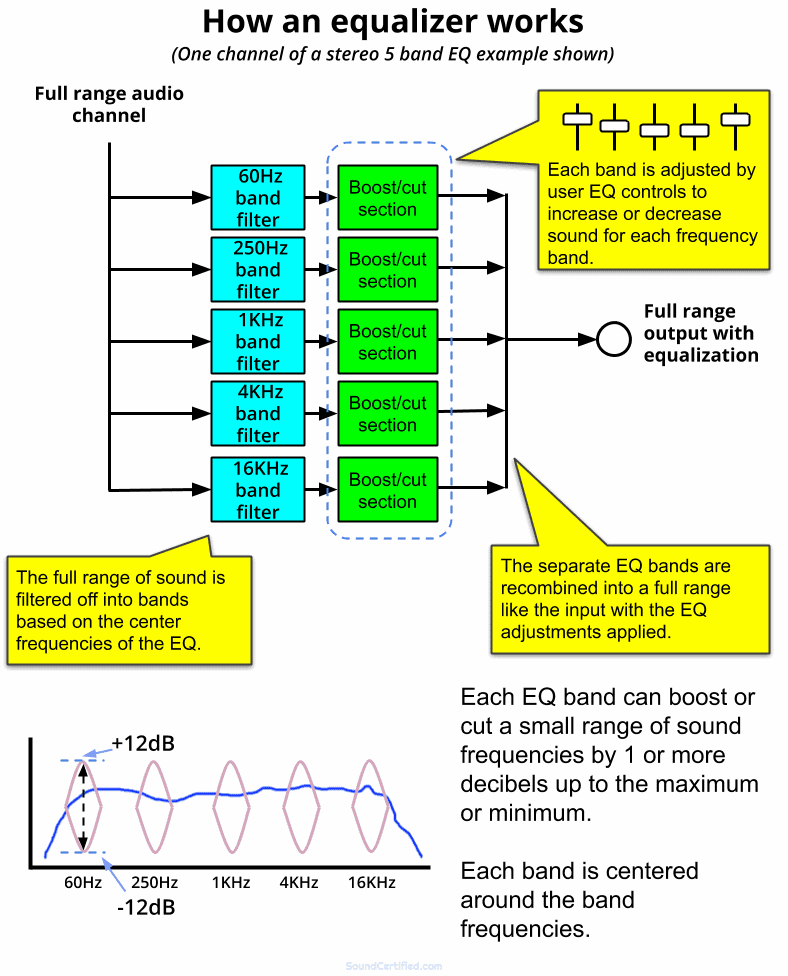
Equalizers aren’t just a fancy name for something cool to play around with – although they’re definitely not all created equal as the saying goes. Equalizers are an electronic device that allow you to improve audio quality by tuning “bands”, or ranges of sound frequencies, in your music.
They do this by providing controls to increase or decrease (“boost” or “cut”) sound frequencies to improve the frequency response produced by your system and speakers.
Equalizers provide a number of controls (usually slide controls or rotary knobs) that let your adjust the sound to your liking as needed. For example: not enough bass? You can turn up one or more knobs in the lower frequency (bass) ranges. Is the music too harsh in some areas like the midrange? You can cut (decrease) the range of audio frequencies that your speakers are producing too much of.
What is the purpose of a crossover?
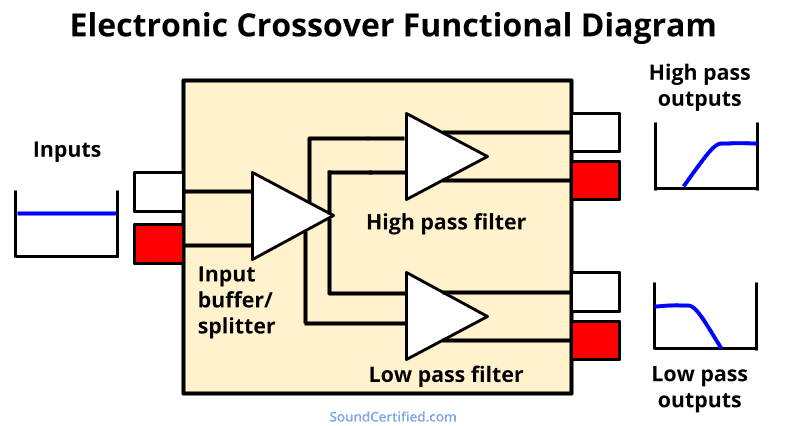
Crossovers are electronic devices that separate an incoming full-range musical signal into one or more high or low-pass signals. They allow you to block unwanted sound frequencies going to certain speakers in order to get the best sound, prevent distortion, and get better sound.
For example:
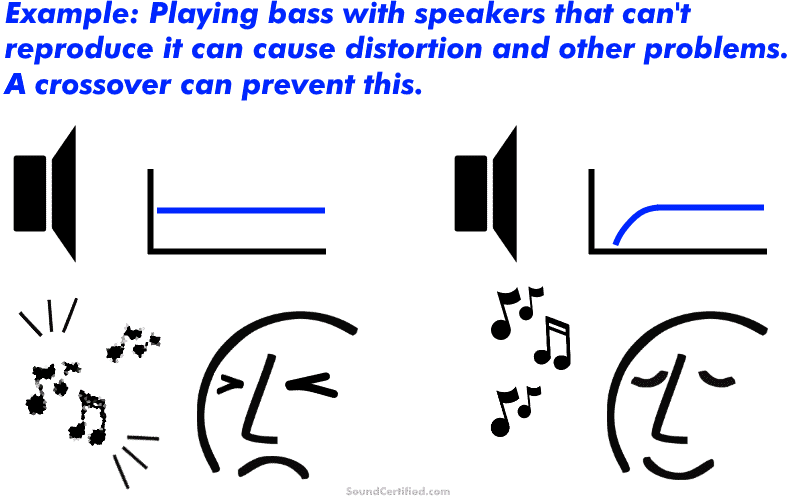
- Tweeters should be protected from bass you’d send to larger speakers. Therefore we use high-pass crossovers with tweeters and other small speakers.
- Woofers sound poor when playing full-range or midrange sound ranges. We can great very clear sound and “pure” bass by using a low-pass crossover for them.
Electronic crossovers are built into many car amplifiers these days. However, maybe you’re using one or more amplifiers that don’t offer them or have a limited amount of control. A separate electronic crossover allows you more control and adjustment than you might have otherwise.
You can also use them for fancier custom car audio systems.
Does a crossover improve sound quality?
Crossovers can help with sound quality but not the same way that an equalizer does. For example, we can use a high-pass crossover with smaller speakers such as 6.5″ full-range speakers to block very low bass that causes distortion and the speakers can’t handle. The result is better sound without the terrible sound speakers have when driven beyond what they can handle.
Likewise, by blocking unwanted sounds to midbass speakers or subwoofer the result is a great-sounding “pure” range of sound without harshness or distortion from sounds they weren’t designed to play.
A properly setup speaker system using crossovers will have much better sound than one without it. You can also drive the speakers with more power and volume than you could otherwise. The result is very nice sound clarity and enjoyable music even at higher power levels.
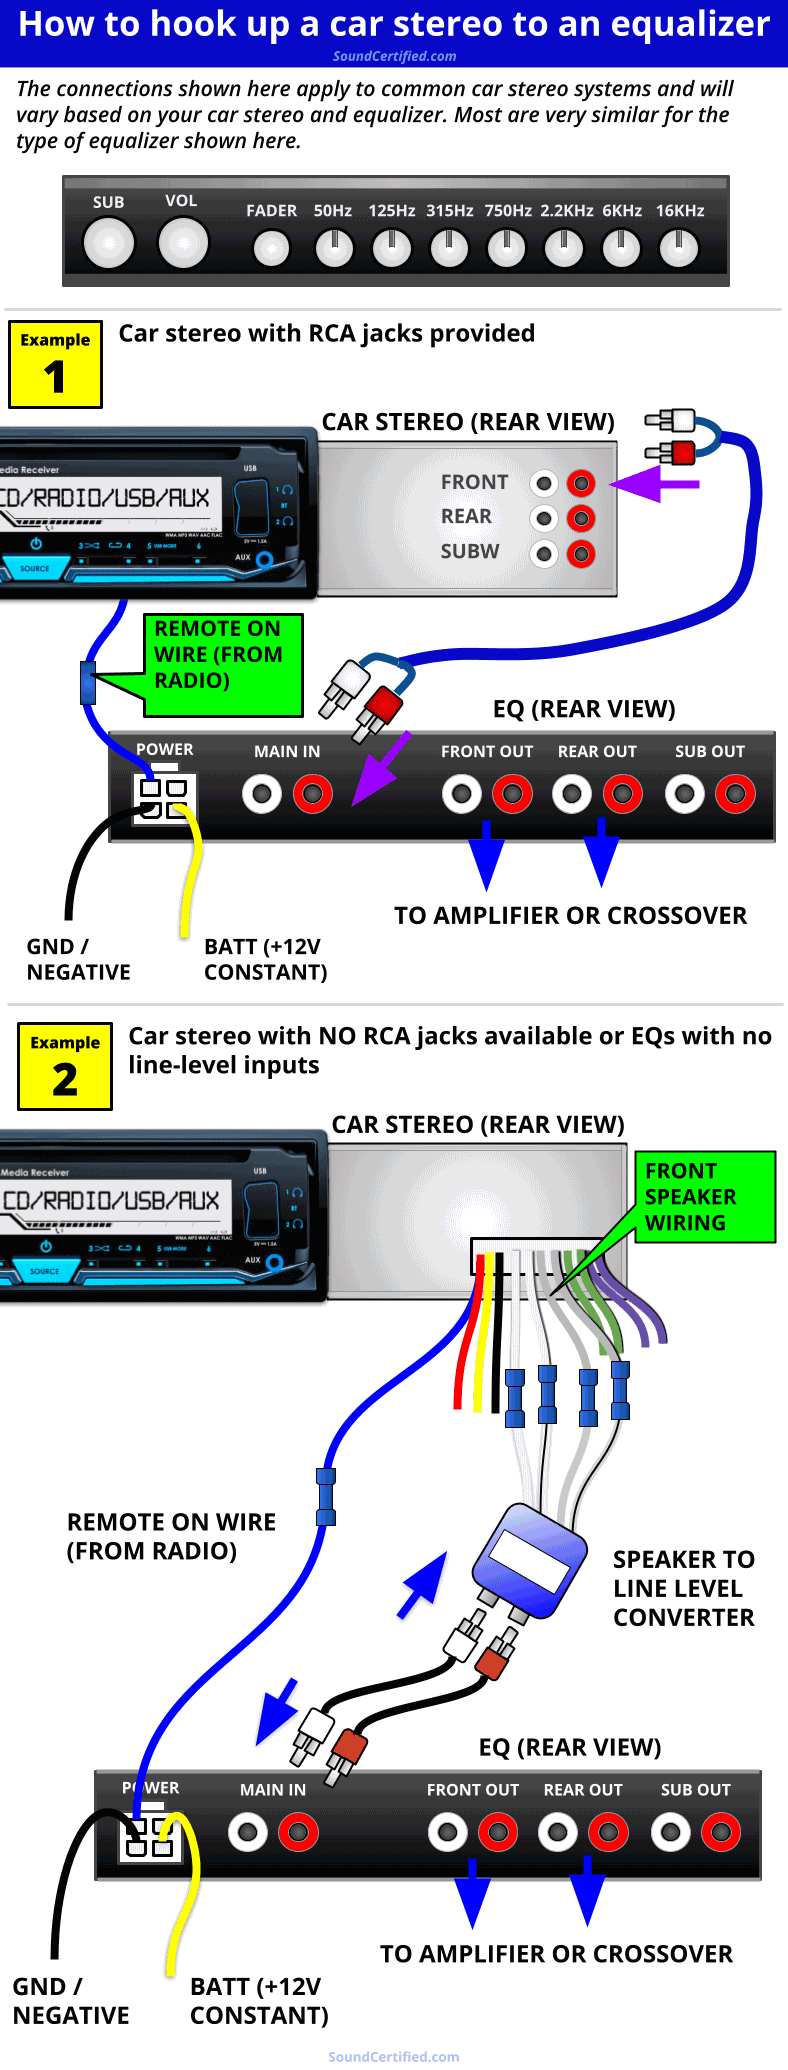
How do you hook up an equalizer to a car stereo? (DIAGRAM)
Connecting a car stereo to an equalizer is generally pretty simple. Most are more or less the same but of course can vary a little bit from model to model. I’ll cover the basics here then discuss crossovers in the next separate section.
1. Connect the power & remote-on wiring
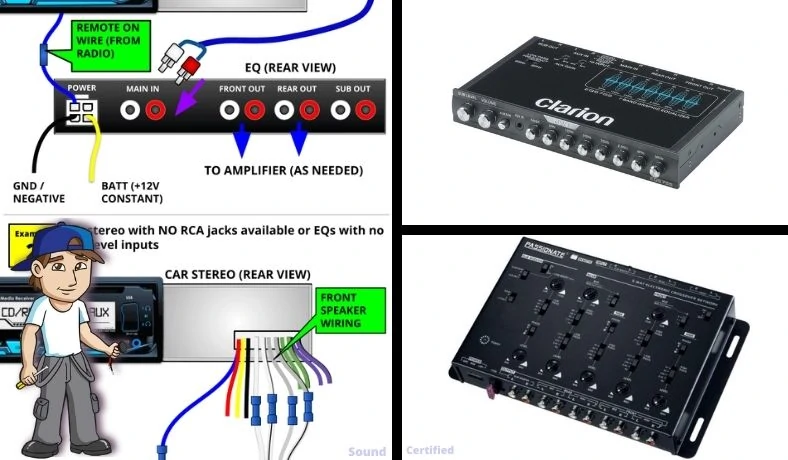
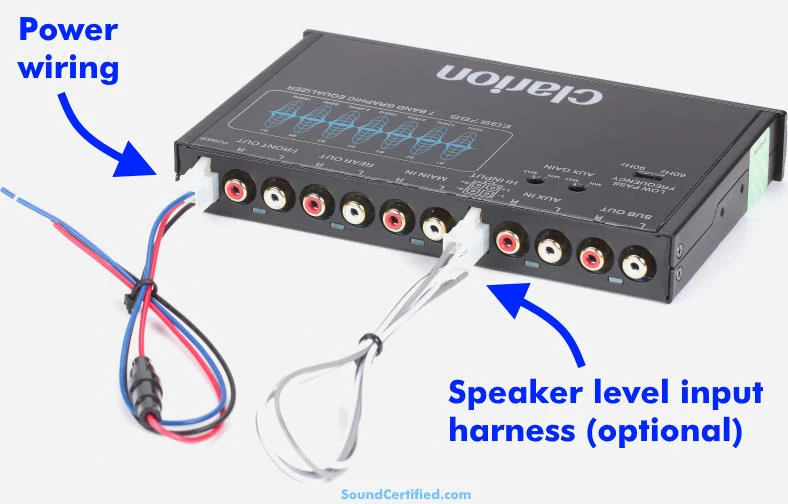
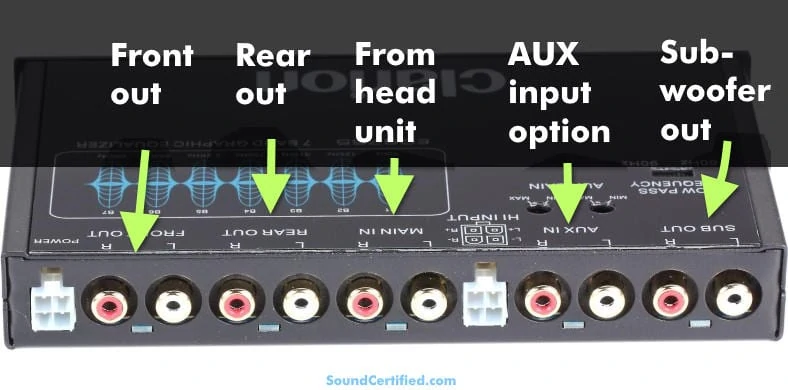
Example of a typical equalizer with its power wiring harness and optional speaker level input harness. Most EQs use three power connections: +12V constant (battery power), remote-on lead, and ground.
Equalizers usually have pretty simple wiring you’ll need to connect for the power and turn-on control:
- Ground wire (negative) – connect to the vehicle’s ground (chassis) or also the radio’s ground connection.
- Battery power – connect to the radio’s memory (+12V BATT) connection or another always-on +12V source.
- Remote on wire – this switches the EQ on or off automatically with the radio. Connect this to the radio’s remote-on wire for best results (it’s also easier than using another wire in many cases).
- *Illumination/dimmer [if present]– This is not that common but some EQs have a dimmer control. Be sure to check the owner’s manual as some dim the EQ display or illumination when a positive lighting signal is connected. Others activate the dimmer with a negative (or ground) connection. You can ignore this wire if you like – dimmer/illumination control wires aren’t required.
Equalizers generally only use a few amps so in most cases you won’t need to worry about wiring them with a separate power connection like a car amp for example. Additionally, it’s also often a good idea to use the same ground connection as the radio as alternator whine (ground loop noise) can be a problem for some installations.
Once you’ve got the power wiring connected it’s time to get an audio signal connection up and going.
2. Connect the equalizer signal input RCAs
Most EQs use a single pair of RCA inputs that connect to your head unit’s RCA output jacks. This is because standard EQs use a single set of EQ controls that work on both the left & right channels at the same time. Many also include a front to rear fader control so you often won’t need a rear RCA connection from the car stereo.
Connecting the RCA jacks on a car equalizer:
- Main RCA inputs: Connect these to the head unit’s (front) RCA jacks, if available. (If your head unit doesn’t have RCA don’t worry – I’ll cover that next)
- Front RCA outputs: Connect to the crossover’s main RCA inputs if it’s a stereo-only (2 input jack) model. If you’re not using a crossover connect this to your amp’s front RCA inputs.
- Rear RCA outputs: Connect to the crossover’s rear RCA inputs if available and if you need this. Otherwise, you can ignore these and ignore the fader control on the EQ. If you’re not using a crossover connect this your amp’s rear RCA inputs.
- Subwoofer RCA outputs (optional): These are optional and usually have a low-pass crossover built into the output design. If you’re not using a crossover between the amp.
- AUX input RCA jacks (optional): Some equalizers offer an AUX input feature to let you directly connect your phone’s headphone jack, an MP3 player, and so on. Connect this to a 3.5mm stereo headphone to RCA cable as needed and use the AUX input switch when listening to other sound sources.
Once you’re connected to the car stereo and the crossover you’re ready to install the crossover too.
Connecting a car stereo with no RCA jacks to an EQ
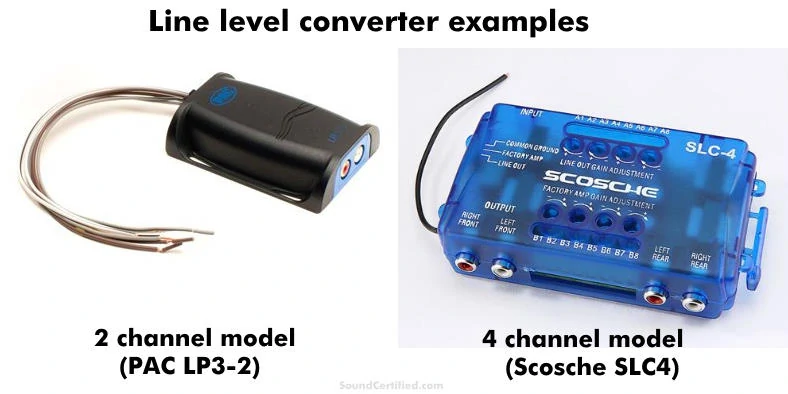
Examples of two good speaker wire line level converters (one for a pair of speaker outputs, one for 4 speaker channels & 4 RCA outputs). Line level converters scale down the higher voltage signal from a car stereo to a lower voltage (“line level”) that an EQ, crossover, or amplifier can use without distortion or damage.
The great news is that you can still use an EQ and crossover with a factory or aftermarket car stereo with no RCA jacks. You’ll need a good quality speaker output to line level converter to do this.
Line level converters are designed to allow connecting to an amplifier’s RCA inputs by converting speaker outputs from a stereo (a higher voltage required to drive speakers) to a low-level signal that an EQ, crossover, or car amplifier can use.
It’s very important to buy a quality, well-designed line-level adapter to avoid noise, poor sound quality, and other problems. Don’t get the cheapest – instead, get a name-brand model you can rely on (like the examples you see above). You can get a nice one like these for around $15-$20 or less these days.
How to wire an EQ and crossover for car audio (DIAGRAM)
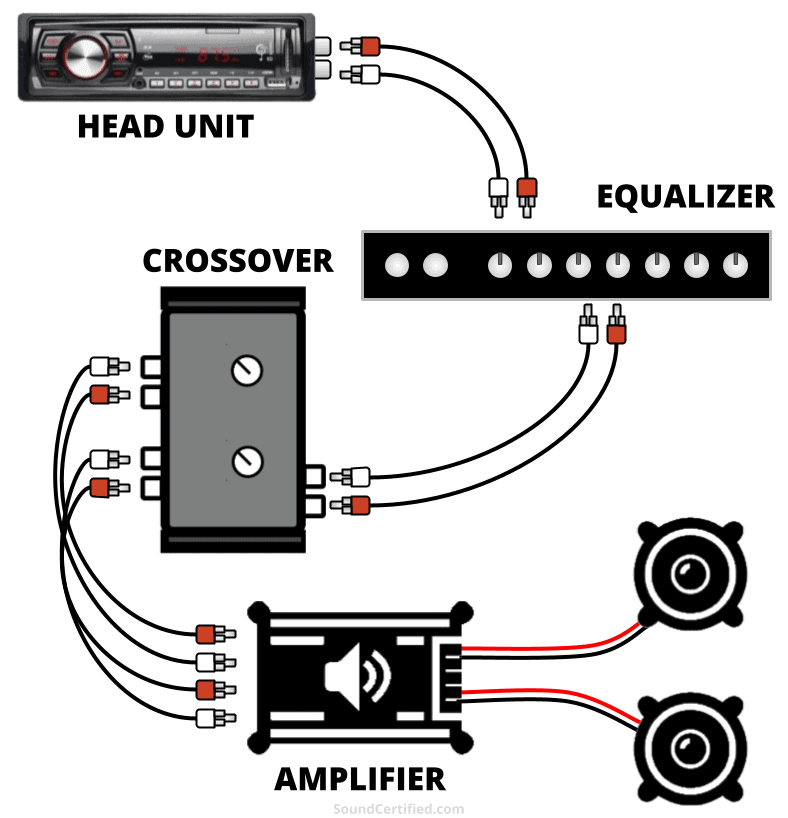
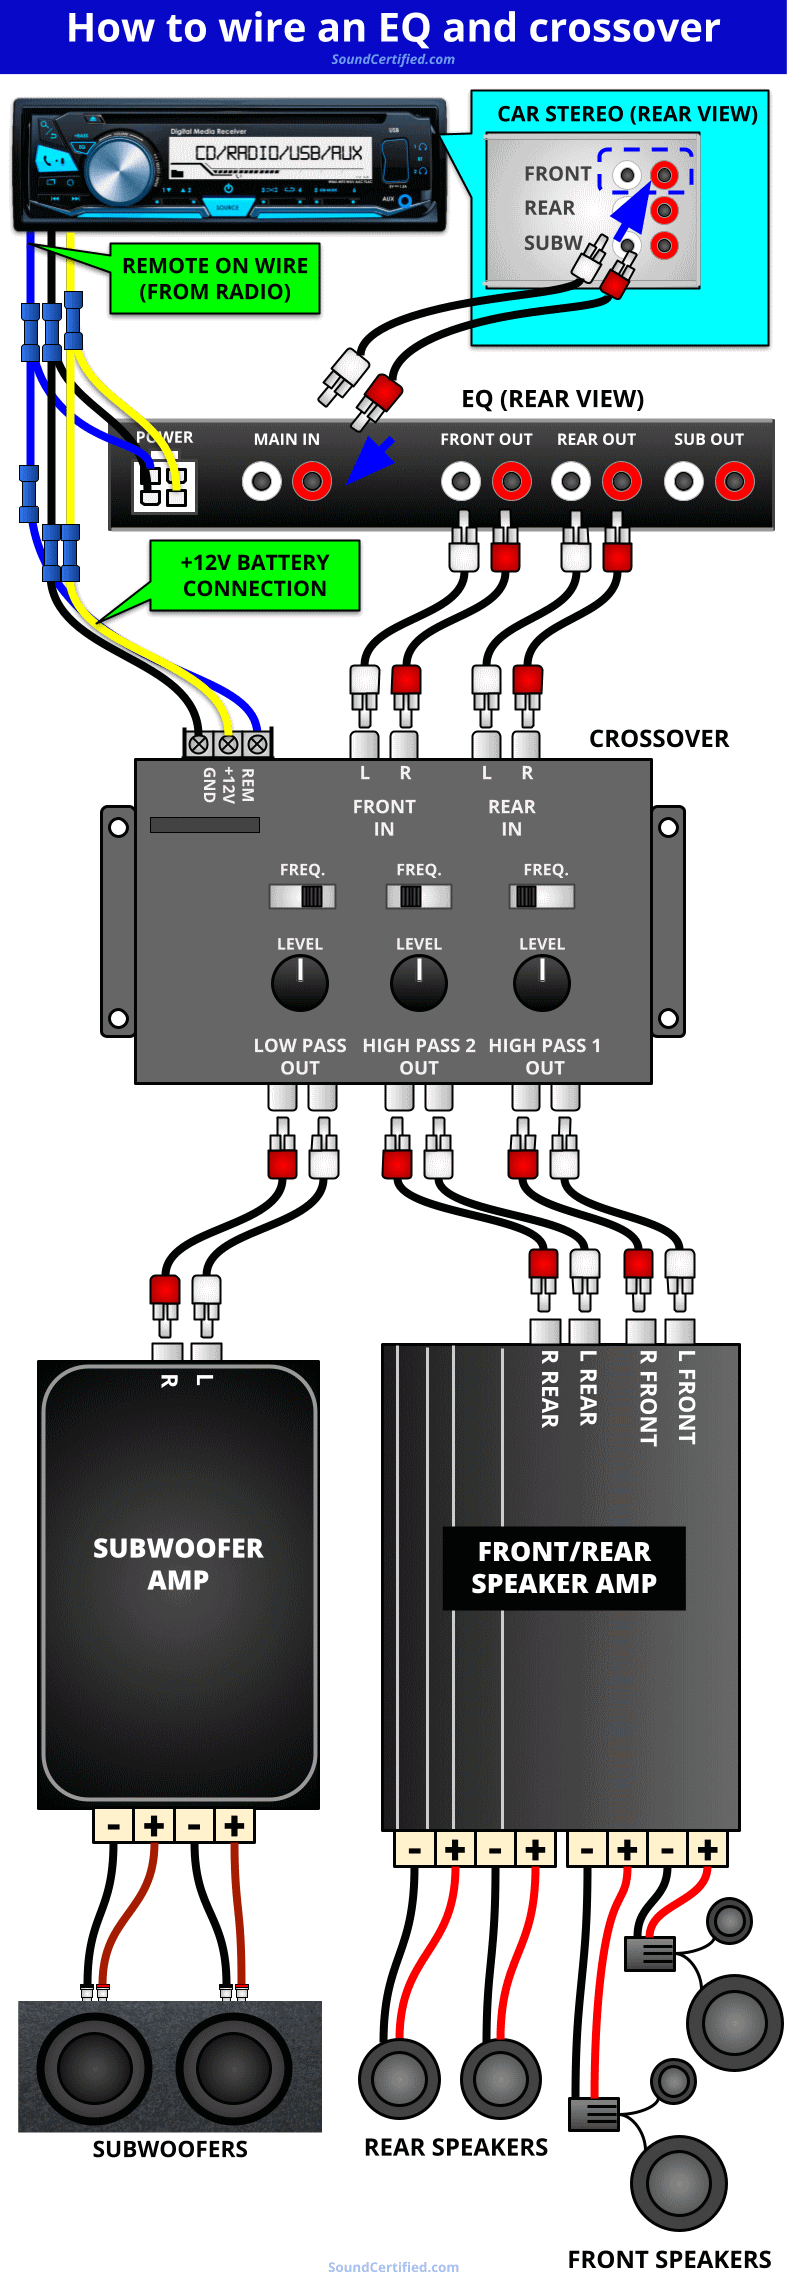
This diagram shows the basic connections for an equalizer and crossover. While the particular equalizer or crossover you have may be slightly different, most have very similar connections.
The diagram above is a guide for how to make the right connections for your equalizer and your crossover. You can expect some slight differences depending on the model you have and the system you’re wanting to install but most should be very similar.
How do you connect a crossover to an equalizer?
To connect a crossover to an equalizer you’ll want to use the front or main RCA outputs of the equalizer for the inputs to the front channels or main inputs on your crossover.
- Full range input(s): the crossover’s main signal input from your car stereo or in this case the equalizer. The equalizer will send a full-range signal which you can then divide as needed for your system using the provided outputs. Some crossovers only have a single pair of inputs while others have front, rear, and sometimes even subwoofer inputs. These additional inputs are usually optional.
- High-pass outputs: these are the high pass (bass blocked) audio outputs for your main amplifier channels such as front or rear speakers. Using the selectable crossover frequency you can block bass and instead send it to subwoofers for better sound & power handling.
- Low-pass outputs: these are for sending only bass to your amplifier used for midbass speakers or subwoofers. Low pass outputs on a crossover usually have a selectable crossover frequency similar to the high-pass outputs, but usually limited to 250Hz or below.
Connecting power to a crossover
Crossovers normally have wiring similar to an equalizer: a ground wire (negative), +12V battery wire, and a remote-on wire. If it’s convenient you can connect the crossover and equalizer wiring to the connections at the radio:
- +12V battery connection: connect to the radio’s memory wire or another power source that has +12V all the time (does not change with the ignition switch).
- Ground wire: connect to the vehicle’s chassis via bare metal or the same ground wire as the car stereo.
- Remote wire connection: connect to the car stereo’s remote wire or alternatively a +12V accessory wire that turns on & off with the ignition.
Can I use a separate crossover and my amp’s crossover?
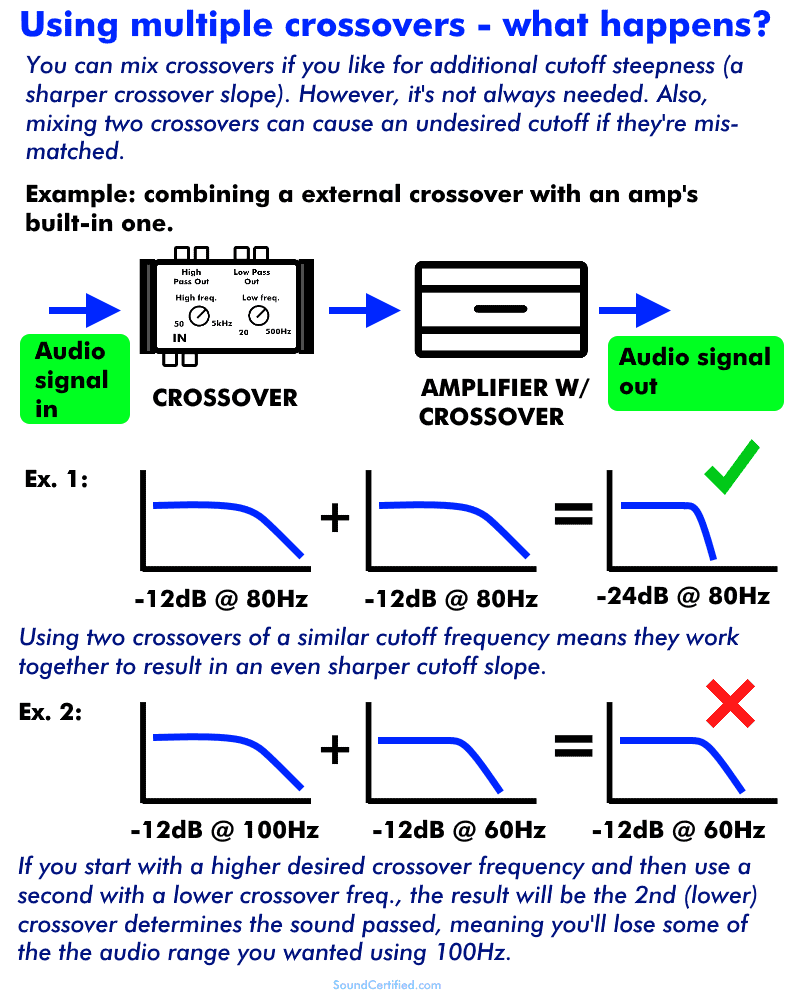
Yes, in many cases you can use an external crossover and the one built into your amplifier or head unit. However, it’s generally not needed in most cases.
These days it’s pretty standard to find -12dB per octave crossovers (also called “2nd order”) in electronic crossovers and amplifiers too. That’s normally a pretty good cutoff steepness for all sorts of speakers including main speakers, tweeters, and subwoofers.
However, if you need an even steeper crossover frequency (say -18dB or -24dB per octave) you can use more than one. There are some things you’ll need to know first:
- You can combine the crossovers for similar cutoff frequencies. The steepness will combine, meaning you’ll get even better filtering of unwanted sound frequencies.
- Mismatched crossovers can mean you’ll have undesirable sound. For example, let’s say you’ve set your crossover to 70Hz and you’re also using an amp’s crossover set at about 50Hz. The end result is the lower cutoff frequency from the amp would block portions of sound you wanted.
When in doubt, always use a 2nd crossover that’s of the same or higher cutoff frequency and you should be ok. As some of today’s car stereos include high or low-pass crossovers, those can be used as well (or instead of the ones built into your amp). They’re also more convenient to change too since they’re right there in the dash.
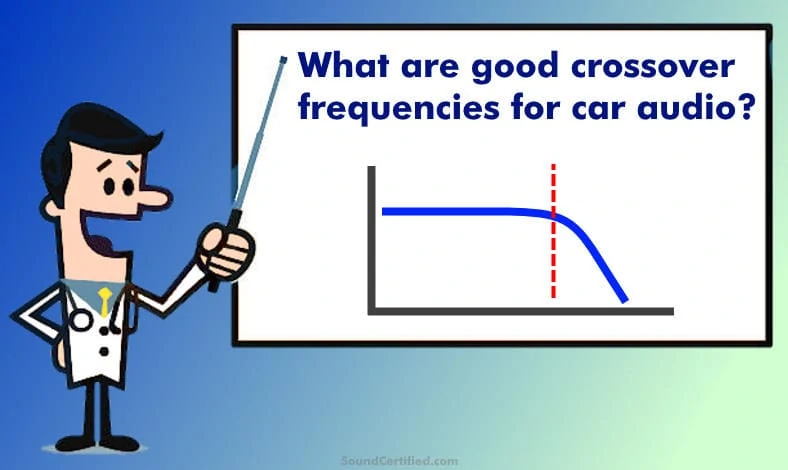
What are good crossover frequencies for car audio?
Car speakers are somewhat different from home audio in that they often suffer from terrible enclosures which aggravates the problems they have when producing certain sounds. I’ve put together some crossover frequencies below as general guidelines that work well in most cases. You may need to tweak them a bit for your particular system.
For example, small speakers with no real enclosure may have horribly “thin” sound – in that case, you may need to raise the high-pass filter (HPF) frequency even higher to minimize sound problems. Use these as a starting point, see what you get, and go from there.
As a side note, be aware that a crossover can’t compensate for a subwoofer that’s poorly matched to a speaker box. It’s very important for good bass sound to have subwoofers in an enclosure of the right size and type.
Car audio speaker & amp crossover frequency table
| Speaker/System Type | Crossover Freq. & Type | Notes |
|---|---|---|
| Subwoofers | 70-80 Hz (low pass) | Good low-pass frequency range for subwoofer bass & blocking midrange sounds. Best for pure, clear bass sound that "hits." |
| Car main (full range) speakers | 56-60Hz (high pass) | Blocks low-end bass that causes distortion or speakers to "bottom out." Great compromise between full-range sound and midrange bass capability. |
| Tweeters or 2-way speakers | 3-3.5KHz (high pass, or high/low-pass) | Most 2-way or 1-way (tweeter) crossovers use a frequency near this as most tweeters can't handle sounds below this range. Same for woofers above this range. |
| Midrange/woofer | 1K-3.5KHz (low pass) | Woofers and many midrange speakers do not perform well above this general range. They're poor for treble and a tweeter should be added. |
| 3-way system | 500Hz & 3.5KHz (Woofer/tweeter crossover points) | Similar to 2-way systems the upper freq. would be the same. Midrange drivers in a 3-way system often do not perform well below 500Hz or 250Hz in many cases. |
What are some good EQ settings for the best sound?
The simple truth is that there’s not a true “best” equalizer or audio system setting. It depends on your goals, but ultimately, the best settings are those that let you tailor the sound in a way that pleases your ears the most.
Regardless, I do have some general equalizer guidelines that can help you. I’ll make sure to cover those in a separate section below after explaining why an equalizer (EQ) is so helpful and the problems with speaker sound.
To keep things organized I’ll break this down into two approaches:
- Setting your EQ by ear
- Using a real-time analyzer (RTA) and microphone
1. Setting your EQ by ear
Here I’ll share with you some basic steps and EQ settings when doing it by ear. In the section after this, I’ll go into the best way to do so: by tuning your system using the right tools.
Getting started
My advice is to do the following before adjusting an EQ:
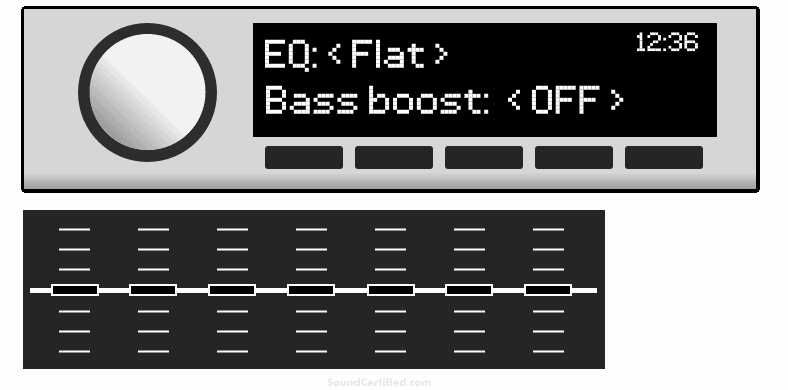
- Disable any special audio modes like bass boost or “music enhancement.” Turn the bass boost, if present, to “flat” or off.
- Set the equalizer band adjustments all to flat. That is, to 0dB level, in the middle of the equalizer display (or to 0dB if it uses a number style control).
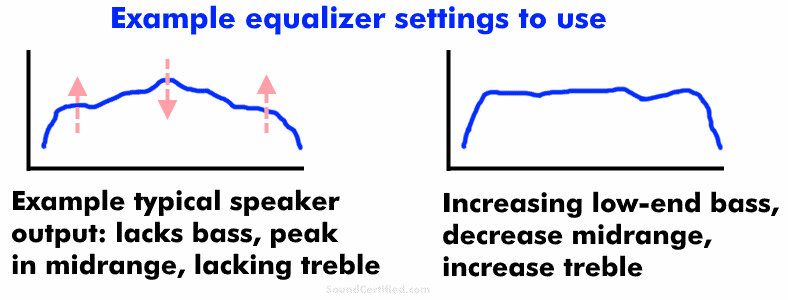
For many speaker systems (for example factory speakers with a factory-installed head unit), typically the sound is lacking in 2 or more areas:
- Not enough bass
- Too much midrange
- Not enough treble (high frequency sounds like cymbals and string instruments)
- Music has poor detail and doesn’t sound like the recording should
I recommend doing the following, being sure to use small adjustments with the equalizer and make changes slowly while listening carefully.
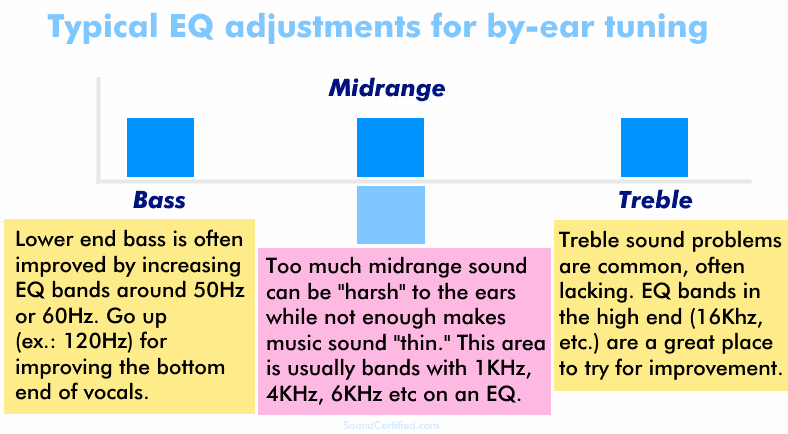
- Increase the bass a bit in the low-end range. This will be a band with a frequency of 60Hz or close to it – this depends on your particular EQ. You can then increase it a bit in the band above it and hear the results (ex.: 120Hz band, which is still bass but on the lower end of midrange sound & vocals).
- Increase the treble 6dB or so around the highest band on the upper end of the EQ, then continue increasing by 3dB if you hear an improvement. Continue until it sounds unpleasant to you, then decrease back until it’s better. This is usually a band with 16KHz or similar (some only go to 12KHz, which isn’t good, sadly). Treble can be a problem because speaker placement is less than ideal in vehicles along with poor quality factory-installed speakers, too.
- If you hear “harshness” and the vocals and instruments in music sound like they’re grating on your nerves, you probably need to decrease midrange sound. Start with a band around 1KHz and decrease by about 3dB and listen for improvement. If there isn’t any, set it back to 0, then move up to 2KHz, 4KHz, and so on as needed.
Visualizing adjusting an EQ for the most basic ranges of sound
The idea is to know how the music should sound with everything set up properly and judge your EQ settings by ear using test music.
Our ears are most sensitive in the midrange span of sounds so that’s often one of the biggest problem areas of speakers that need attention. Tweeters very often need some increase at the high end, too. It’s a huge problem with factory-installed tweeters that have a poor response (sound output) at the highest end of the sound range.
2. Using a real-time analyzer (RTA) to tune your EQ
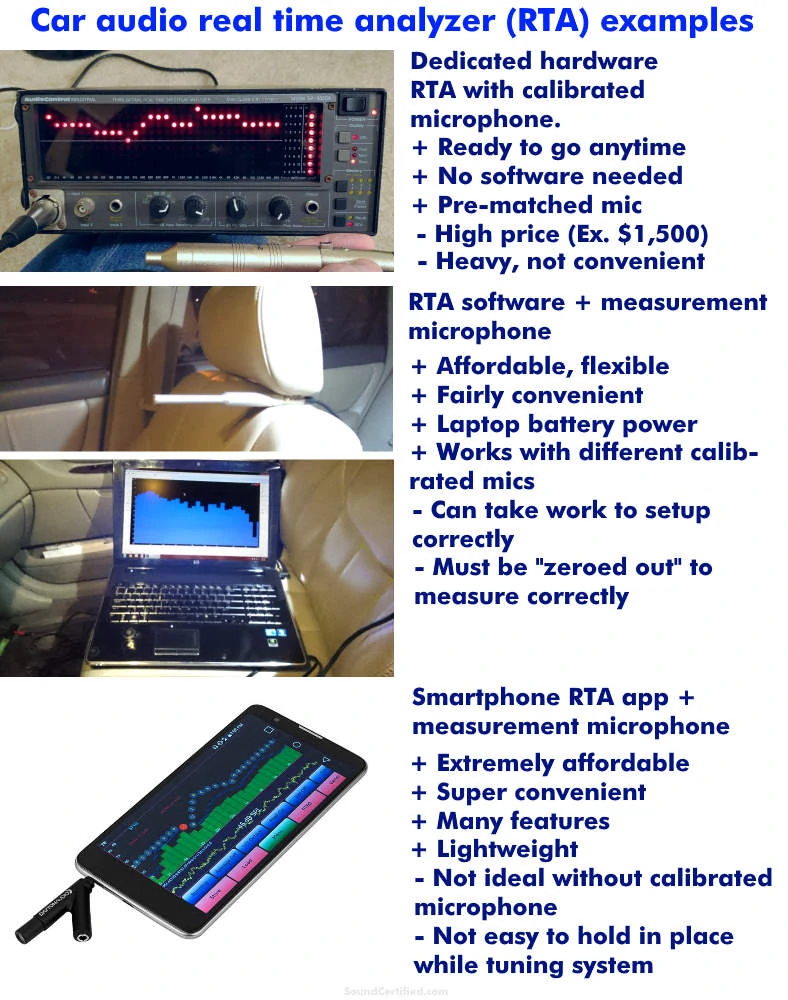
Some examples of your options for measuring and tuning your car audio speaker system. Of the 3, using a laptop and RTA software or smartphone app are the best values for the dollar. Today’s smartphone apps like AudioTool offer many of the same features as much more expensive options.
The best way to tune your system (find the optimal equalizer settings) is to use a measurement tool and find the areas that needed adjusting. To do so, you’ll need a real-time analyzer (RTA) and microphone. There’s simply NO WAY to get the best sound using only some music and adjusting it by ear.
This used to be way too expensive in the past. However, these days you can find get good results using your laptop and RTA software (such as TrueRTA, for example) or use an inexpensive RTA app with your Apple or Android smartphone.
For the sake of keeping things simple, I’ll cover using a smartphone and an RTA app. I recommend AudioTool for Android as it’s very good and while it’s not free, it’s cheap! ($7.99 at this time). Using an app isn’t as accurate as a more expensive setup but it’s enough in most cases to get the job done pretty well.
Using an RTA app and microphone for tuning sound
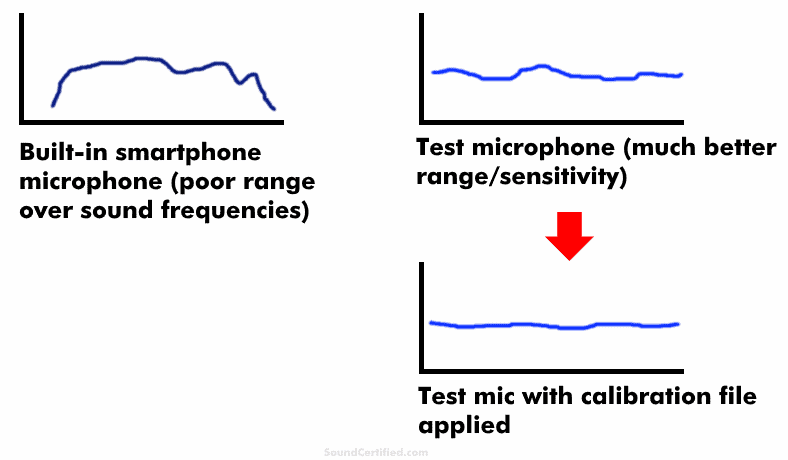
I don’t recommend using a smartphone’s built-in mic for tuning your equalizer settings. Built-in mics have poor frequency measurement performance compared to a real test microphone. Calibrated microphones also include a file to allow them to give a near-perfect measurement if your RTA supports it.
While you can use your smartphone’s built-in microphone to tune your system and set your EQ, I don’t recommend it. Built-in mics have poor performance for measuring sound and your readings won’t be very good. This means you’ll never be able to get the sound quite right sadly.
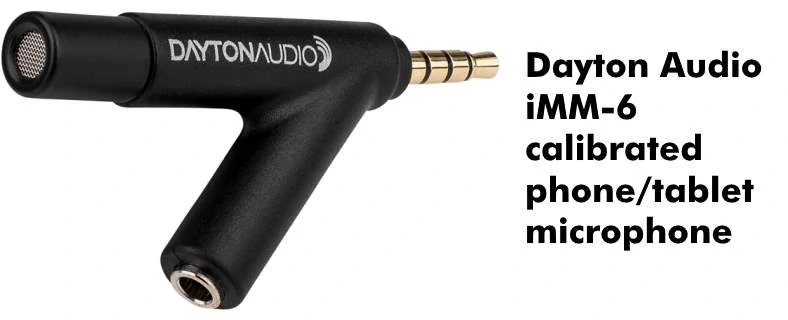
One option is to pick up an affordable calibrated microphone like the Dayton Audio iMM-6 at around $17. As an added bonus, each one includes a unique calibration file to help you get more accurate readings. You’ll need an audio app that supports importing a calibration text file. (Not critical by any means but nice if you can.)
