Tuning your car sound system with an equalizer can be a frustrating mess and a waste of time if you’re not sure what to do. I’d love to help you!
In this article I’ll explain in clear words along with great diagrams and images:
- What an equalizer is, how they work, and the different types
- Why speakers and car audio systems benefit from using an equalizer
- Some basic recommended EQ setting details for good sound quality
- How to set your EQ and tune your system the right way (using affordable tools that work great)
- What to do if you’re still having sound problems
Contents
What are the best equalizer settings? The honest truth
The truth is that there’s not a true “best” equalizer or audio system setting. It depends on your goals, but ultimately, the best settings are those that let you correct deficiencies in your system and that please your ears the most.
However, I do have some general equalizer guidelines that can help you. I’ll make sure to cover those in a separate section below after explaining why an equalizer (EQ) is so helpful and the problems with speaker sound.
Better sound quality in cars means spending you’ll a bit more effort if you want to enjoy your music to its full potential. I’ll explain specifically what those are and the EQ settings you’ll need to fix that.
But before we get to that, let’s better understand what equalizers do and how they work.
What is an equalizer? How does an equalizer work?
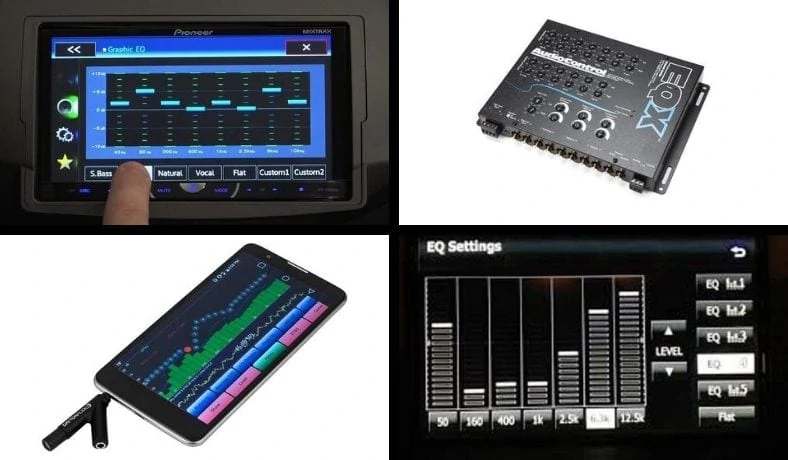
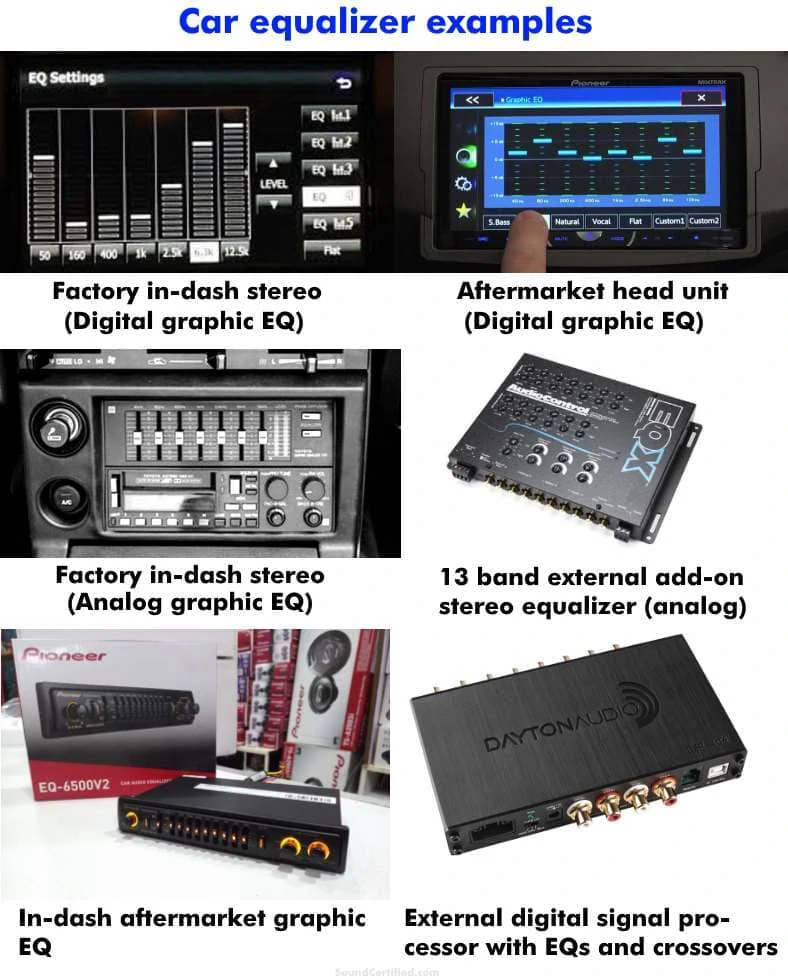
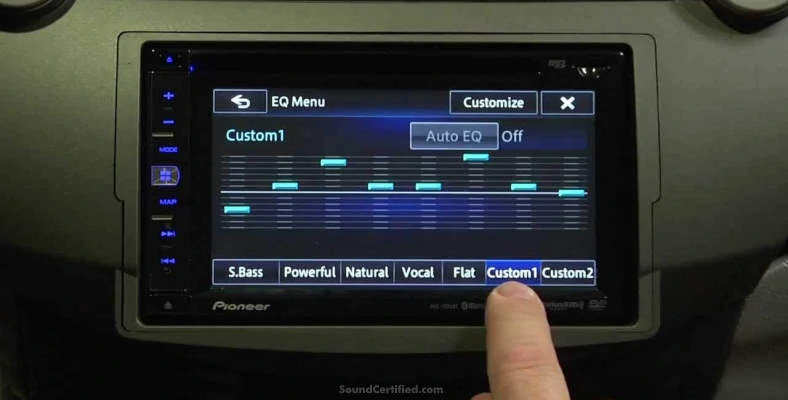
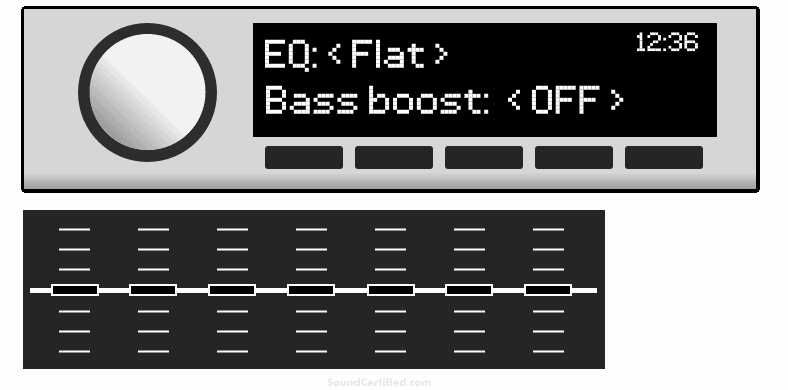
Examples of the most common type of car stereo and car audio equalizers you’ll find are shown here. It’s possible to find good EQs in some aftermarket head units. However, you can also use an external add-on EQ to get great sound in your ride.
Why are equalizers needed?
Equalizers allow you to improve the sound quality of your car audio system by boosting or reducing portions the different frequencies that need improvement. The goal is “smoothing” the sound to remove harshness or areas where sound is lacking. They’re also extremely useful to if you just want to do some tweaking to get the desired sound you’re after.
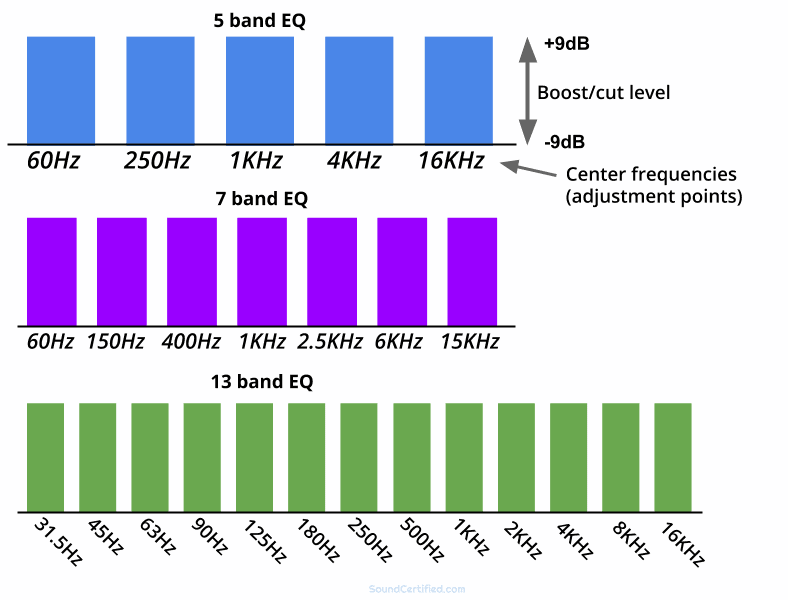
Equalizers allow you to correct problems with a sound system by boosting (increasing the volume of) or cutting (reducing the volume of) small bands (limited-width segments) over the full range of musical sound frequencies. These specific “sections” are fixed around a central point called the center frequency.
Car speakers, for example, have areas where they produce too much of some sounds and not enough of others, so having control over the frequency response can make a big difference.
The basic bass (low frequency), midrange, and treble controls included with many head units can’t correct much, sadly. Fortunately, equalization lets us correct many of these problems.
What does an equalizer do?
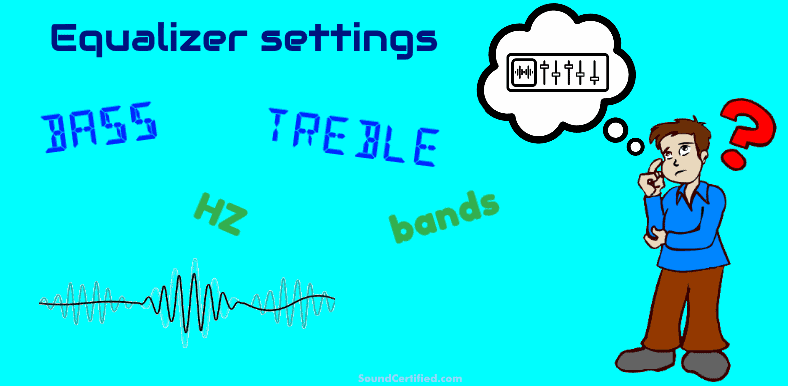
Equalizers split up the musical signal into small ranges of sound called “bands.” An EQ band is a frequency range of sound based on a center frequency. The number of bands (amount of adjustment slots if you will) available determines how much control you have. The more bands, the finer and better the improvements you can make.
The amount of boost or attenuation you can apply is measured in decibels (dB) and usually there’s a maximum range of +/-9dB to +/-18dB. However, it depends on the particular model and design. 9dB and 12dB EQs are very common.
The number of bands an EQ has increases the amount of control you have over the audio sound adjustment range. More bands provide a means for better sound adjustment (you’ll be able to better correct speaker sound problems when tuning).
A 31-band EQ graphic equalizer, for example, offers a lot of audio control but take can take a lot of time to tune a system. When choosing a more basic equalizer vs one with more bands, the best choice is the one with more bands
How does an equalizer work?
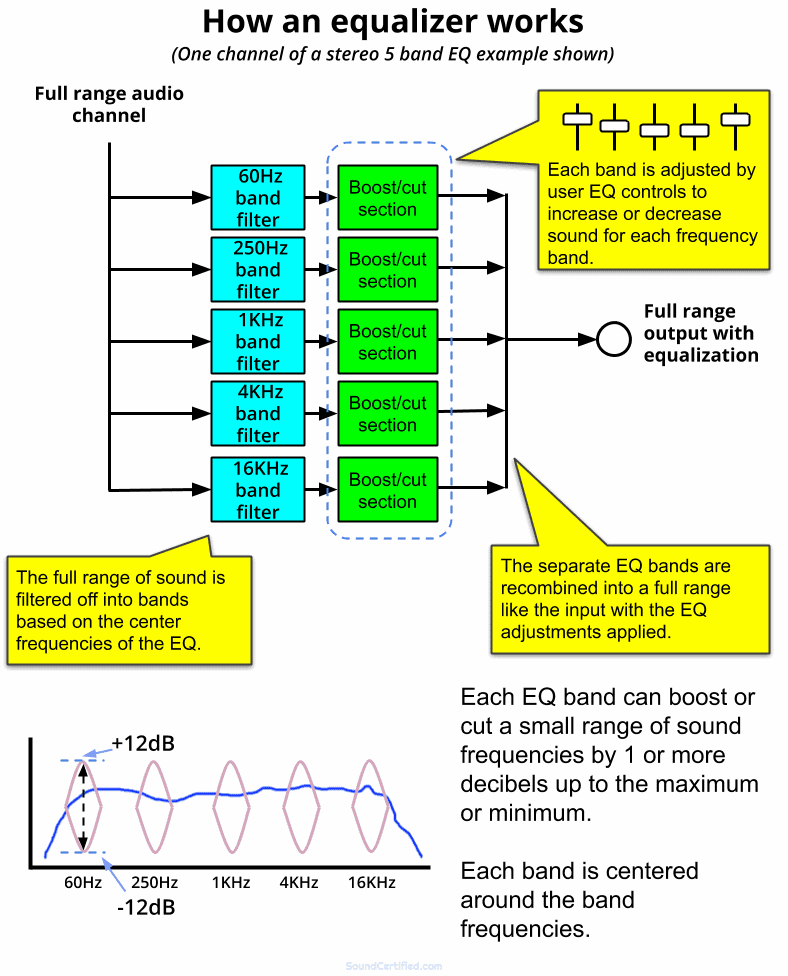
Equalization is done by dividing up the full range of sound into smaller sections called bands. These are centered around the EQ center frequencies. This section of sound is then increased or decreased as you like to adjust the sound. The bands are then recombined and output as a full range again with the EQ adjustments included.
Equalizers work by taking the full-range sound of each stereo channel (or mono, if it’s a subwoofer crossover, for example) and dividing them into “bands” using filters. Each filter directs the sound frequencies of that band, based on the band frequency, to a circuit that increases or decreases the volume of that range depending on your adjustments.
The sound from each of those circuits is then combined back together and sent out to your amplifier or speaker system. The result is the same input sound but with EQ adjustments applied to it – not just a simple bass and treble improvement!
Many equalizers use a single set of controls for both the front and rear speakers (one set of EQ controls for both stereo channels) while more advanced ones have separate left and right channels for better tuning. Some provide EQ channels for both front and rear speakers as well.
Some also offer a small set of adjustable bands for subwoofer bass tuning. This is often the case for digital equalizers like those in touchscreen car stereos and digital signal processors (DSPs).
Analog vs digital equalizers
- Analog equalizers use electronic hardware such as op-amps, resistors, or integrated circuits to adjust the sound output as you adjust it.
- Digital equalizers perform the same functions in software using mathematical routines and/or specially designed audio signal processor chips.
While both have their pros and cons, digital equalizers offer more features these days and save money and space since they don’t need the added hardware to do the work. In many cases, they also include more adjustable features than hardware-based EQs which makes them more flexible.
Analog in-dash EQs often provide a built-in auxiliary input feature while digital models often include EQ presets, making it a snap to save and recall your settings.
Graphic vs parametric equalizer differences
A graphic EQ has fixed bands you can boost or cut. A parametric EQ, however, normally has fewer bands but the center frequency can be moved up or down over the audio frequency range. Both have their pros and cons, but I recommend a graphic EQ with a higher band count for most people (no less than 15 or more bands is a good idea when possible).
Basic recommended car equalizer settings – setting your EQ by ear
In this section, I’ll share with you some basic steps and EQ settings when doing it by ear. In the section after this I’ll go into the best way to do so: by tuning your system using the right tools.
Getting started with the basics
You’ll want to do a few things before trying to adjust an equalizer because having too many adjustments means they can work against each other, meaning you might not get anywhere!
My advice is to do the following before adjusting an EQ:
- Disable any special audio modes like bass boost or “enhancement” settings. Set them to “flat”, zero, or off as needed.
- Set the equalizer band adjustments all to flat. That is, to 0dB level, in the middle of the equalizer display (or to 0dB if it uses a number style control).
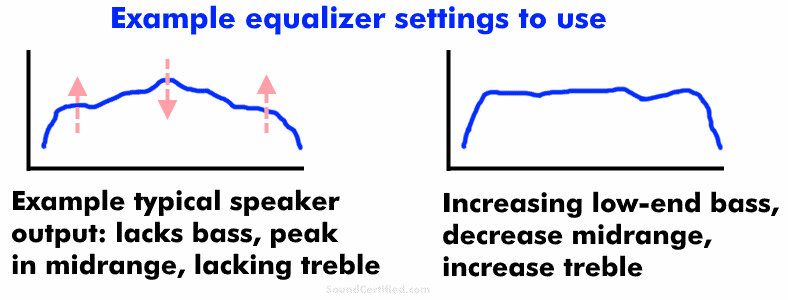
For many speaker systems (for example factory speakers with a factory-installed head unit), typically the sound is lacking in 2 or more areas:
- Not enough bass frequencies
- Harsh or lacking midrange frequencies
- Not enough treble (high frequency sounds like cymbals and string instruments)
- The music has poor detail and doesn’t sound like the recording should
In this case, I recommend doing the following, being sure to use small increments of the equalizer and make changes slowly while listening carefully.
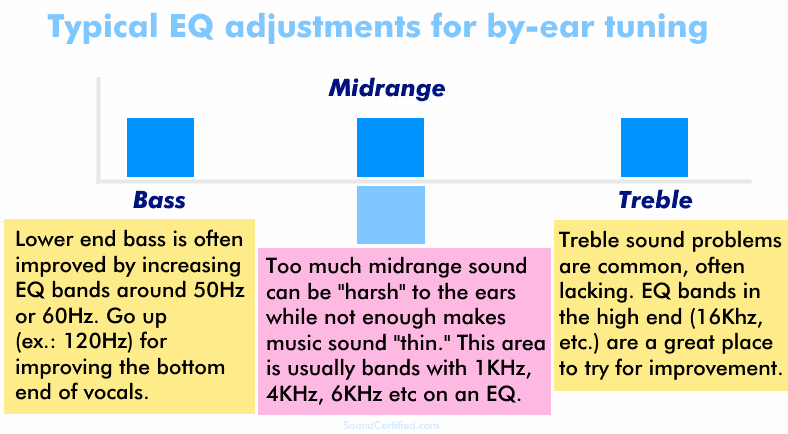
- Increase the bass a bit in the low-end range. This will be a band with a frequency of 60Hz or close to it – this depends on your particular EQ. You can then increase it a bit in the band above it and hear the results (ex.: 120Hz band, which is still bass but on the lower end of mid range sound & vocals).
- Increase the treble 6dB or so around the highest band on the upper end of the EQ, then continue increasing by 3dB if you hear an improvement. Continue until it sounds unpleasant to you, then decrease back until it’s better. This is usually a band with 16KHz or similar (some only go to 12KHz, which isn’t good, sadly). Treble can be a problem because of speaker placement is less than ideal in vehicles along with poor quality factory-installed speakers, too.
- If you hear “harshness” and the vocals and musical instrument detail, you probably need to decrease mid range sound. Start with a band around 1KHz and decrease by about 3dB and listen for improvement. If there isn’t any, set it back to 0, then move up to 2KHz, 4KHz, and so on as needed.
The idea is to know how the music should sound with everything set up properly and judge your EQ settings by ear using test music.
The idea is to know how the music should sound with everything set up properly and judge your EQ settings by ear using test music.
Our ears are most sensitive in the mid range frequencies so that’s often one of the first areas that need equalization. Tweeters very often need some increase at the high end, too. It’s a huge problem with factory-installed tweeters that have a poor response (sound output) at the highest end of the sound range.
It’s also a common issue since many car tweeters are mounted in a location where they’re pointing away from you. That’s because tweeters are most effective with a directional installation where they’re facing your ears (called “on-axis”) and not to the side or away from your head.
If not, you’ll hear get a fairly high loss in the treble range in music.
How to tune your system for the best EQ settings
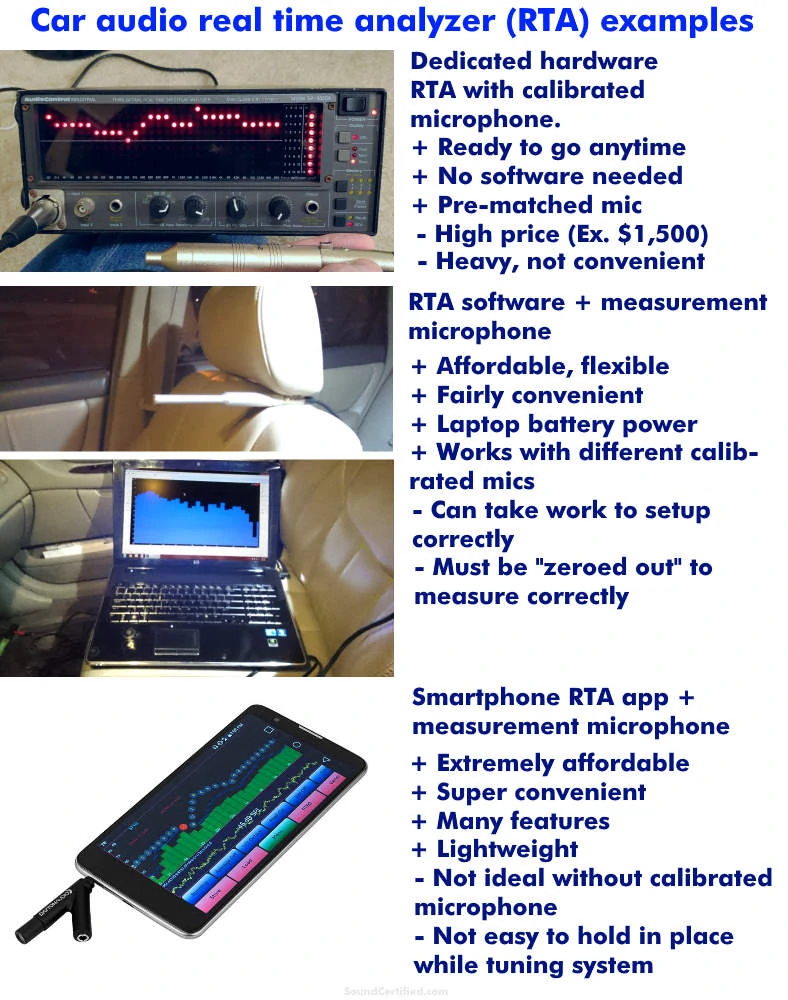
Some examples of your options for measuring and tuning your car audio speaker system. Of the 3, using a laptop and RTA software or smartphone app are the best values for the dollar. Today’s smartphone apps like AudioTool offer many of the same features as much more expensive options.
As I mentioned earlier, without question the best way to tune your system (find the optimal equalizer settings) is to use a measurement tool and find the areas that need adjusting. To do so, you’ll need a real-time analyzer (RTA) and microphone. There’s simply NO WAY to get the best sound using only some music and adjusting it by ear.
In the past this used to be a serious pain in the neck – if you could even at all find an RTA to use. Until some years ago, real-time analyzers were far too rare and expensive. A dedicated portable unit like the AudioControl SA-3050, for example, often sold for $1,500. They were heavy, limited in functions, and battery power wasn’t even standard!
Thankfully, these days you can get professional results using your laptop and RTA software (such as TrueRTA, for example) or use an RTA app with your Apple or Android phone.
Of the two, the most affordable and convenient option is to use your smartphone. For the sake of keeping things simple, I’ll cover using a smartphone and an RTA app. I recommend AudioTool (Android) or AudioTools (iPhone) as they’re good and while not free, they’re affordable at just a few dollars.
Using an RTA app for tuning (and why you need a good microphone)
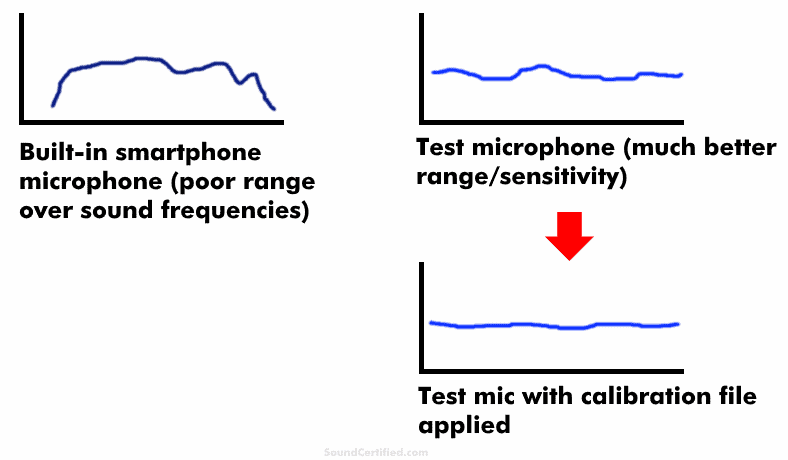
Although you can use your smartphone’s built-in microphone to get you by, I don’t recommend it for tuning your equalizer/sound system. Built-in mics have poor frequency measurement performance compared to a real test microphone. Calibrated microphones also include a file to allow them to give a near-perfect measurement if your RTA supports it.
While you can use your smartphone’s built-in microphone with an RTA app to tune your system and set your EQ, I don’t recommend it. They’re poor for measuring the audio frequency spectrum and your readings will be off – way off in some cases!
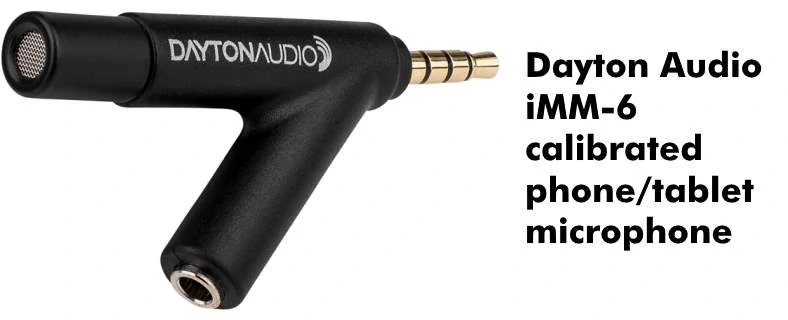
You’re much better off buying an affordable calibrated microphone like the Dayton Audio iMM-6 at about $17. If your phone doesn’t have a headphone jack, a USB microphone like the Dayton Audio UMM-6 is ideal.
Each one includes a unique calibration file to help you get more accurate readings. You don’t have to use calibration files or a calibrated mic, but for the most accurate measurements you can be confident about, I highly recommend it.
Modern smartphone headphone jacks and measurement problems
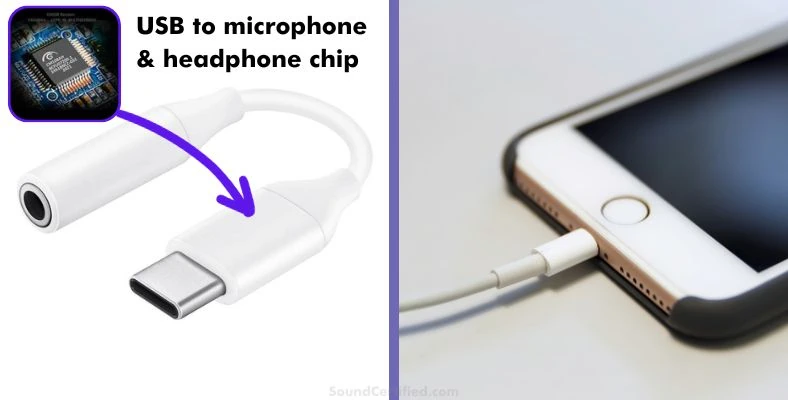
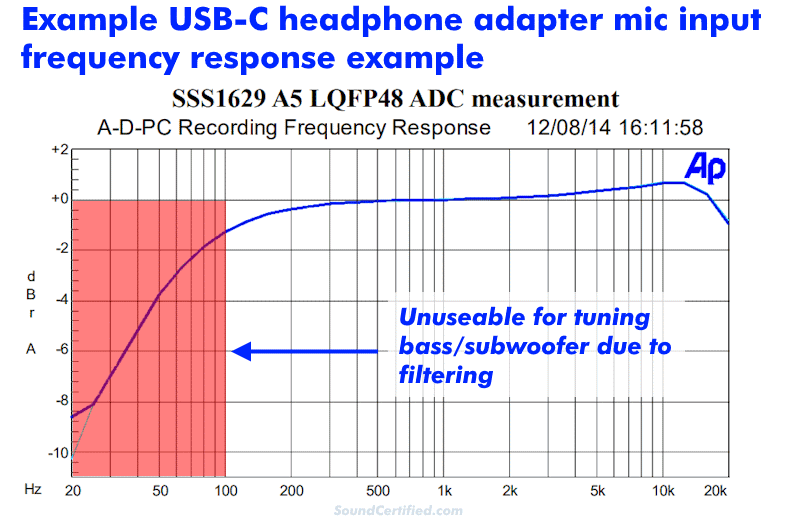
Unfortunately, many smartphones sold today no longer include a real headphone + microphone meaning you’ll need to use a USB-C headphone adapter. I’ve discovered that many use a USB audio IC which has a limited bandwidth (sound frequency range) for the microphone input with a poor low-frequency sensitivity.
The result is you won’t be able to use a smartphone app and external microphone for full-range audio measurement in tuning. Midrange and treble? Yes. Bass & subwoofer tuning? No.
Image: An example of a USB to microphone and headphone audio adapter IC with poor low-frequency capability. This means the chip will not be able to sufficiently measure low-frequency sounds in the bass region for tuning.
If you don’t have a smartphone with a headphone jack, your options are:
A. If you’re on a budget:
- Using an affordable USB measurement mic like the Behringer ECM8000 which doesn’t provide a calibration file but has good accuracy.
- Buy a cheap used smartphone with a headphone jack and use the Dayton Audio iMM-6.
Both are simple to do, although I’d recommend option #1 for the best results between the two. This is due to avoiding issues with the frequency response of the phone itself when using a plug-in mic. USB mics provide a signal the iOS or Android system can use directly.
B. If you’d like an accurate measurement that’s not super-pricey:
- Calibrated USB microphones like the Dayton Audio UMM-6 or the miniDSP UMIK-1. These are easy to use and provide a calibration file you can download and use with software like AudioTool (Android) or AudioTools (iPhone).
- Use an external USB audio interface like the Behringer UMC22 and an XLR 48V calibrated mic like the Dayton Audio EMM-6.
- Buy a high-fidelity USB audio adapter for your smartphone with an audio IC without the mic range restriction. Possible but it requires a lot of searching to know what you’re buying.
C. Using a full PC-based setup (slightly pricier than using a smartphone):
- Using a computer-based program (REW, TrueRTA, etc.), USB audio interface (Behringer UMC22 or Focusrite Scarlett Solo, and a calibrated microphone instead. This is possible for under $200 these days if you hunt for good deals.
How to tune a car equalizer
Your goal should be not to get perfect sound but to correct the areas where the speakers have bad peaks or valleys in the sound output. For that, you’ll want more expensive tools and a lot more effort and time.
The most important thing is to have a pretty good idea of what’s going on with the sound output and correct the most troublesome sound points.
To tune your system and measure where you need to make improvements using your EQ, you’ll want to do the following:
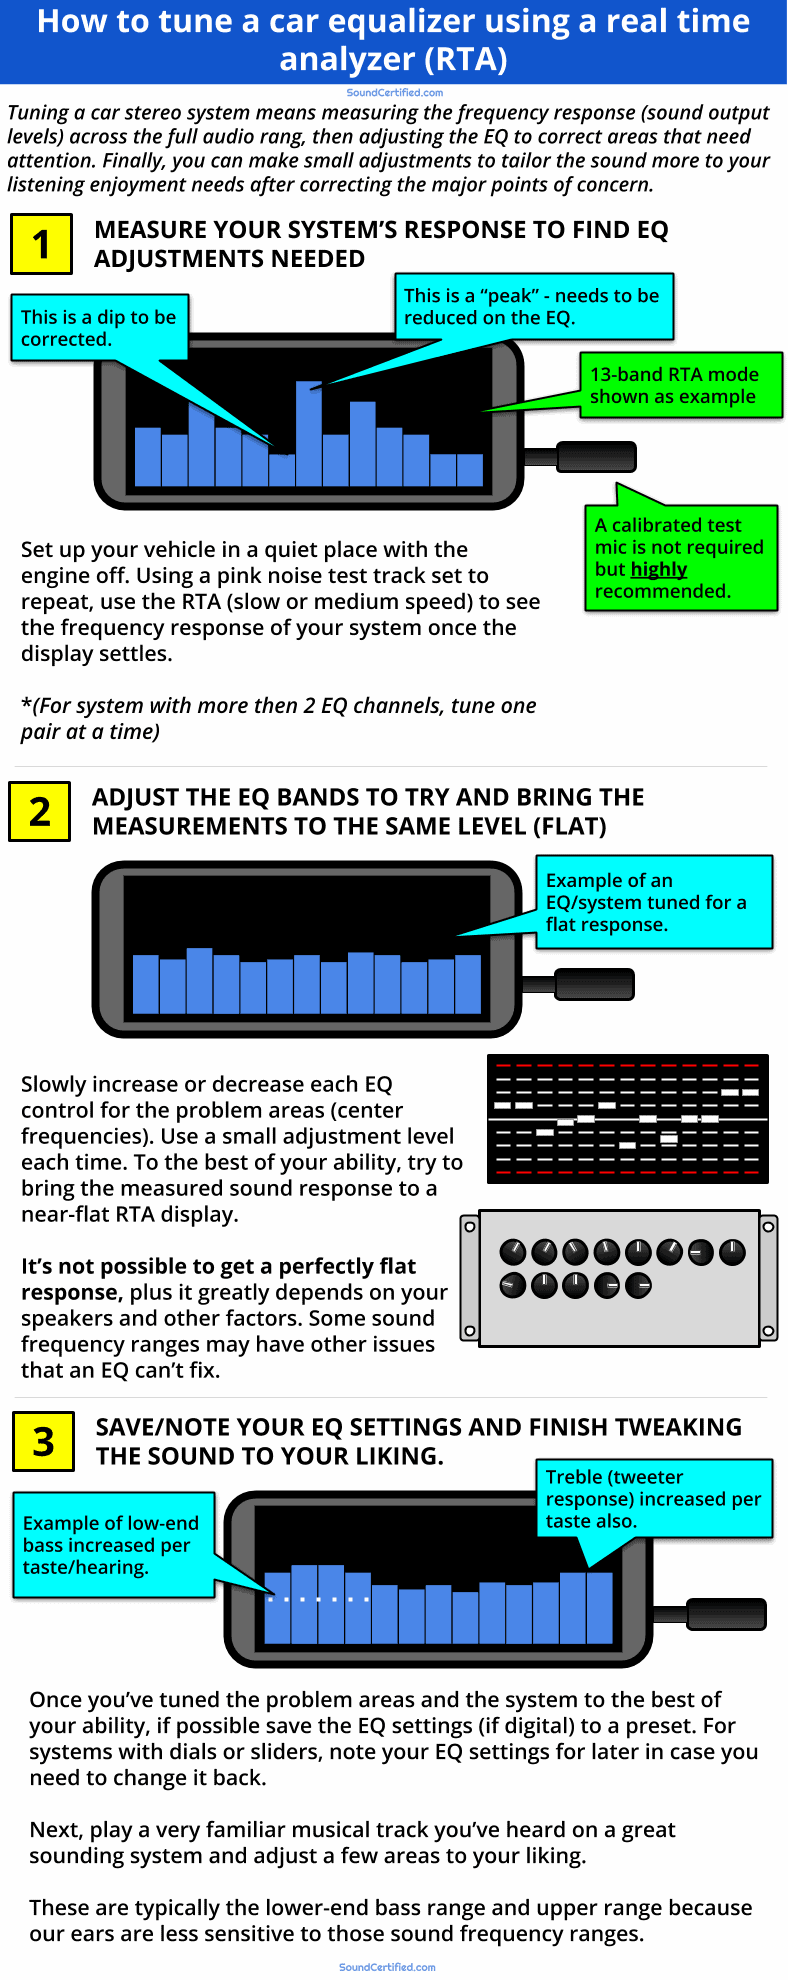
- Park your vehicle in a quiet area without outside noise that can interfere with your measurements. Leave the vehicle engine off.
- Set up your RTA to an “octave” mode similar to the number of bands on your EQ. Set the measuring speed to medium or slow. I personally prefer 1/3 octave (31 bands) mode but for those of you with fewer EQ bands, setting it to a smaller number of bands for the RTA display should help.
- Set your equalizer to all-flat (all settings at zero) and any other sound enhancements disabled.
- For systems using amplifiers, be sure you’re not using a bass boost for the subwoofers.
- With the RTA running and your microphone connected (set up the RTA’s mic option if needed), play a pink noise test track for measuring the system’s sound output with the RTA. (You can use an audio file or CD, but it needs to be high-quality and not compressed audio to make sure you’re generating real pink noise that’s not altered and that could result in bad measurements.) Note that some RTA apps can generate noise so you can connect the output to the AUX input of some head units.
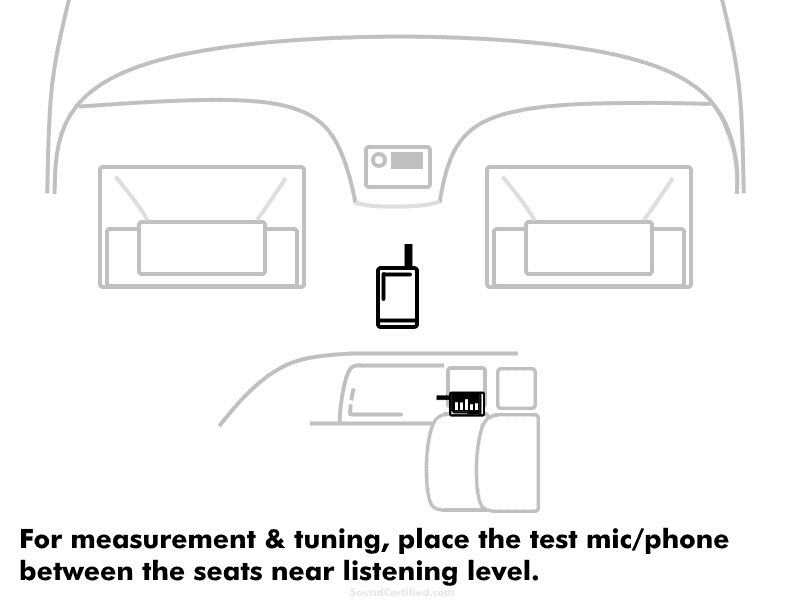
- With the RTA running and held in a middle place between the seats near ear level, note areas where there are dips and peaks in your system’s response.
- Begin adjusting the EQ a small amount for the bands in those spots and carefully watch the changes. Turning the EQ up or down too much for each frequency can cause you to have to constantly compensate by changing other bands as they interact. Do it a little at a time.
- A near-perfectly tuned system would appear as a nearly flat RTA line across the entire audio range. However, that’s not realistic or very acheivable. We’re aiming to get as close as we can to that then make custom adjustments later.
- Once you’re satisfied you’ve got it corrected (it takes a bit of time and patience!), save your EQ settings as a preset if it’s a digital equalizer. For analog (dial or slider type EQs) units, take notes for future reference.
- Final touches: play a music track (with good bass) that you’re VERY familiar with and know the sound on a proper system. Carefully make changes as you need to for what sounds best to you. In my experience, this is increasing the low-end bass (around 60Hz), lower midrange (around 120Hz), and higher frequencies (16 to 20KHz) depending on your hearing and taste.
The best goal isn’t to get perfect sound but instead (1) correct the worst problems in your sound system and (2) adjust the results to get the sound that YOU really enjoy with your music.
After tuning the system, feel free to use your bass booster or other features if you think you like how they sound. However, be aware that a properly tuned system with good speaker performance normally doesn’t need gimmicks to make it sound right.
You should be able to hear sufficient bass when it’s adjusted optimally.
Those are instead for:
- Making up for what your system is lacking (for example, poor subwoofer output
- Occasionally adding that extra slam to your favorite music when you’re in the mood – just not every day
In that case, no amount of tuning can help. You’ll need to work on improving either the installation, the speakers, or both.
Upgrades that make a huge difference when your EQ can’t
Equalizers are great but they can only do so much. Since they’re limited to a range of +/-12dB to +/-9db of sound adjustment typically, that means for problems exceeding that, you won’t be able to correct it enough.
Some of the biggest problems with car audio systems are very common based on what I’ve seen over the years. It depends a LOT on the particular vehicle, the speakers used, and much more.
In most case it’s due to one or more of the following problems:
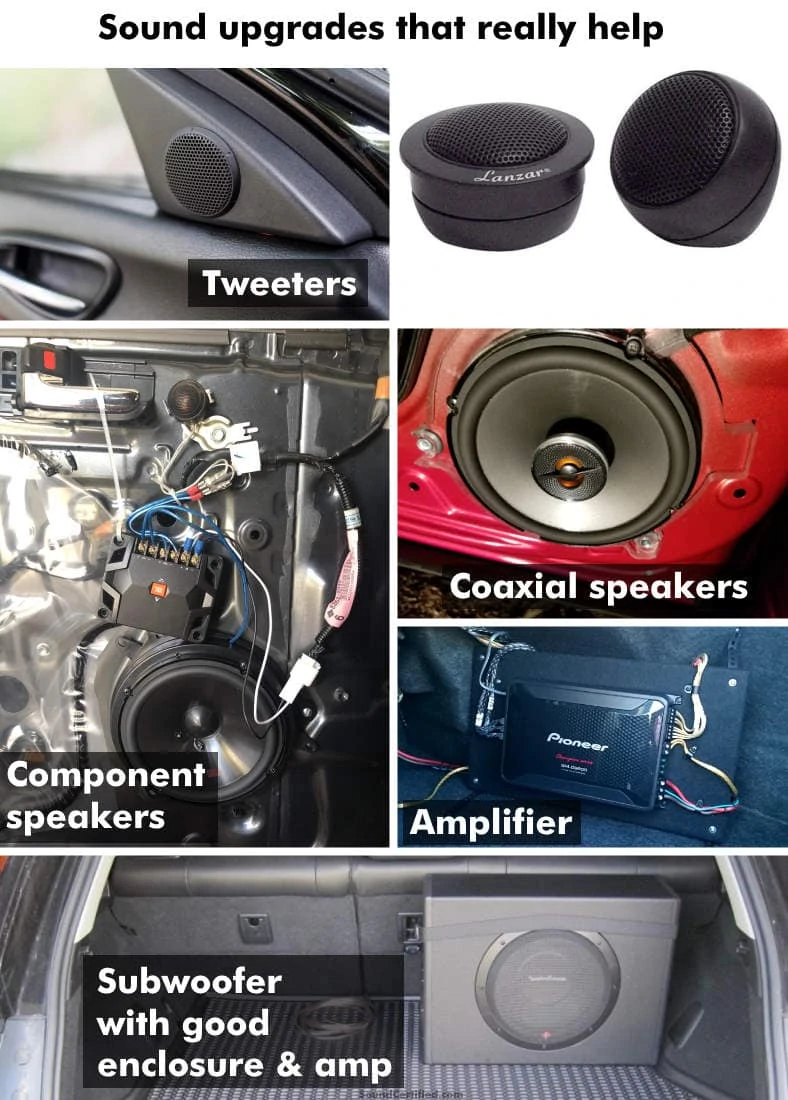
- Poor or no low-end bass: needs a subwoofer to be added or better subwoofer to replace the current one
- Poor/very weak treble: Needs tweeters to be replaced and/or added. Also, consider moving tweeters to a better location facing the driver & passenger seats.
- Music sounds “thin” and unnatural (poor midrange): Requires a speaker upgrade as this is a sign of poor speaker performance.
- Distortion during playback especially at high volume: Insufficient power to drive the speakers. Consider driving them with an amplifier or replace a factory amplifier (if equipped) or a higher power aftermarket model.
The good news is that these days you don’t need to spend a ton of money on any of these. Each one can be found (with pretty good quality and sound, I might add!) for around $100 or less. In fact, by replacing all of the main components (a better sounding head unit, front and rear speakers, add a subwoofer for bass, driving speakers with an amp, and so forth) you’ll get great sound that no factory system can match.
