Having tried several of Rockville’s line of budget car amps, I’ve come to appreciate that they’re often a good value with lots to offer.
5 channel amps are a special group of car amplifier and there aren’t many to choose from – especially affordable ones. But is this one a great option or should you pass it by?
In my Rockville RXH-F5 5 channel car amplifier review I’ll share with you what I’ve found. You’ll want to know what I found out during testing before you buy one!

Contents
- Basics first: Getting to know the Rockville RXH-F5
- Pricing & power ratings
- Unboxing and first impressions
- What’s in the box?
- Build quality and fit & finish
- Front and rear panel details
- Control panel & audio jack diagram
- Speaker level inputs – Another cool feature!
- The Rockville’s amp guts revealed – What’s inside?
- Specifications
- My test setup and installation
- Checking out the bass remote
- How does the RXH-F5 sound? Real music and test tracks
- A problem with the Rockville RXH-F5’s design (noise)
- Owner’s manual quality
- Special features that set it apart
- Review score & summary
Basics first: Getting to know the Rockville RXH-F5
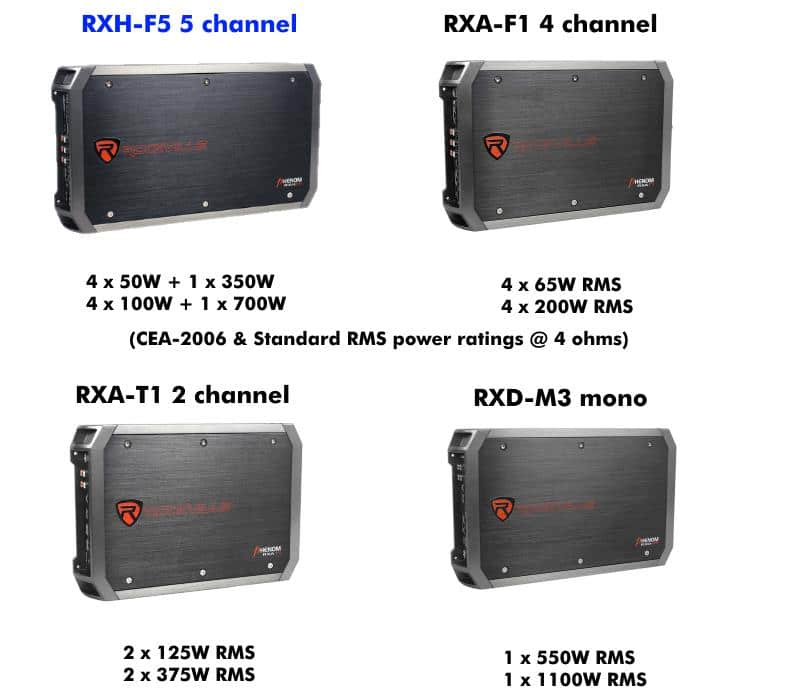
Phenom series amps are highly affordable class A/B amps with a traditional amp design inside. Some of the best-selling Rockville amplifiers from the Phenom model line are shown here with 2 true RMS power ratings (2 different measurements are used). The RXH-F5 adds a class D subwoofer channel for lots more power.
One of Rockville’s Phenom line of budget-priced amps, the RXH-F5 amplifier shares the same basic design features as its siblings. If you’re not already familiar with Rockville products they’re a relatively new company with a variety of budget level car audio products.
What helps set the Rockville line of amps apart from other budget brands are the Consumer Electronics Association (CEA) 2006 industry standard power ratings. That is, unlike many budget amps you’ll find when shopping reliable power ratings are provided.
More about the Phenom series of amps & the RXH-F5
Like most amps in the product family, the F5 uses a traditional A/B amp design for the front and rear speakers. However, it adds a 5th channel powered by a class D supply dedicated to driving one or more subwoofers.
They also list (as do some other manufacturers) another RMS power rating that’s measured differently. Not to worry though as I’ll explain more about that later.
In the Phenom family you’ll find several types of amplifiers:
- 4 channel models
- 2 channel models
- 5 channel models
- Mono (single) channel bass amps
Rockville also has a product line called the DB series. However, the Phenom series provides slightly better sound quality specs and features the DB series doesn’t offer (although the DB series are still a good choice as well). Phenom amps also offer more channel configurations (like this 5 channel version).
Phenom series amps are only a few dollars more than DB models and many also offer more features so they’re hard to pass up. Many sell for around $90-$160 or so making them an affordable choice for many.
Pricing & power ratings
In terms of price, the RXH-F5 sells for about the same as comparable amps from Hifonics for example at close to $150-$165 or so.
Unlike its sibling the 4 channel RXA-F1 I reviewed here, there’s no twin marine version with 5 channels offered.
As power ratings can be a bit confusing I’ll try to break down what you can expect to get for your money.
CEA-2006 compliant RMS power ratings (at 1% THD):
- 4 x 50W + 1 x 350W @ 4 ohms
- 4 x 75W + 1 x 500W @ 2 ohms
RMS (“uncertified”) continuous power ratings:
- 4 x 100W + 1 x 700W @ 4 ohms
- 4 x 150W + 1 x 1000W* @ 2 ohms *(company claimed rating)
Note that CEA-2006 are guaranteed and based on a stricter industry standard way of measured useable amp power, while the standard (“uncertified”) continuous power ratings are normally measured to clipping.
A reasonable expectation for the power you can expect to get is the CEA-2006 power ratings plus a bit more.
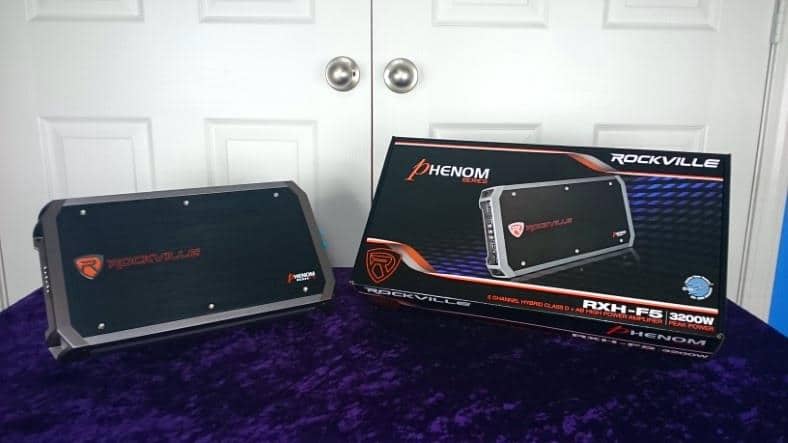
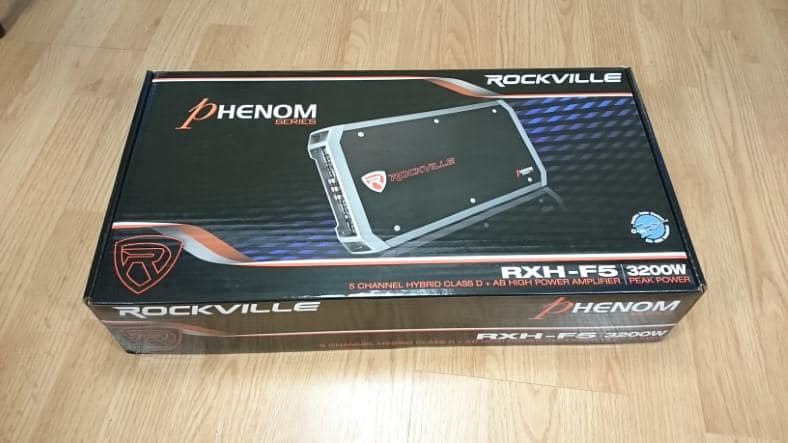
Unboxing and first impressions
I finally got my hands on it! My Rockville amp finally arrived and I got started unboxing right away. Inside the box was the amp’s production certificate, accessories, and manual. It’s also safely packed inside snug foam inserts holding it in place which I prefer over styrofoam.
I opened the box up and got a good first impression.
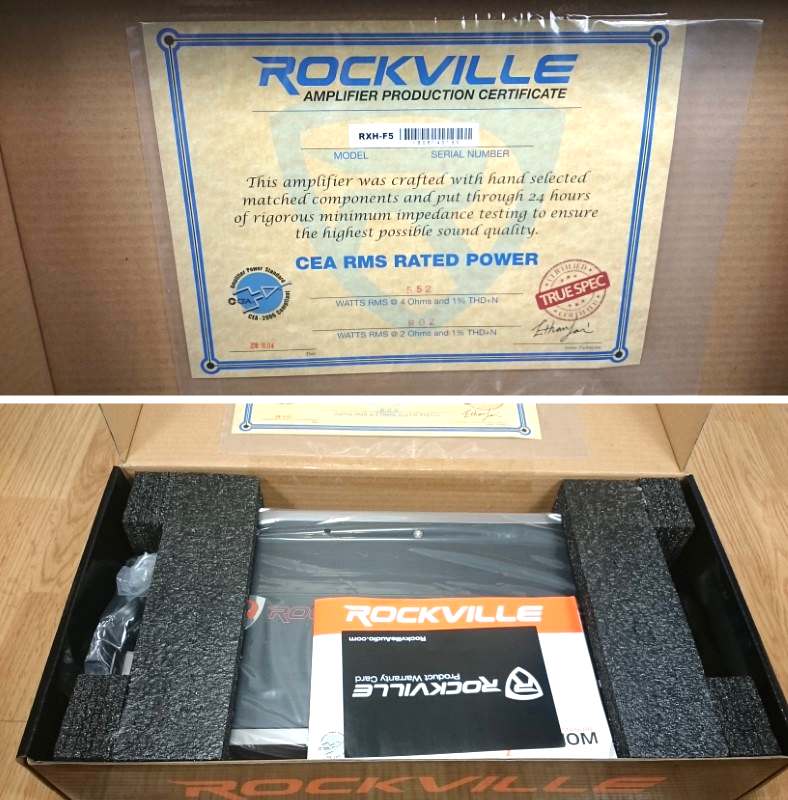
After opening the amp box inside you’ll find the amp’s production certificate stamped with both the CEA-2006 power ratings and the serial number. It’s a nice touch.
It’s not as detailed as the manufacturing certificates provided with some much more expensive amps (like those by Rockford Fosgate, MTX, and so on) but it’s still a nice touch.
The certificate gives the impression that each amp has power measured individually during production but that’s actually not true, as I’ve noticed all amps of the same model have the same power rating stamped inside. However, in my opinion, that’s not really a problem.
What we really care about is having the amp meet its rated power output as advertised. I’ll cover that topic later below.

The RXH-F5 is well-packaged and has the power ratings & features clearly labeled on the back which is great. However, despite being marketed with true power ratings (CEA-2006 & standard RMS specs) they still list the power on the box as “peak power.” Why? That makes no sense to me.
All in all, my RXH-F5 was well-packaged and everything looked good. Despite being a budget amp line I’m happy with what I found after opening it up. What I don’t like for is the use of “peak” or “maximum” power ratings on the box like less reputable amps use (as seen in the lower right corner on the front of the box above).
I just don’t get that in this day and age, especially since part of Rockville’s advertising is based on their realistic power ratings. However, as it’s not being used as the power ratings for sales ads, I’ll overlook that.
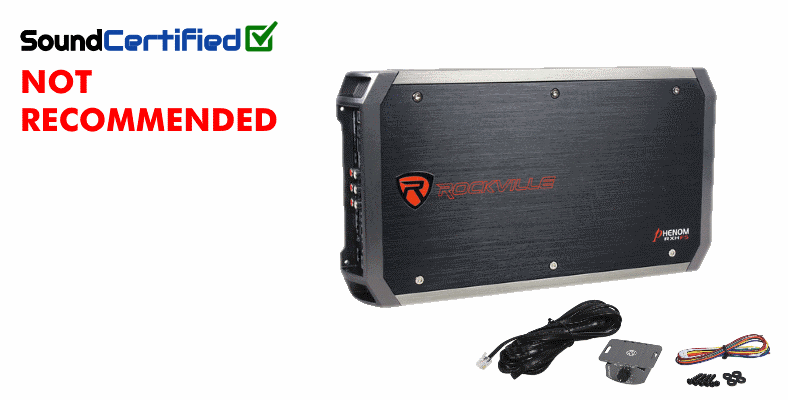
What’s in the box?
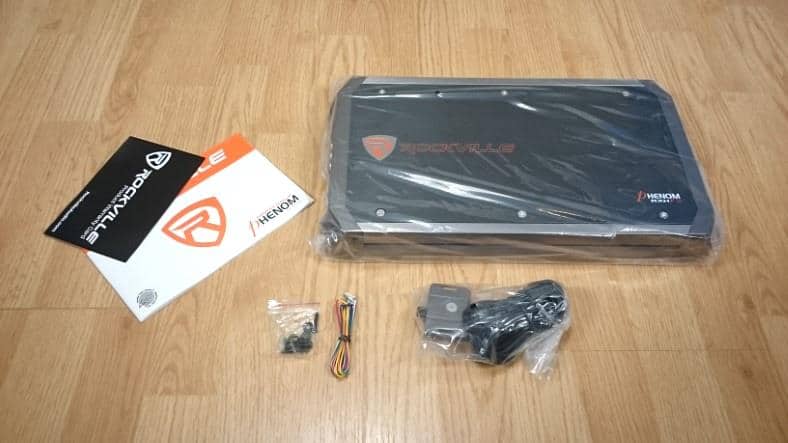
Let’s keep moving and get to more good stuff. What comes in the box?
You’ll find the following inside:
- A nice owner’s manual
- Warranty card (1 year warranty)
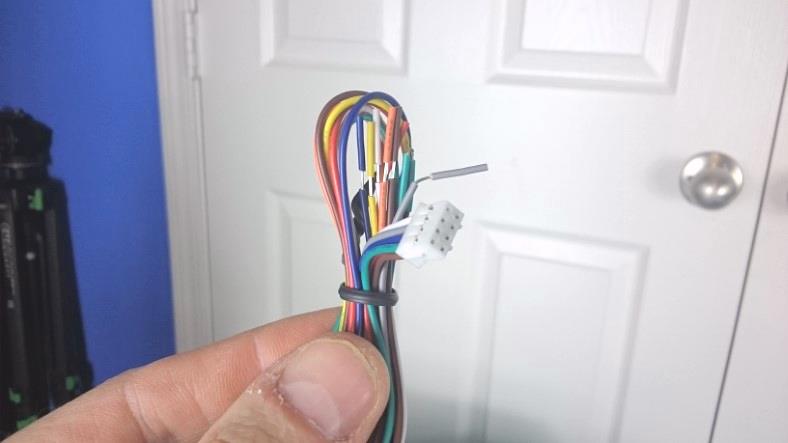
- Speaker level input harness adapter
- Four #8 1″ pan head screws with non-damaging rubber washers
- The amplifier
The included screws are #8 pan head screws and should work well for most installations. I used them myself during testing. They’re definitely the right length so you shouldn’t need to buy any others.
Installer tip: I recommend you drill pilot holes before driving the screws into the mounting surface when mounting it.
That’s because driving screws into some materials without pilot holes (using a 1/8″ bit) can cause them to split & crack badly. For soft woods like pine if making your own DIY car amp rack however that’s usually not a problem. For other materials like medium-density fiberboard (MDF), particleboard, or fiberglass it can be a big problem
The included rubber washers are a non-scratch/non-marring type used between the screws and the amp’s mounting hole surface. This prevents damaging the plastic mounting feet as the amp doesn’t use metal mounting tabs as many do.
So far, so good. One thing I did notice, however, is that the hex wrenches you need for the wiring terminals aren’t included.
You’ll need to get your own with the following sizes:
- +12V & ground terminals: 4mm (5/32″)
- Speaker & remote wire terminals: 2mm (5/64″)
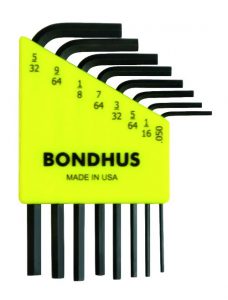 The amp doesn’t include the 2 hex wrenches you’ll need to use on the wiring terminals. I recommend a good budget priced set like these I found at Amazon.
One great thing I like is that you can use up to 4 gauge wire for the power and ground terminals!
Build quality and fit & finish
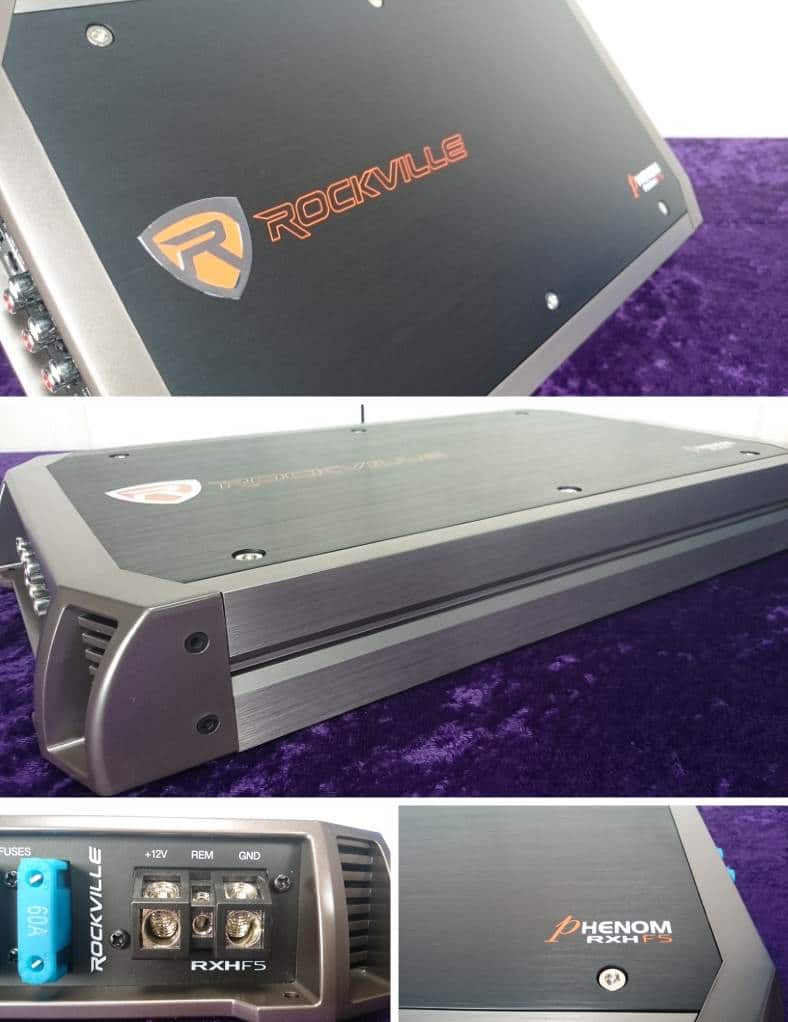
Close-ups of the RXH-F5 from different angles to show the build quality & fit and finish I found. I found it to be a well-built amp that looks better than I expected for a budget amp line. It’s also very attractive despite using a fair amount of plastic on both ends. There’s a nice black brushed metal center inlay that I really like.
I gave it a good “once over” to check the build quality, assembly, and find any noticeable flaws. Overall, it’s a good-looking amp and well made. Fit and finish are good with no noticeable issues.
There’s a lovely black brushed metal centerpiece in the amp’s chassis with the Rockville logo and emblem. It’s a nice-looking touch and adds a bit of class you won’t mind showing off.
General design and finish quality
It’s the same tried-and-true design: An aluminum heatsink chassis.
However, the Phenom series of amps have a slightly unique design in that the sides are a dark gray instead of black like the top. There are also some false hex-head chrome screws in the centerpiece which adds a good-looking style accent.
Front and rear end sections are made of plastic and serve as the mounting feet. That’s my only complaint because metal mounting feet are a lot more durable and can take more force without warping or cracking. You’ll need to be careful not to overtighten the mounting screws when installing it.
Overall, the fit and finish are very good. It’s a good-looking amp and you might guess it’s more expensive than it really is if you didn’t know better. I like it.
The downside of being a budget amp is that to keep costs low older technology is used. Unlike some of today’s more compact amps, the tradeoff is the size since a more cost-effective design is used for the electronics.
A note about budget amp quality
I’ve owned and have tested several Rockville amps and a few times I’ve noticed a few minor quality control issues.
In 1 or 2 amps I’ve had a dial or two (gain or other adjustment dials) were a bit misaligned with the end panel opening. However, that’s a fact of life sometimes for budget products and it didn’t affect how I used the amp.
Overall, though, I’ve been pretty happy with how the Phenom series amps are built and mine had no manufacturing problems at all.
Front and rear panel details
Shown: Front and rear panels with controls and wiring connections for the amp. For a budget amp, it’s actually very good. Wiring terminals need hex wrenches to use them, but you’ll get a much better and reliable connection than most budget amps use. Controls and input jacks (and more) are clearly labeled and easy to understand.
Wiring terminal quality & installation notes
For an amp in the budget price range, you’d think you’d get the same cheap wiring terminals that so many other amp manufacturers use. That’s not the case here, and I’m really happy to see that!
Wiring terminals use a solid machined metal design – instead of using a Phillips screw terminal style you get a much better design with 360° contact on your wiring.
Hex head screws tighten within each wiring terminal for a high-current & reliable connection.
During testing I found them to be very secure and good-looking too. While the openings do face out at a very slight downward angle (only a few degrees), I didn’t really notice it when installing it.
The amp uses two standard 60 amp automotive fuses (replacements can be bought online or in stores if needed). Labels are clear and easy to understand, but for some reason, the speaker wiring bridge connections aren’t provided.
Bridging is easy though – just check the owner’s manual to be sure you’re using the correct terminals (Left channel positive & right channel negative).
Control panel & audio jack diagram
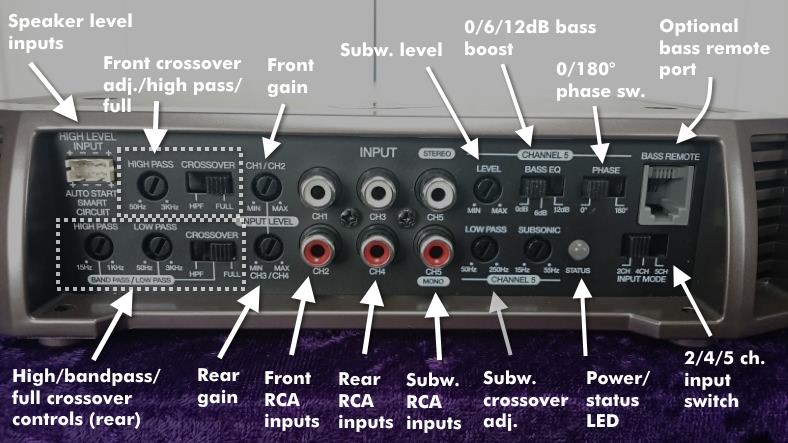
Lots of good stuff packed into a small panel! For clarity, here’s a diagram showing all the functions & what they’re for.
There’s a lot packed into the control & input panel end of the amp. There’s a lot to cover here so I’ll try to keep it simple to understand and be right to the point.
The control & input panel has the following:
- Speaker level input harness connector
- Front, rear, and subwoofer (mono or stereo) inputs
- Front crossover switch: Full range or high pass
- Front crossover adjustments: High pass frequency – 50Hz to 3KHz
- Rear crossover switch: High, full, and bandpass options (bandpass allows low pass use)
- Rear crossover adjustment: High, low, and bandpass high/low options
- Status & protection indicator light
- Front, rear, and subwoofer level adjustments
- Rear channel bass boost adjustment (0/6/12dB)
- Subwoofer 0/180° phase switch
- Bass remote jack
- 2/4/5 channel input source switch
Each end of the amplifier also has 2 plastic areas resembling grills for air vent cooling. Immediately next to those are the mounting screw locations.
Crossover controls
While it might seem confusing at first, in all reality the controls are pretty straight forward. Fortunately, the owner’s manual is really helpful at explaining everything.
You have the crossover modes to choose from:
- Front channels: Use in full range high pass mode
- Rear channels: Full, high, or bandpass (which can be used for a low pass as well)
A “bass EQ” (bass boost) is available and provides 2 fixed levels of boost: 6dB and 12dB to the subwoofer channel. The bandpass filter mode is only offered on channels 3 & 4 and provides a lower adjustment of 15Hz-1KHz and the upper limit is adjustable from 50Hz-3KHz.
Thanks to this, unlike the front channels it’s possible to use it as a low pass filter if you like. Unlike some other Phenom series amps (like the 4 channel RXA-F1 I tested) there aren’t any crossover multiplier switches to add more flexibility.
Speaker level inputs – Another cool feature!
Rockville Phenom amps provide speaker level inputs in case you don’t have RCA jacks handy on your head unit. Factory radio? No problem! In fact, to my surprise, there’s an auto-on remote feature built in when using this.
One of the best features of the amp is the auto-on option when using the amp with a factory system.
When using speaker level inputs, you won’t need to connect a remote wire! The amp will automatically switch on or off when it senses signals from your stereo.
While that’s excellent and can save you a lot of work, there’s a minor gripe I have: Front and rear speaker level inputs aren’t labeled in the owner’s manual for some reason.
The +/- speaker input wiring is labeled on the amp, so you’re good there. However, the owner’s manual doesn’t tell you the front/rear wiring colors, so you’ll have to find that out that at installation time.
The Rockville’s amp guts revealed – What’s inside?
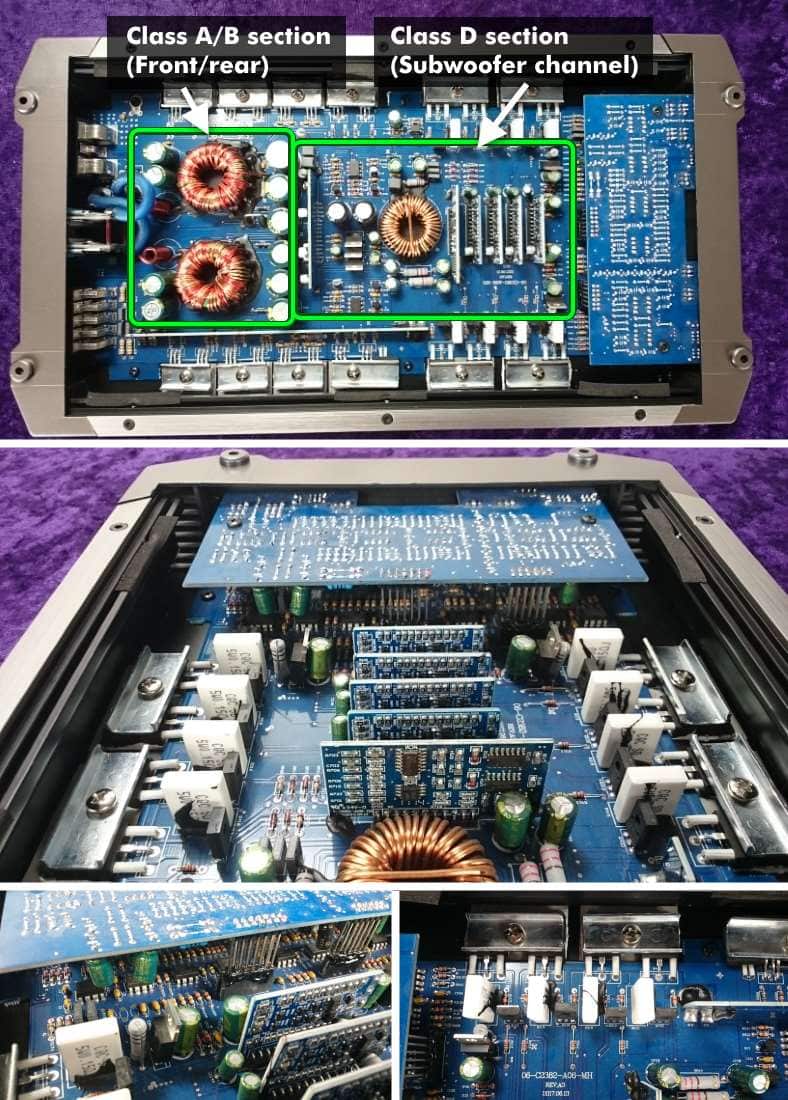
Internal view of the RXH-F5’s components. The amp uses 2 types of power supplies for the different channels: Front & rear channels are powered by a traditional class A/B design while the subwoofer channel has a dedicated class D supply for high power output.
I opened my amp to show you all the gritty details so you can see what I found.
Overall, after giving it a close look-over I can say it’s well done. While it’s a single-sided circuit board (conductive traces are on the bottom of the PCB) there’s a lot of solder added to the traces for extra conductivity and current flow with less resistance.
Front and rear channels use a Rockville’s own version of the traditional class A/B power supply design. The high power output available from the dedicated subwoofer channel relies on a second class D design in the middle of the circuit board.
Components used are mainly older style (but good) through-hole type for lower cost. That’s not a bad thing, it’s just that you need to understand that to save money compromises have to be made.
Design specs & notes
Standard bipolar output transistors are used. Undervoltage & high-temperature protection is built in as well. The adjustable control potentiometers (used for gain, crossovers, and bass boost levels) are of good quality, too.
Switches seem to be of good quality and have a good feel to them as well. No complaints about the parts used to build it.
Note: The company also advertises that the Phenom amps use audiophile-quality capacitors and feature a “class G” design which basically a slightly modified version of a standard class A/B car amp for the main channels.
Basically this means while it’s a traditional design, the power supply reduces output depending upon power needs to help improve overall efficiency.
Specifications
- CEA Compliant Power Ratings:
- 4 Ohms: 550 Watts (4 x 50 Watts + 1 x 350) at 4 ohms and 1% THD+N
- 2 Ohms: 800 Watts (4 x 75 Watts + 1 x 500) at 2 ohms and 1% THD+N
- RMS Power Ratings
- 4 Ohms: 1100 Watts (4 x 100 watts + 1 x 700 Watts)
- 2 Ohms: 1600 Watts (4 x 150 watts + 1 x 1,000 Watts)
- Front/rear: Class A/B, channel 5 is mono class D
- Studio-Grade Bipolar Output Stage Transistors
- Fully Adjustable 12dB/octave crossovers
- Ch1/2: High pass 50H-3KHz
- Ch3/4 Low Pass 50 Hz – 3 kHz, high Pass 50Hz – 1KHz
- CH5 low pass 50Hz – 250Hz
- High level inputs w/ auto-on feature
- Thermal/short circuit protection circuitry
- Optional bass remote included
- Bass EQ: 0/6/12dB boost selectable
- 2 Ohm stable stereo
- 4 Ohm mono bridgeable
- 3 Channel Mixed-Mono Capable
- 2 Ohm subwoofer capable
- 2 CH / 4 CH / 5 CH Input Mode Selector
- Fully Adjustable Subsonic Filter: 15 – 50Hz
- Crossover Bandpass Control
- Subwoofer Phase Control (0/180°)
- Mute and Delay Soft Start System
- 8 Volt Preamp Circuitry
- ELNA Brand Audiophile Quality Capacitors
- Status Mode LED Indicator
- Minimum THD at Rated Power: < 0.05%
- S / N Ratio: > 100dB
- Frequency Response: 10Hz – 40KHz
- Damping Factor: > 200 @ 100Hz
- Dual 60 Amp standard Maxi fuses
- Dimensions (W x H x L): 8.6″ x 2.0″ x 16.1″ inches
There are quite a few features you’ll get for your money and the specs are pretty good for its price range. However, real-world testing is what counts in my experience.
Understanding the RXH-F5’s power ratings
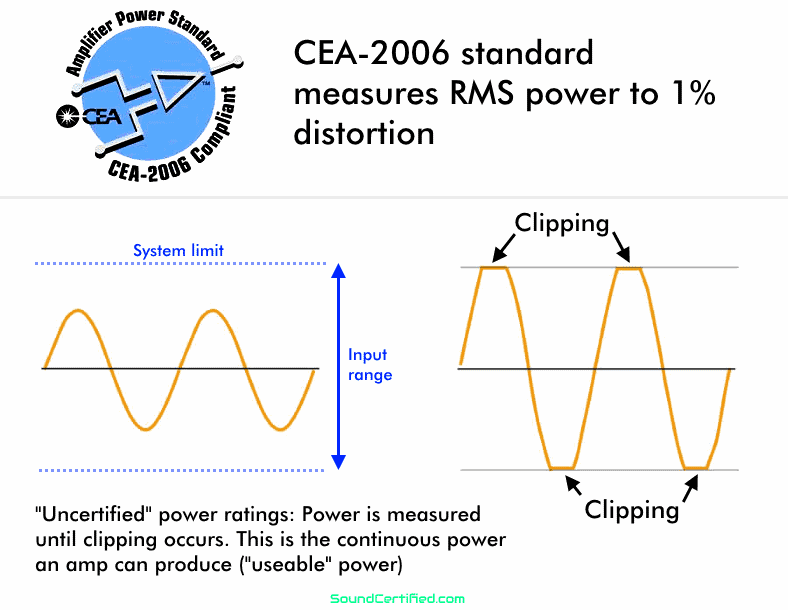
It can definitely seem confusing when you first look at the amp’s power ratings. However, there’s a logical reason they offer 2 RMS power ratings. Continuous root mean square (RMS) power ratings existed long before the industry standard CEA-2006 method of rating an audio amplifier’s power came along.
They differ in a few ways, but both are useful when comparing similarly rated electronics:
- CEA-2006 power ratings are measured when an amp’s power output reaches 1% distortion. This is a lower number than what an amp is capable of producing (with higher distortion) in nearly all cases.
- The continuous RMS power (sometimes called “uncertified” power) is a measurement of the power an amp can put out continuously until the signal begins to clip.
Clipping is the point at which an amp can’t amplify the input signal anymore. It’s also a terrible form of distortion and can potentially damage speakers. That’s why we try to avoid it always.
The “uncertified” rating is how much “useable”, or how much power you can continuously expect to get, out of an amplifier for the rated speaker load.
The important thing to remember is this: When comparing car amps, compare similar power ratings. Otherwise, it’s not a fair comparison and can be very misleading!
Fortunately, the Rockville amps are industry certified to deliver at least the CEA-2006 power ratings advertised. In fact, they’ll exceed those up to the uncertified (continuous) RMS ratings.
A quick note about the signal-to-noise ratio (SNR)
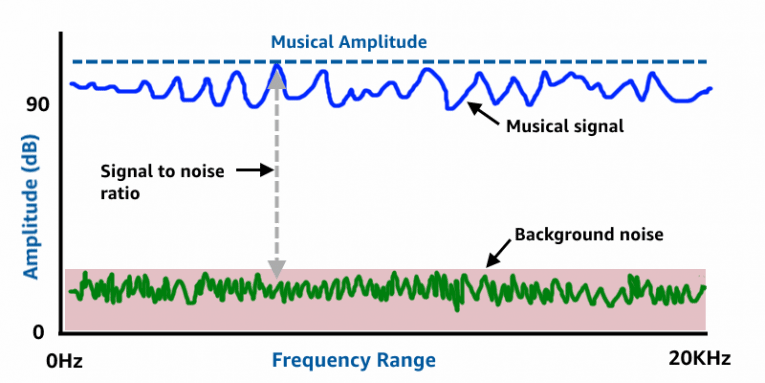
The signal-to-noise ratio (SNR) is measured in decibels (dB) and is a way of comparing the amount of “hiss” or base noise level an amp produces compared to the musical signal. A higher number is better, and typical car amplifiers are around 90dB and above.
Rockville lists the Phenom series (at least several of the prime models) as having a SNR ratio of greater than 100dB, which is very good. You’ll have to pay a lot more money to get even higher numbers, and it’s really not worth it unless you’re a true audiophile or want competition-level performance.
Note that they don’t specify how that’s measured. In some cases the SNR is measured at 1 watt, and/or at a higher power output where amps perform better. Those more specific rating specs are a bit rare among car amps, though.
My test setup and installation
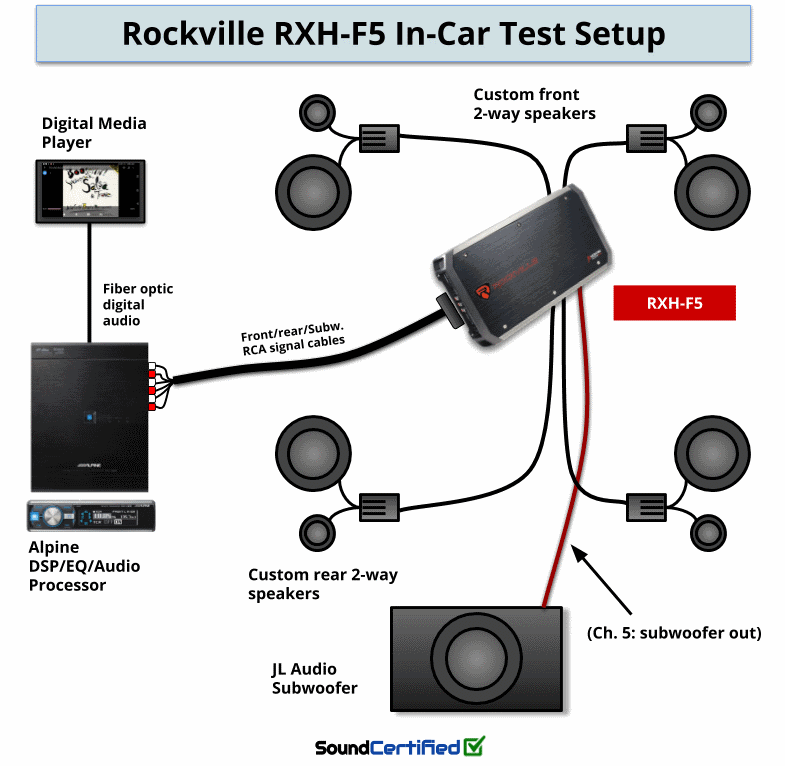
Shown: My test setup used for real-world testing of the amp during daily use and with many types of music.
Alright, on to the good stuff! Once I got the amp I was able to install it, tune my system, and give it a real-world test.
Installing the RXA-F5
Installing the RXH-F5 for daily testing and putting it through its paces. I use a test installation setup for checking out amps, especially with a very high-quality audio signal source.
I used my test setup I’ve installed just for this purpose to power and supply a super-clean audio signal to the Rockville amp.
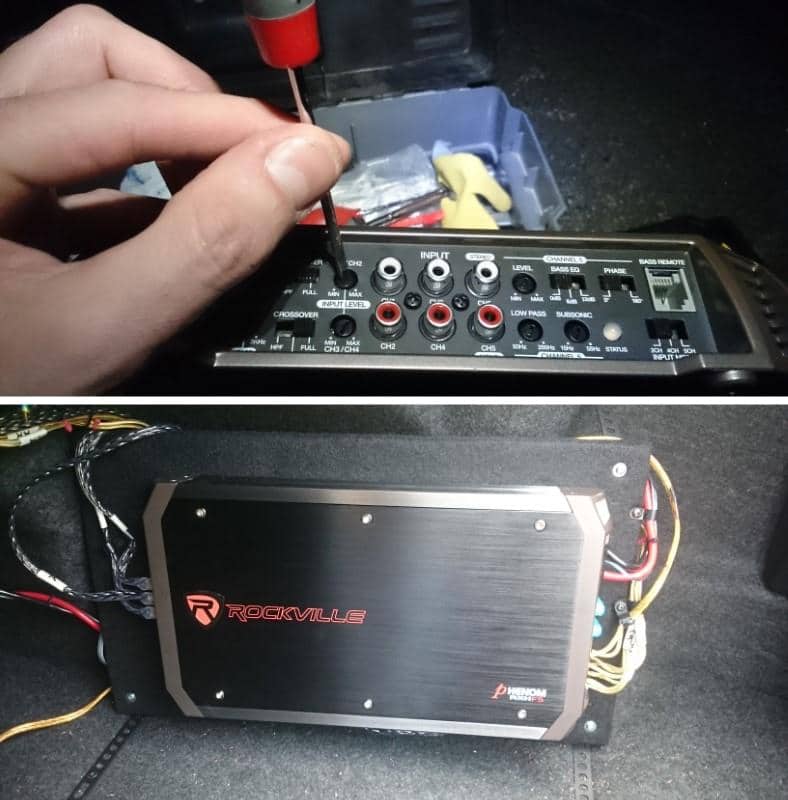
Installing the RXH-F5 is fairly easy although I did have to find my own hex wrenches for loosening & tightening the wiring terminal screws.
I did find that the speaker wiring terminals can be a bit tricky, as they’re a bit deep inside: You’ve got to be sure you’ve got the speaker wire inserted fully deep into the wiring terminal. Otherwise, after tightening the screws it’s possible to pull the wire out and you’ll have to start again.
No problems with the power & remote wire terminals, however. They’re easy to work with and everything was good. After installation, I gave the amp around 1 day for burn-in time to be sure any initial problems would show up and the parts had a chance to break in a bit.
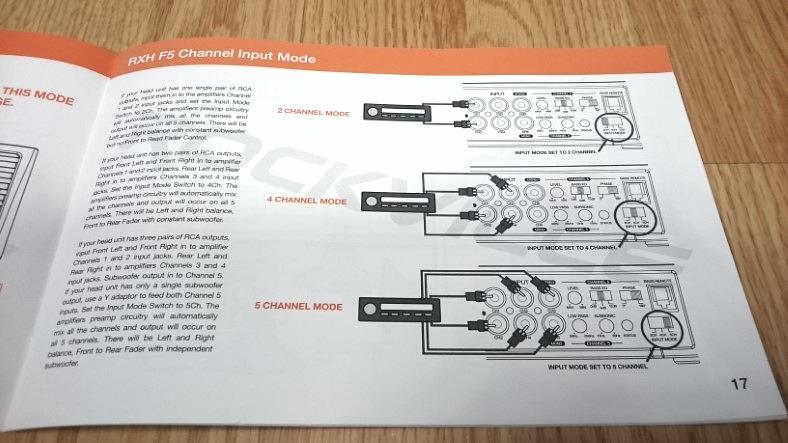
Note: If you’re using a head unit with only 2 channels instead of 4 (front/rear) and/or a dedicated subwoofer RCA output, you can use the 2/4/5 channel input switch to avoid needing RCA “Y” adapters. The remaining channels (including the subwoofer) will derive a signal from the 2 or 4 inputs you have available.
This works for both RCA inputs and the speaker level inputs as well.
One thing I didn’t like however is how the mounting holes are spaced very closely to the plastic end panel “walls” if you will. It makes for a very tight space during installation and it’s easy to scratch the plastic with your tools when driving the mounting screws into place.
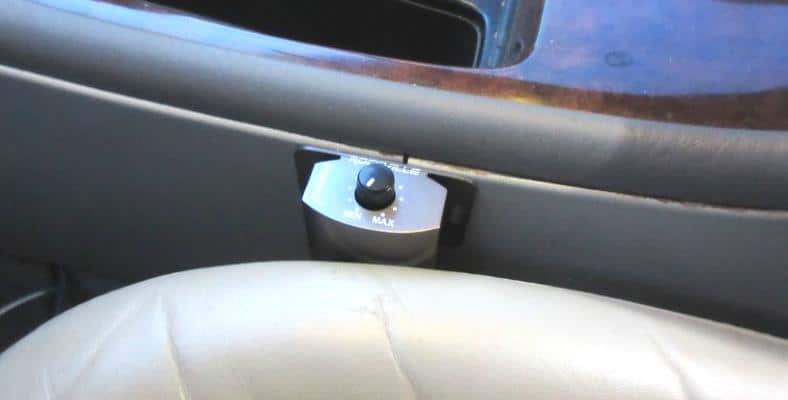
Checking out the bass remote
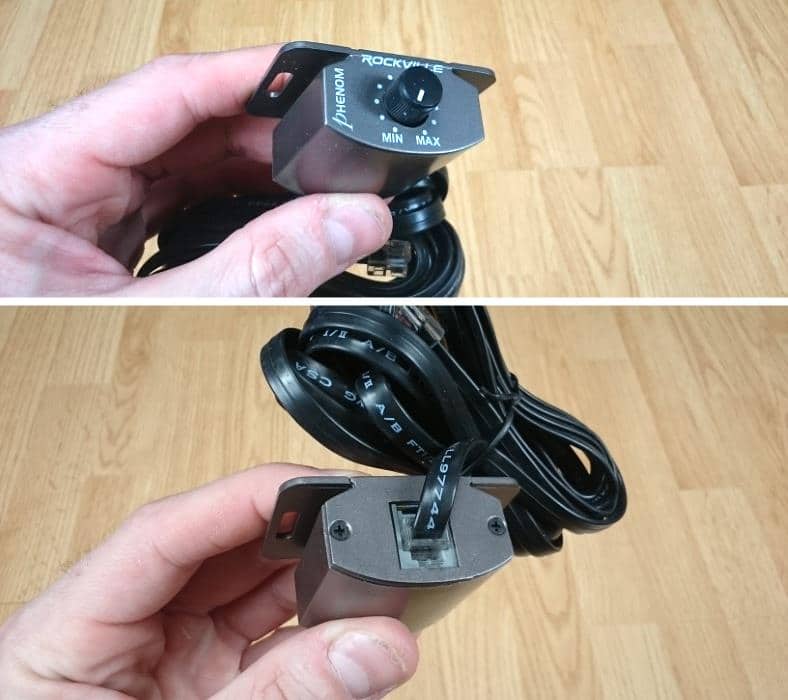
The optional bass remote includes a standard 6-conductor phone cable about 18 feet in length. The remote mounts near your dashboard and allows adjusting the subwoofer level any time you like. It’s very easy to use, easy to install, and a great feature I recommend.
No installation & test is complete without trying out the special features, right? I installed the included Rockville bass remote (cable is included) in my vehicle and got to work.
It’s very easy to use, although you don’t want to leave it just lying around. Personally I recommend at least using a good double-sided tape for a removable installation.
Ideally, however, you’ll use the screw mounting tabs provided. Unfortunately, installation accessories aren’t included with the bass remote. I can’t imagine why they’re not.
Setup and results
To use the bass remote, you’ll need to tweak the amp a bit after installation. You’ll need to increase the gain of the subwoofer channel so it’s very high when the bass remote is to its max setting, and so it’s at a normal level at zero.
It’s fun to use for that quick bass boost anytime while you’re driving and works well – I like it! It’s a lot easier than having to go into your head unit’s bass settings EVERY TIME you just want some extra bump for your favorite tunes.
How does the RXH-F5 sound? Real music and test tracks

Some reference car audio test tracks I used for testing the amp and verifying sound quality. Top: Autosound 2000 Test CD #102. Bottom: A high-fidelity album from Mapleshade Music featuring unprocessed, excellent sound quality used in some high-end car audio demos.
Using my reference test CDs (as well as music I enjoy and I’m familiar with very well) I ran the amp through a series of tests to check some important characteristics:
- Sound quality & clarity
- Stereo imaging
- Bass sound quality
- Power output with real music
I do this because it’s important to be consistent when testing different audio components including amps. For example, if I were to change the way I tested the amp (change it from the previous installation) I could easily add 1 change that unfairly gives the wrong impression.
To be consistent, I use very high-quality audio tracks and I’m familiar with high-fidelity test tracks as a known good frame of reference.

Listening to your favorite everyday jams on Spotify (or whatever music source you like) is enjoyable and fun with the Rockville. Music is crisp, clear, and can really jam hard when you crank the volume. Bass-heavy songs like Ne-Yo’s Miss Independent come through clearly and with plenty of power. In fact I had a lot more power on tap when I needed it.
The music quality was great, with crisp, dynamic highs and punchy bass. While it’s a teeny-tiny bit less clear than my old-school reference amps, it’s still very good for the money. When I say it’s “good”, I really mean it sounds very good.
It’s surprisingly good for the price, surely due to the use of class A/B amp circuitry for the main channels. Class A/B amps have been popular for many, many years since they can offer great sound quality for lower cost.
Power and bass quality
With at least 500W RMS of power available to the subwoofer channel and well above 50W RMS to the main channels, power definitely isn’t a problem.
Driving a 4 ohm subwoofer is a pleasure and the bass absolutely is great. The power on tap is excellent and should be more than enough for most buyers. I got some great sounding bass with more power than I needed!
In fact don’t let the 50W RMS/channel CEA-2006 make you think you won’t have enough for great, loud music. In my experience, the uncertified RMS power ratings are more in line with what most people would find usable (in this case, around 100W RMS/channel).
Unfortunately, during more casual, low-volume listening I discovered a problem.
A problem with the Rockville RXH-F5’s design (noise)
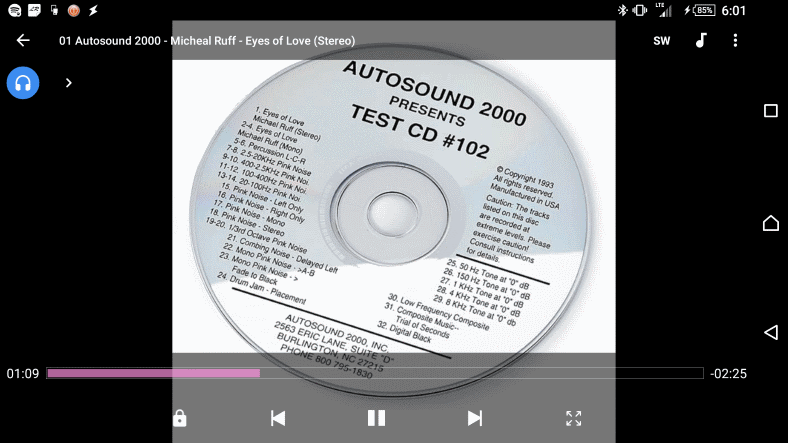
During amp testing when using test tracks played at a low volume (especially with vocals, like in this Autosound 2000 stereo imaging track) I found distortion was present in the main channels. It’s not noticeable at higher power levels – even moderately higher – but definitely a huge disappointment if you’re a sound quality enthusiast like me.
Unfortunately during testing, I discovered the amp’s design causes an odd type of distortion in the front & rear channels. It appears to be a design-related issue due to the class D power supply being added alongside the 4 channel amp sections.
I haven’t encountered this kind of problem for a long time. Using my test track from AutoSound 2000 it’s very easy to reproduce at low volumes with music tracks with vocals.
When testing the RXH-F5 during low volume with my reference test tracks I’m able to hear a slight kind of “sshhhhh” distortion that’s created in the musical signal. The type of distortion is one I’ve heard before and it’s caused by noise induced in the power supply and/or musical paths.
At moderate (normal) or higher volume it’s not noticeable at all – so it may not be a problem for many people. However, it tells me the amp hasn’t been fully vetted for low-noise operation and there’s more work to be done.
I’m an “audiophile” at heart and have very good hearing which is both a blessing and a curse. It’s easy for me to hear distortion when something’s not right like in this case.
It’s a shame, too, as I really wanted to be able to recommend this amp!
Confirming the problem
To have a fair and honest review, just in case the amp was a single defective model I called Rockville and exchanged it for a replacement.
Sadly, there’s no change and I’m easily able to reproduce it every time. It’s an inherent problem with the amp’s design and one that shouldn’t happen even in a budget amp. These days the company faces pretty solid competition out there.
As other 5 channel amps (both for car and home) don’t produce the same problem there’s no excuse for this.
I narrowed it down even further by eliminating all possible noise sources in my test system – it’s definitely an issue with the amp.
If you’re not picky like I am, you don’t have much to worry about. However, if you expect great clarity from your music and listen casually at lower volumes I think you’re going to be disappointed.
Owner’s manual quality

The owner’s manual is surprisingly good. I’ve seen many over the years and most are pretty weak when it comes to instructions, set up, and getting the most out of the amp.
This one’s better. While it covers several models in the amp family (which is fine, and typical for most amp manufacturers) the instructions apply equally to the main amps in the product family.
Where there are differences it’s made clear to avoid confusion.
It’s easy to read and you’ll get clear instructions on how to wire up pretty much all speaker systems you could think of. For a 5 channel amp like this, the speaker systems used are pretty typical but you’ll get good, clear diagrams that help.
It’s also tri-mode capable, too, which is covered inside as well.
However, when using the speaker level input feature the harness adapter coloring isn’t listed in the manual for some reason. I’m not sure why that is, but it’s a pretty minor complaint.
Regardless, you’ll be able to connect speaker level inputs using the (+) and (-) symbols which are shown both in the manual and are printed on the amp itself – you just won’t find the connections listed by color but by position in the harness.
Special features that set it apart
 Bandpass filter option: This one’s really unique and excellent for 3-way or even some bi-amped 2-way systems.
The rear channels offer not only a high pass filter (15Hz-1KHz), a low-pass filter (50Hz-3KHz), but also both can work together to provide a bandpass filter. Both the low and high pass adjustments will work the same in that case but will work together and you’ll adjust it as needed for the top and bottom cutoff frequencies.
Note: You won’t be able to use the amp to drive bass-only woofers from the front 2 channels as there’s no low-pass crossover for those – only full or high-pass.
For bi-amped custom speakers systems though, it’s not a problem. In that case, you’d use the high pass on channels 1 & 2 then the low pass option from channels 3 & 4.
Review score & summary
While it’s a good value, is well put-together, and has lots of great power to offer, I can’t get past the distortion issue. That shouldn’t happen – you won’t find the same problem from other similar 5 channel amps.
Unfortunately, after trying 2 identical amps and confirming the problem I can’t recommend the RXH-F5 if an affordable 5 channel amp with good sound quality is what you need.
Because I consider design-related noise problems unacceptable, I’ve taken a lot off of the sound quality & other rating factors in my review score below.
Note that my complaint might not be a problem for everyone – especially if you rarely listen to quiet music levels (for example if you’re a Jeep owner or someone who likes to crank it up a lot). In that case, you’ll never notice it and you’ll get plenty of amp for your money.
 Sadly, I can’t recommend No products found. to buyers who care about sound quality at casual listening levels.
 A better alternative with similar design, power, features, & price is the the Hifonics Zeus ZXX-5000.5 you can read more about at Amazon.
Overall
-
Overall quality - 5/10
5/10
-
Sound quality - 2/10
2/10
-
Power & performance - 7.5/10
7.5/10
-
Installation ease - 7.5/10
7.5/10
-
Features - 8/10
8/10
A good performer and value sadly ruined by a noise problem affecting sound quality
I can’t recommend the RXH-F5 and that’s a shame – I REALLY wanted to like it as the sibling RXA-F1 is a good buy. However, there’s no excuse for noise at quiet listening levels due to design issues given the competition. The RXH-F5 is well put-together and offers plenty of power, however. It definitely offers a lot for the money – especially subwoofer power.
While other Phenom series amps I’ve tested have very good class A/B sound quality for the money, the addition of the 5th channel’s class D supply seems to cause noise issues/distortion during low volume. For some, it may not be a problem (especially at normal to high listening levels). Otherwise, check out the competition’s offerings instead if high fidelity sound is important to you.
Pros
- Good build quality
- Included bass remote works well
- Nice appearance and finish
- Good speaker terminal blocks
- Speaker level inputs + auto-on sensing
- Flexible input options (2/4/5 ch.)
- Powerful subwoofer output
- CEA-2006/continuous true power ratings
- Good, clear owner’s manual
- Bass boost EQ
- Bandpass crossover option
- Tri-mode capable
- “Class G” power supply for more efficiency
Cons
- Noise induced in front/rear channels noticeable at low volume
- No speaker terminal wrenches included
- No speaker input harness color diagram
- Plastic mounting feet (vs metal)
- Mounting hole spacing could be better
- Occasional minor quality control issues
- No low-pass filter on front channels
- Bass boost limited to +12dB max vs +18 of others
- No bridging label near terminals