4 channel amps are great and have a lot of flexibility for the most part. However, they’re intended for use with 4 speakers or 2 speakers and a sub – not both.
However, it is possible to wire a 4 channel amp to 4 speakers and a sub! I’ve put together some really detailed information to help make this as painless (and inexpensive) as possible.
Read on to find out how! There are plenty of detailed diagrams to guide you, too.

Contents
- What you need to know first
- What does the minimum impedance (Ohms) rating mean for an amp?
- Testing speaker ohms with a multimeter
- What is “bridging” an amp? Why is this best for driving a subwoofer?
- DIAGRAM – How to wire a 4 channel amp to 4 speakers and a sub
- Using power resistors for harder installations (4 ohm min. amps)
- How to get around the lack of a front/rear fader
- What crossover settings should I use on my 4 channel amp?
- What if my amp can’t be bridged?
- How to connect a 2 ch. car stereo to a 4 channel amp
- Additional suggestions & parts you may need
What you need to know first

Let’s get a few things out of the way before we go any further. To drive 4 speakers and a sub with a single 4-channel amp you’ll have to make a few compromises.
I’ll explain here what I mean:
- You’ll likely have to give up front-rear fader control ability as you’re giving up 2 channels for the rear speakers to drive a sub (2 front/2 rear).
- Most but not all car amps today can handle speaker loads down to 2 ohms. If yours doesn’t, you’ll need a work-around I’ll show you. You may need a few extra parts.
- Driving 4 speakers from 2 channels means the speakers are sharing the amp’s power, so you’ll have less power available to each of those.
That being said, don’t worry too much! You can still enjoy the music you love with a nice-sounding 4 speaker + subwoofer system.
What does the minimum impedance (Ohms) rating mean for an amp?
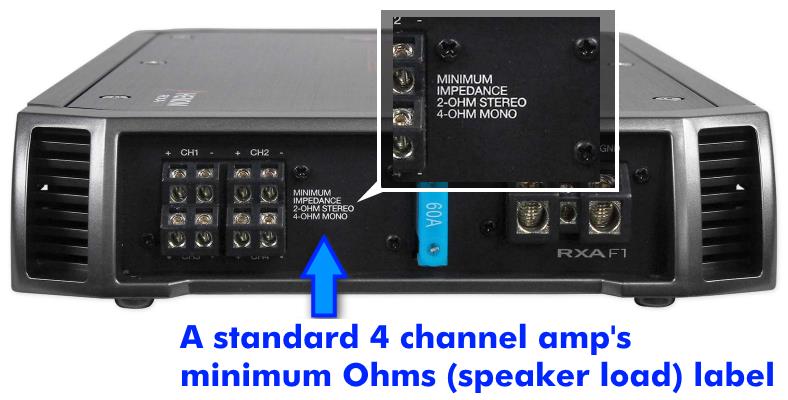
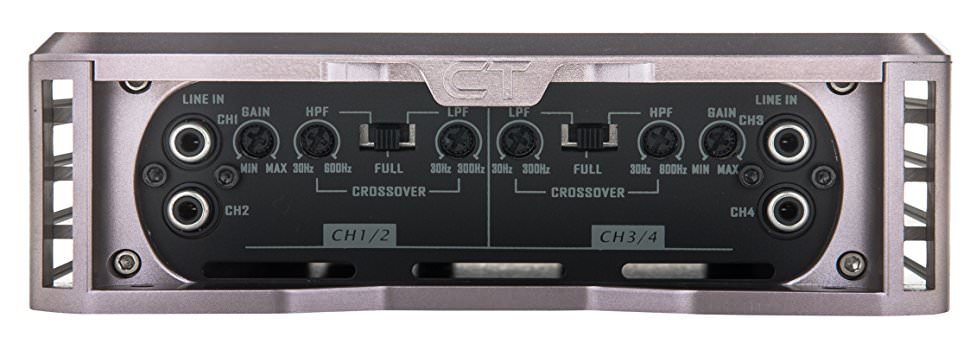
Image showing a typical 4 channel amplifier’s minimum speaker load (Ohms) rating. Most car amps today have a minimum of 2 ohms per channel in standard (stereo) use and 4 ohms minimum when bridged. Never run an amplifier with a speaker load that’s lower than the rating! Your amp will run hot and possibly become damaged.
Today’s 4 channel (and other) car amplifiers have a minimum speaker load they can handle. The speaker impedance or “Ohms” rating of a speaker (also called the speaker load) is the resistance to the flow of electrical current that the amplifier sees at the speaker terminals.
Amplifiers are designed to handle a minimum speaker load. The rating shown on the amp or in the owner’s manual serves as a warning.
If you connect a speaker load below the amp’s minimum rating it can get hot and even become permanently damaged at some point.
I’ve seen this happen when people try to “get more power” by incorrectly wiring speakers to an amp. Don’t do it! Burning out your amp’s output stages is not a nice surprise.
Minimum speaker loads for wiring a 4 channel amp to 4 speakers and a subwoofer
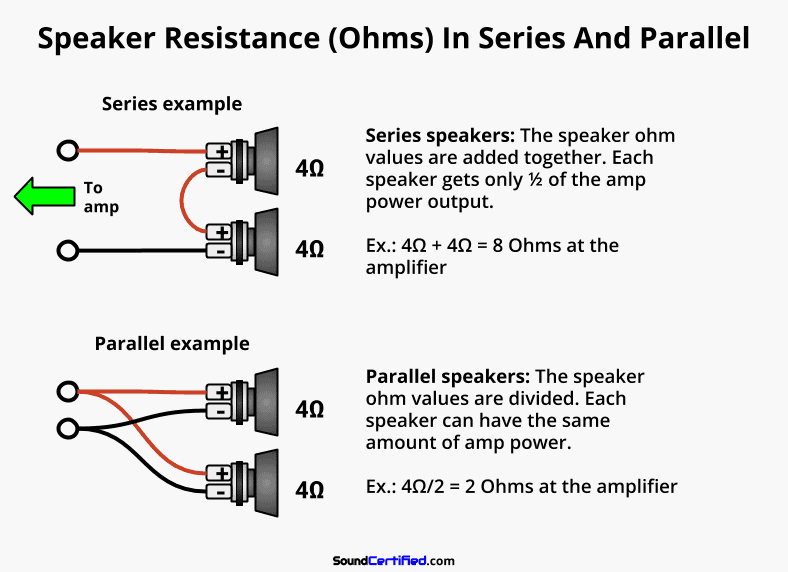
Diagram showing how a car amplifier’s Ohm rating works with speakers. Speakers are usually connected in series or parallel (well, really, most often in parallel) which affects the total resistance an amp will see. That’s important because amps are designed for a certain minimum speaker load (Ohms rating).
As I mentioned above, most car amps today can handle a 2 ohm load per stereo channel (left & right channels) and 4 ohms minimum when bridged to drive an amplifier (called “mono”).
The real answer, however, is that it depends on your amp’s ratings. Always be sure to check to be sure. To keep it simple, I’ll summarize what will work for almost all systems & amplifiers you’ll come across.
The amp wiring systems I’ll cover here
In this post I’ll cover 3 types of systems as that should cover almost all amps you’ll find:
- 4 channel amps with a minimum speaker load of 2 ohms in stereo, 4 ohms bridged (for the subwoofer)
- 4 channel amps with a minimum speaker load of 2 ohms in either stereo or bridged
- 4 channel amps with a minimum speaker load of 4 ohms
#3 is less common but it’s one you’ll run across. Maybe you’ve got an older amp that’s been sitting around unused. If so, you’ll be glad to know there’s a work-around that I’ve come up with that will let you wire your 4 speakers up without damaging your amp.
Here are the speaker wiring and speaker (Ohms) loads possible for nearly all amps you’ll run across. I’ll describe 3 main system setups which I’ll cover in detail.
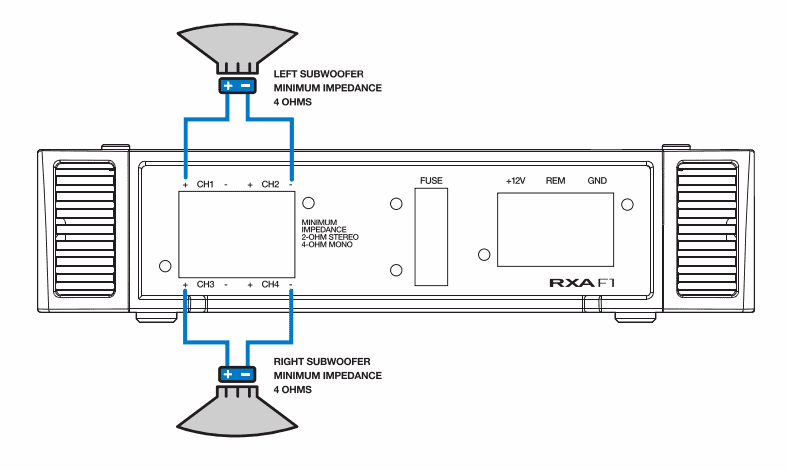
System 1: 2 speakers (parallel wiring) to each front channel = 2 Ohms x 2 + 1 subwoofer wired for 4 Ohms on the rear channels bridged for more power. This is the first and best choice for most modern 4 channel amps.
System 2: 2 speakers in parallel to each front channel = 2 Ohms x 2 + 1 subwoofer wired for 4 or 2 Ohms on the rear channels bridged for more power. 4 channel amps that handle 2 ohms bridged are less common but they are out there.
System 3: 2 speakers on each front channel (parallel wiring) wired with extra parts for 4 ohms per channel + 1 subwoofer wired for 4 ohms minimum. Because these kinds of amps can’t handle a 2 ohm load, it’s a bit harder and needs a different approach.
Testing speaker ohms with a multimeter
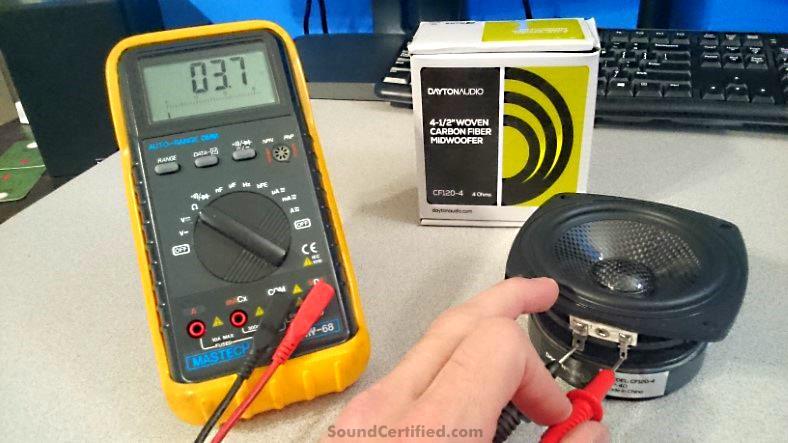
Shown: An example of how to measure speaker impedance (Ohms) with a multimeter. It’s a great way to know for 100% sure what kind of speakers you’re dealing with to avoid problems with your 4 channel amp.
Car stereo and home speaker speakers are very similar except for the impedance rating they use. A speaker’s impedance value, measured in Ohms, is just the total measurement of electrical resistance the amp will see from the speaker’s voice coil.
Partly due to tradition in the electronics world and partly due to various other electrical reasons car stereos are commonly rated at 4 ohms and home stereo speakers around 8 ohms.
The good thing is that all you really need to know is roughly what the resistance of a speaker is. If you can measure that you can tell what Ohms rating to go by!
How to measure speaker Ohms with a multimeter
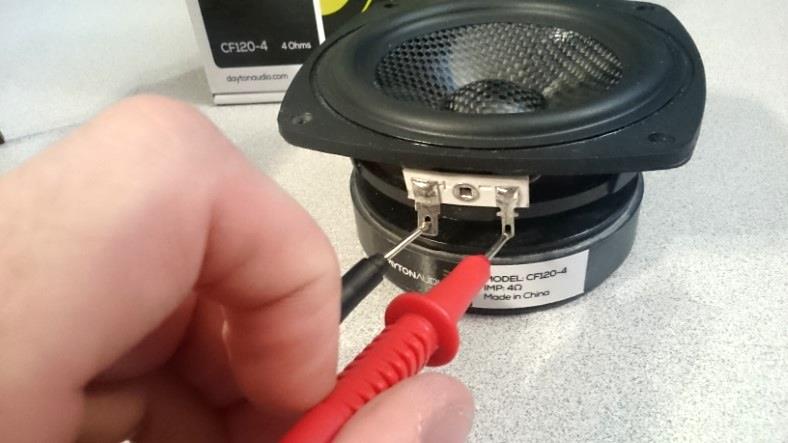
To measure the Ohms (resistance) of a speaker’s voice coil, hold the meter probes to the speaker terminals, making sure to keep firm contact to bare metal Paint, insulation, dirt, and solder flux can mess up your reading otherwise.
For example, we usually have a label on a speaker telling us if it’s 2 ohms, 4 ohms, and so forth. However, as crazy as it sounds, some speakers don’t!
That’s why it’s excellent to have a multimeter handy – you can find out 100% for sure.
- Set the multimeter to the Ohms setting. If the meter has an auto-ranging function you should be fine. Otherwise, set it to the lowest setting like the 10 Ohms or 200 Ohms range, etc.
- With the speaker disconnected, touch the speaker terminals with the meter probes. Be sure to touch bare metal on the terminals and make good contact.
- Read the measured value. The general range will tell you the Ohms rating of the speaker (Example: 3.6 ohms resistance would mean a 4 ohm speaker)
It’s important to be sure you’re not measuring across substances that can interfere with your measurement.
Things like the following can cause problems (I have seen this happen many times!):
- Leftover solder flux or solder coating from manufacturing
- Heavy oxidation
- Heavy dirt, dusty, or other contaminants that build up over time
- Paint or other coatings that don’t conduct electricity
If in doubt, you can rub them gently with a bit of sandpaper or even scratch the meter probes against the terminals to make better electrical contact.
Note: If a speaker is “blown” or burned out from abuse or physical damage to the voice coil you’ll never get a reading. That’s because for blown speakers the voice coil no longer has a complete electrical path you can measure.
Multimeters show an open circuit condition as “infinite” Ohms, which just means there’s no reading to be made.
Speakers don’t measure exactly 4 or 8 ohms!
Car and home speakers are rated by their general Ohms (impedance) rating. For example, 2, 4, and 8 ohm speakers are never measure exactly with those Ohm measurements.
That’s because each speaker’s design is a bit different from the next. The resistance you measure from a speaker is due to the voice coil’s resistance thanks to the long wire it’s made of.
Here’s an example chart to help you know what to expect when measuring speakers.
| Speaker Rating | Typical Measurements |
|---|---|
| 2 Ohms | 1-1.8 Ohms |
| 4 Ohms | 3.2-3.6 Ohms |
| 8 Ohms | 6 Ohms or more |
| 16 Ohms | 12 Ohms or more |
As you can see, you won’t measure exactly 4 ohms for a 4 ohm speaker. It will be in the general range and close to its advertised rating, however.
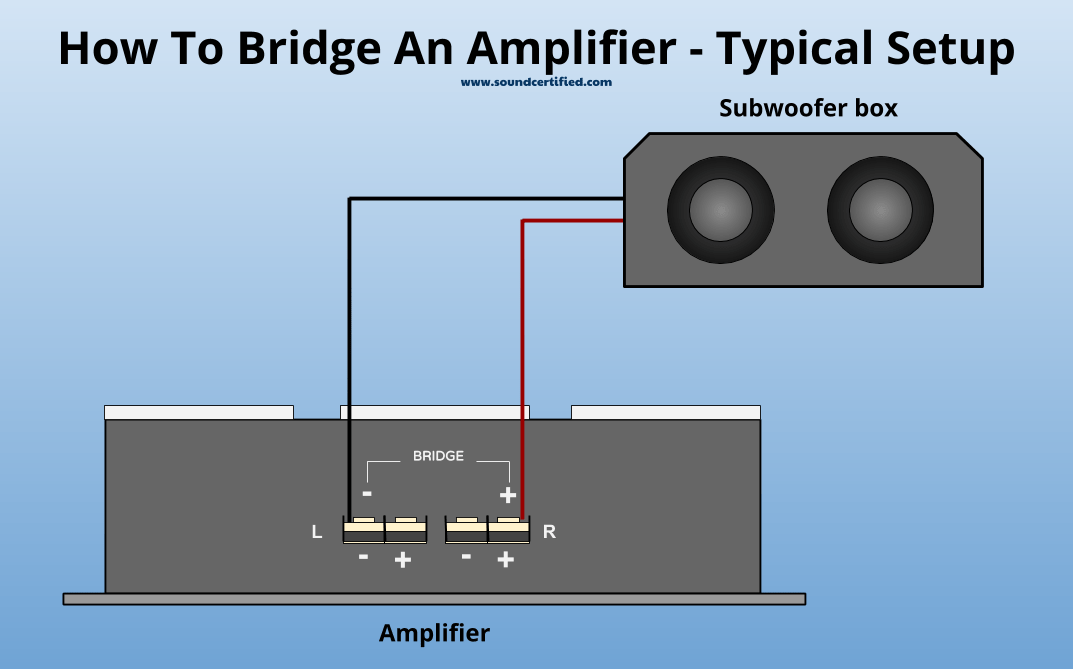
What is “bridging” an amp? Why is this best for driving a subwoofer?
Shown: Example of a 4-channel amp bridged to 2 channels.
Bridged mode (mono mode) is a built-in amplifier feature in which a “push-pull” set up is created: one channel (normally used for the left speaker) produces a signal that’s the opposite of the second channel (normally used for the right speaker).
When this happens the result is that you’ll get substantially more power with them working together than you would with one channel alone.
Bridged mode is a flexible way to get more power from 2 channels (in this case the rear channels, for example). That’s especially important because subwoofers are big, heavy speakers that need more power than small speakers to produce the bass sound you want.
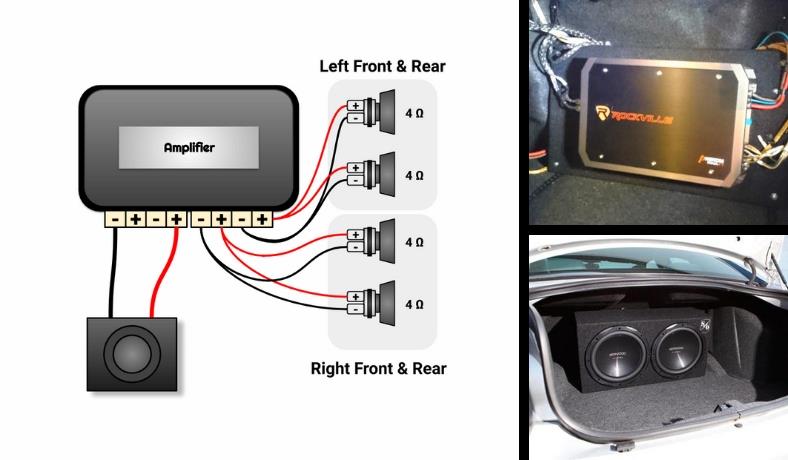
DIAGRAM – How to wire a 4 channel amp to 4 speakers and a sub
Note: Most standard aftermarket car speakers are 4 ohms each so I’ll use that assumption for my diagram. Always be sure to check your speakers before you wire them to your amp to be sure they’re compatible.
(Or click on the image to enlarge & zoom)
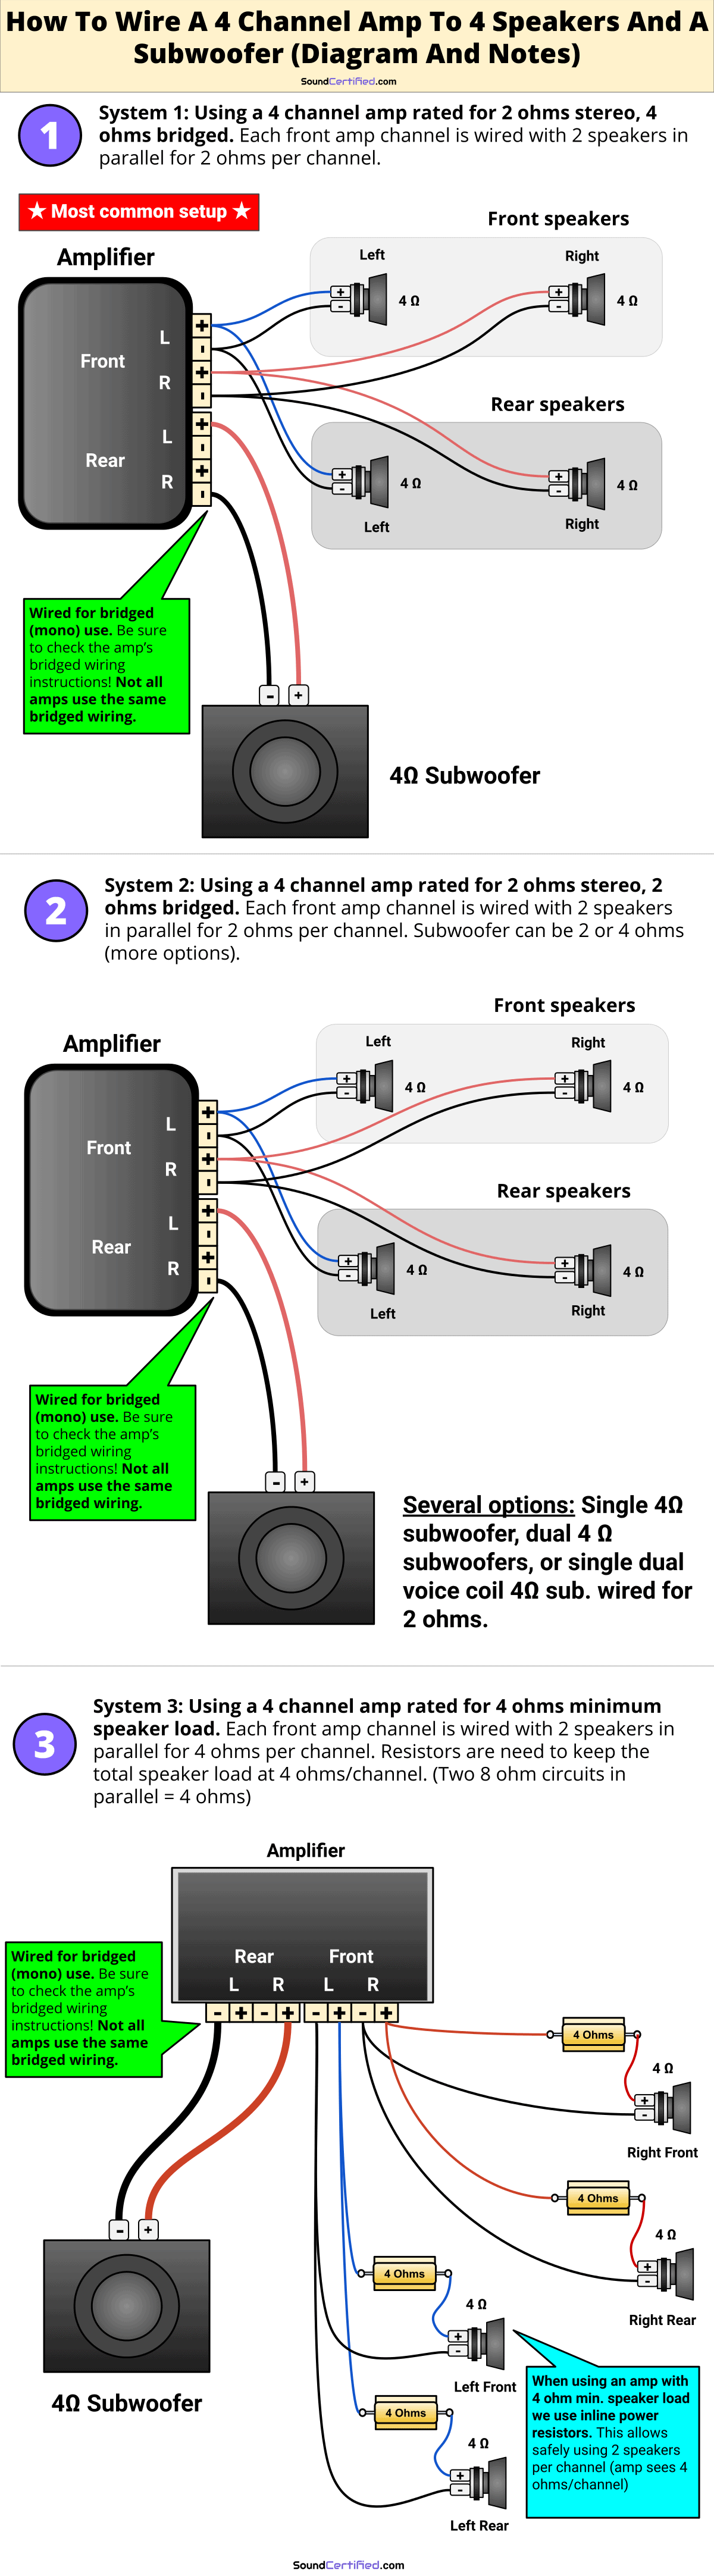
Using power resistors for harder installations (4 ohm min. amps)
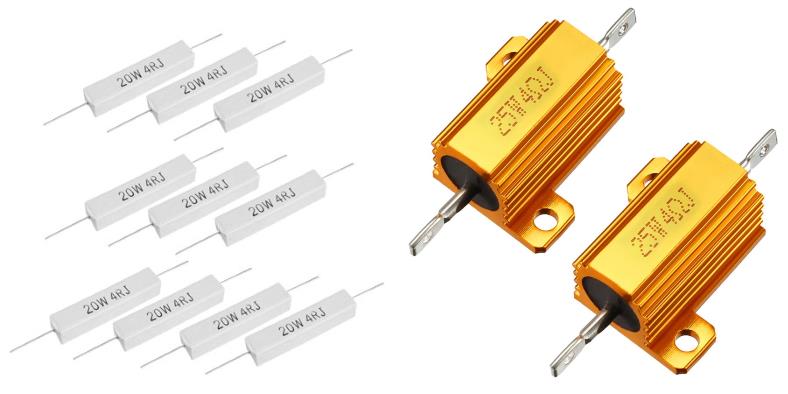
Shown: High power resistors that can be used with a 4 channel amp when adding more speakers. Using these will allow you to keep the total speaker load (speaker Ohms the amp sees) to a safe level so the amp won’t get damaged. They’re inexpensive and are easy to use.
Power resistors are larger versions of the resistors used in many electronic products. Unlike their smaller siblings, they’re designed to be able to handle a large amount of heat.
Because of this, they’re a great way to deal with more difficult speaker and amp systems. In example #3 I showed you earlier, it’s not possible to use two 4 ohm speakers in parallel with an amp that can’t handle 2 ohm loads.
We can use 1 large resistor for each speaker as a work-around for this.
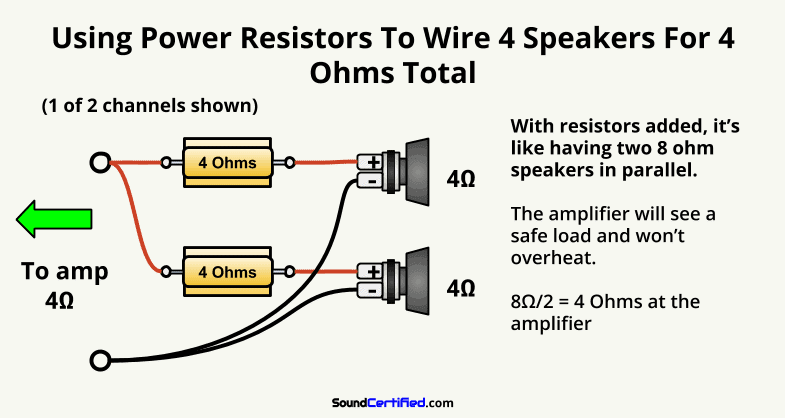
In the case of a car amplifier that can’t go below 4 ohms per channel, there’s no other way. However, if we add one 4 ohm power resistor in series with each speaker we can use the math to our advantage.
By doing so, we’ll end up with two 8 ohms measurements in parallel which will give us a nice, safe 4 ohms per channel!
However, you’ll want to buy the right kind of resistor. I recommend at least 25 watt (25W) 4 ohm resistors. While you won’t find them in many local stores, the good news is that they’re affordable. I’ve used them many times for speaker problem-solving.
I’ve used some like these over at Amazon.
How to get around the lack of a front/rear fader
As I mentioned at the beginning, if you’re using a 4 channel amp to drive both 4 speakers and a subwoofer, you’re going to have to make compromises. There’s simply no way around it.
The biggest one that comes to mind is losing the front/rear fader control. However, I’ve come up with a sort of solution that helps a bit!
By adding inline resistors to the rear speakers you can drop their volume and it acts as a “fader” already. You can use an L-pad (speaker volume attenuation) site like this one to calculate resistor values for you.
I’ve already done the work for you, and here’s a great example. If you’re wiring 4 speakers and a subwoofer to a 4 channel amp, by adding 60 ohm resistors to the rear speakers you’ll drop the volume by 24dB (decibels).
The result will be that the sound is “faded” to the front and the rear speakers won’t be too loud.
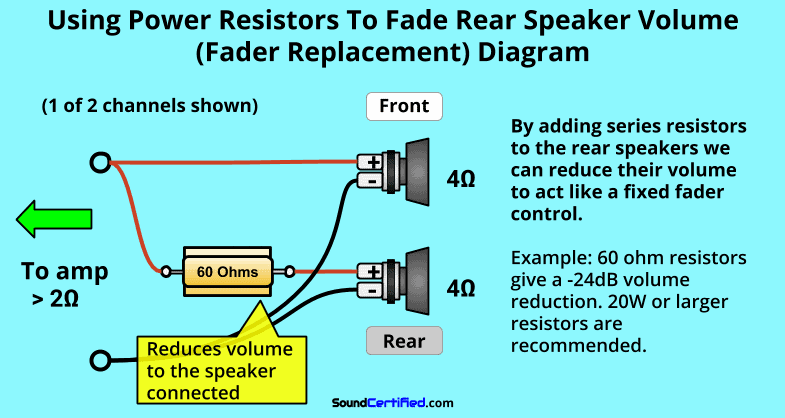
Following the example I’ve provided in the diagram above it’s pretty easy. You’ll need to pick up some 15W-20W (or higher) resistors. I recommend about 60 Ohms as it will reduce the volume by 24dB.
That should be enough in most cases: Not totally silent in the rear, but most of the volume will be towards the front speakers.
What crossover settings should I use on my 4 channel amp?
As most modern car amplifiers include very nice optional crossovers, for good sound it’s smart to take advantage of those.
Here are some good recommendations for the 4 main speakers and the subwoofer:
| Speaker | Crossover Settings |
|---|---|
| 4 main speakers | Flat (crossover off) or 56-60Hz high pass |
| Subwoofer | 80Hz low pass |
By using a high-pass filter for the 4 main speakers you can crank the volume when you want for more power & sound before distortion happens. When using a subwoofer, it’s really important to block vocals and upper-frequency music from getting to your sub.
The idea is to get “pure” bass sound as that’s what subwoofers are best suited for: Just purely producing great-sounding bass you’ll love.
What if my amp can’t be bridged?
While it’s true that nearly all amps with any “real” power today can be bridged from 2 channels to 1 channel (called “mono”, or bridging) for more power, some can’t. That’s especially the case for some older “old school” amps you might have in your closet but still like to use.
In that case, unfortunately, you’re really limited. Sorry! You have just a few options:
-
- Buy another small amp just for the subwoofer/subwoofers
- Run one small subwoofer from each of the rear channels
The problem with option #2 is that subwoofers need a lot more power to drive them well and sound good. There’s just no way around it.
8″ subwoofers are an option or a dual 4 ohm voice coil subwoofer could be used. That way you can safely drive each channel with a 4 ohm load even older amps can handle. These days, though, it’s usually easier just to get a cheap budget amp and avoid the headaches.
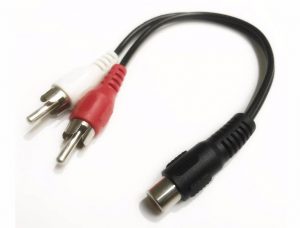
How to connect a 2 ch. car stereo to a 4 channel amp

If your stereo doesn’t have output channels that’s ok! You can still connect a head unit car stereo with only 2 channels (left and right) to a 4 channel amp easily. In most cases, you only need 2 RCA Y adapter cables. The head unit’s left channel RCA jack is connected to the left front and left rear amp inputs. Then the same for the right channels. If using speaker level inputs on the amp, use the connections shown above. NOTE!: Use only ONE of the two connections shown. Never connect both the speaker level and RCA jacks at the same time – speaker level signals can damage your head unit’s RCA outputs.
If you’re wanting to install a 4 channel amp for 4 speakers and a subwoofer but only have 2 stereo channels available, that’s ok.
As shown in my diagram, you can connect 2 channels to a 4 channel amp using either the speaker level inputs wired in parallel or by using RCA “Y” adapter cables.
All you need is a decent quality pair (2 total) 1 female to 2 male RCA “Y” adapters No products found.
The sound quality will be exactly the same. Modern car amps are designed in a way such that all 4 inputs will get the same signal and there won’t be any problems.
After connecting the stereo to the amp, you’ll need to adjust the gain controls for both the 4 main speakers and the subwoofer output. My advice is to use a high-quality music track you know well already so you can easily tell when music sounds correct.
Additional suggestions & parts you may need
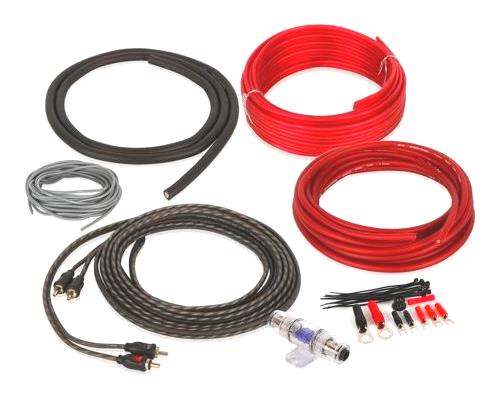 An amp wiring kit like this one will make your life easier! A a great (but affordable) amp wiring kit like this Belva 8-gauge complete kit includes not just the basics but a lot more. You’ll also need to pick up a 2nd pair of RCA cables (if using them) and maybe some extra speaker wire, too.
I can’t stress enough how important it is to be ready to install your 4 channel amp. While there are several ways you can go about it, wasting gas, time, and getting stressed out isn’t worth the headache.
It’s a lot better to start on the right foot and be ready at installation time. My advice is to pick up a good amp wiring kit and the tools you need beforehand.