
If you want more power & volume, less distortion, or simply to enjoy your music with better sound, you’re going to need to know how to connect speaker crossovers. I’d love to help!
In this article, I’ll cover how to install and wire car speaker crossovers with great results.
Here’s what you’ll find inside:
- Car speaker crossover wiring diagrams
- How to install tweeters with crossovers (including tweeters with built-in crossovers already)
- How to install a crossover in your car like a pro – tips on installation and mounting
- Additional helpful info about speakers, impedance, crossovers, and more
There’s a lot to cover so let’s get started!

Contents
How to wire car speaker crossovers (diagram and info)
How-to and tips for wiring car speakers to crossovers
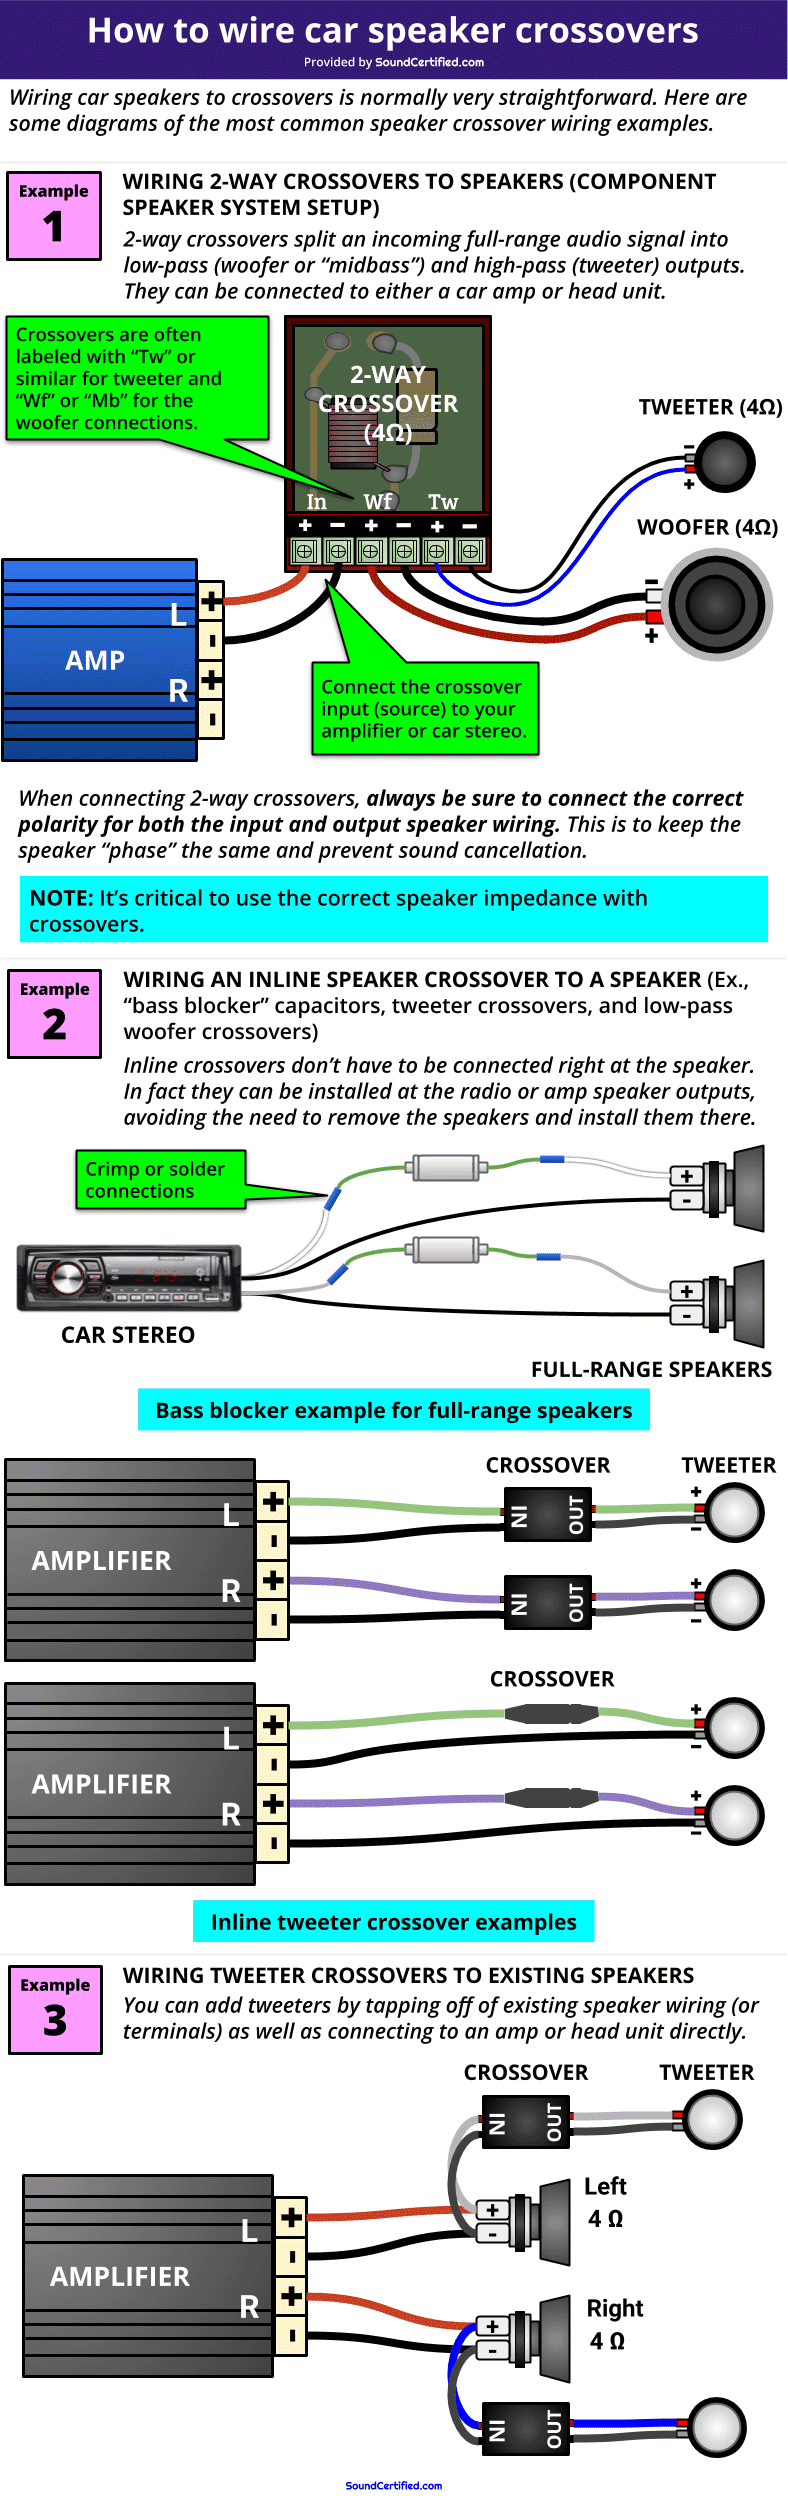
In order to correctly wire speaker crossovers, you’ll want to do the following:
- Be sure to plan for having enough speaker wire on hand. Many speakers do come with speaker wire, but more often than not (1) it’s fairly short in length or (2) it’s not great quality. I recommend picking up a roll of 25 feet, 50 feet, or even more to make sure you have enough if running wire from speakers to the crossovers.
- When connecting the wire, strip about 3/8″ wire from each wire and twist the bare conductors tightly to prepare them for the speaker wire terminals or connectors you’ll be using
- Be sure to carefully follow the crossover & speaker wire polarity markings. That’s because if one speaker is wired backward vs another, this creates a condition called being “out of phase.” That just means one speaker is working to make sound in the opposite direction of another and can cause some sounds to cancel out, in addition to sounding weird and not as it should.
- Always use the correct speaker impedance for the crossover. Crossovers are designed to work only with one speaker impedance (Ohms) in most cases. Changing this causes crossover shift which means the crossover’s frequency cutoff changes dramatically and your speakers won’t sound right at all.
Crossovers are normally marked with the correct speaker wire polarity to connect to as well as which speaker you should connect. Often you’ll find an abbreviation like “TW” for the tweeter and “Wf” or “Md” for woofers and midrange/midbass speakers.
Do crossovers have to be wired close to speakers?
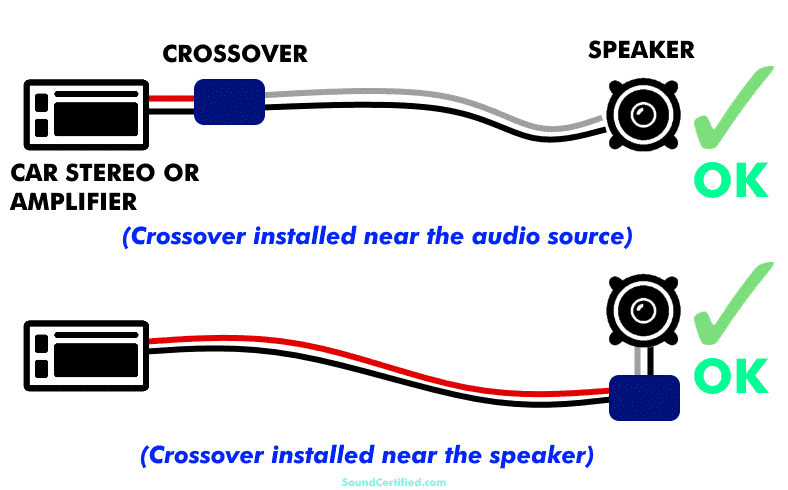
You can install & wire speaker crossover close to the amp or car radio. They don’t have to be installed close to the speakers.
The good news is that yes, you can wire speaker crossovers close to your amp or car stereo if it’s less work. While it’s usually easier to do it where the speakers are when upgrading factory 2-way component speaker systems (since they’re often close to each other in the doors, for example), it’s not important.
It’s generally easier to put a crossover near the component speakers when upgrading (or adding your own) 2-way speaker systems. However, there’s no reason you have to most of the time. When it’s convenient, you might find it helpful to keep the crossover closer to the car stereo or amp, saving the need to do more work or run new speaker wire to go to it.
For example, if you’re upgrading factory-installed tweeters but don’t want to have to hunt down and modify the factory wiring, normally it would require running new speaker wire to them. Instead, you can avoid all that time & headache by wiring them inline behind the head unit, then connecting the new tweeters in place of the old ones.
As long as the speaker wiring is reasonably short (less than 50 feet for each speaker, for example), in the real world it’s not a problem. This is especially helpful for situations like adding bass blockers (inline high-pass crossovers) from an amp to your main speakers.
Just be aware that some vehicles may have factory crossovers installed on the speaker itself (very common for factory tweeters) or somewhere else in the speaker system. It pays to be sure before connecting your own.
How to mount & install car speaker crossovers – 2 great ideas
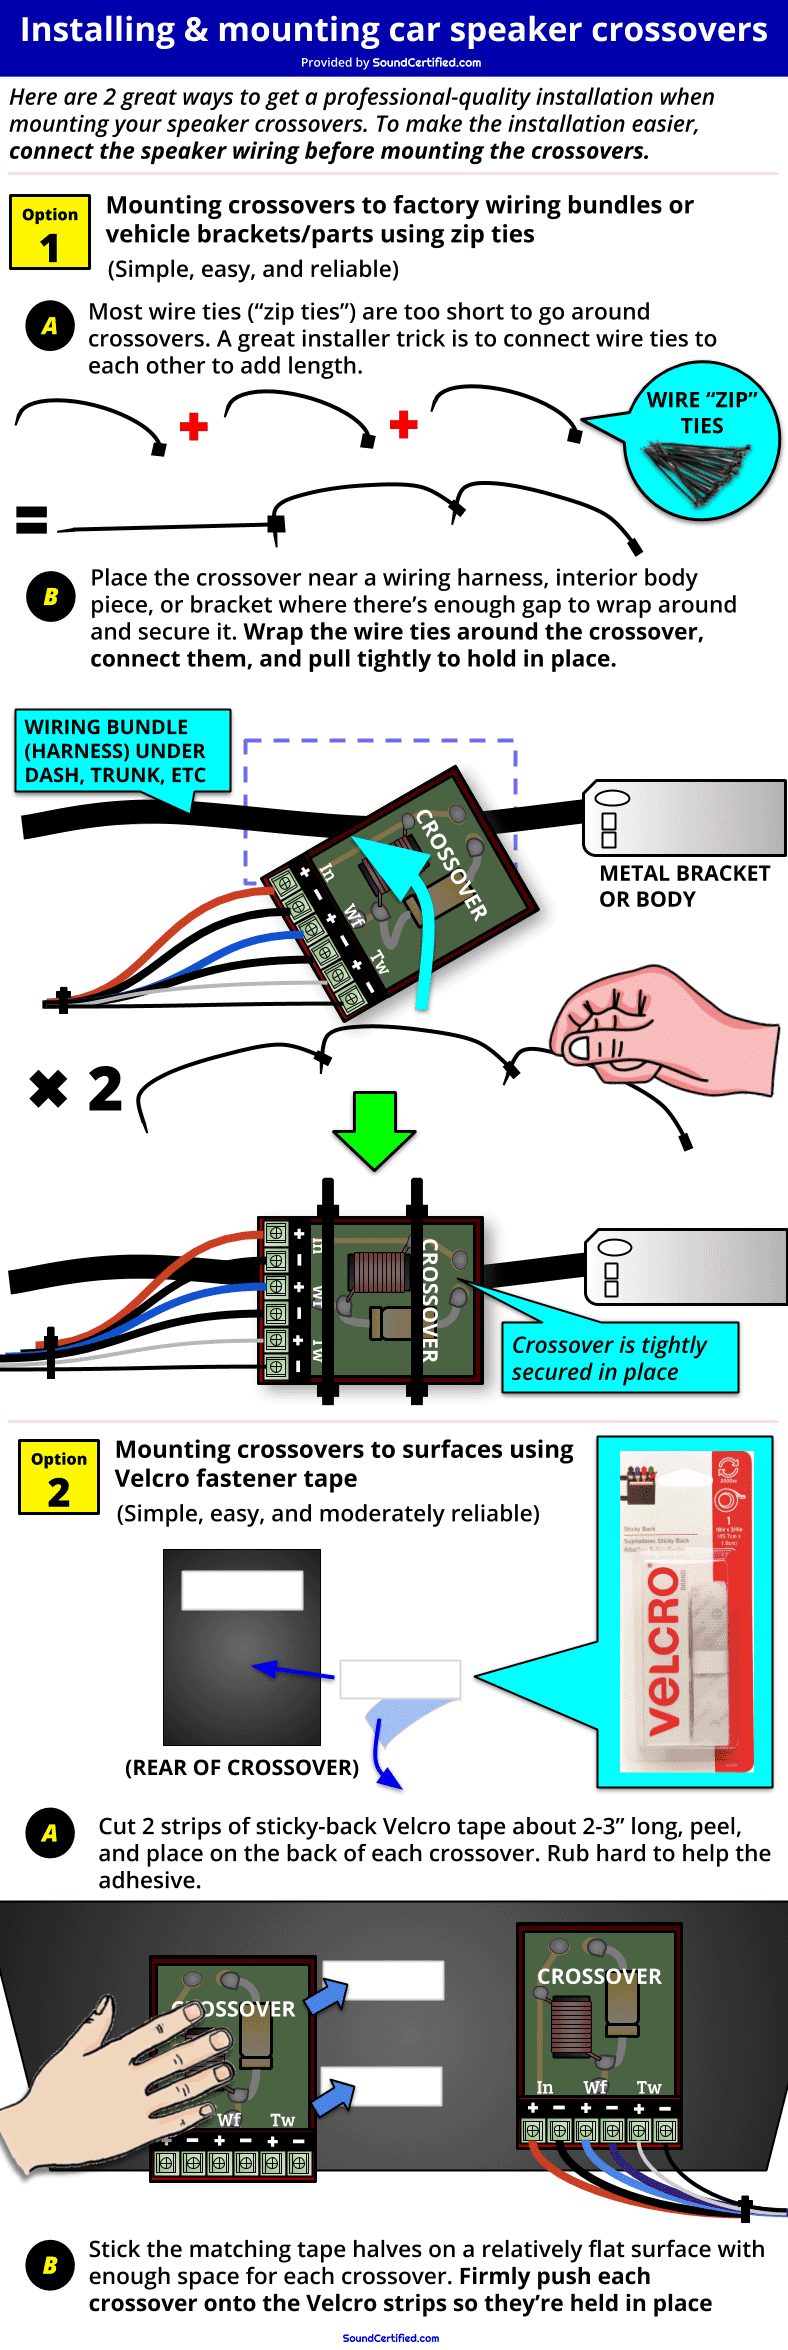
Once you’ve wired your speaker crossovers, you’ll want to make sure they’re installed and mounted securely. That avoids a lot of problems with them bouncing around and even potentially having a short-circuit if the terminals come close to metal.
As you can see from the diagram above, I’ve provided 2 practical ways:
- Mounting crossovers using wire (“zip”) ties: this is definitely one of the easiest and best ways to make sure your crossovers stay put. Not only that, but it saves a lot of time, too. This also works in nearly all vehicles (even boats in many cases!).
- Using self-adhesive Velcro tape: Using sticky-back Velcro tape is pretty fast as well, although in hot temperatures the adhesive can lose its strength over time. However, it’s really easy and if you have some Velcro already handy it’s a great way to make good use of it. You can also remove the crossovers without having to cut anything unlike with wire ties.
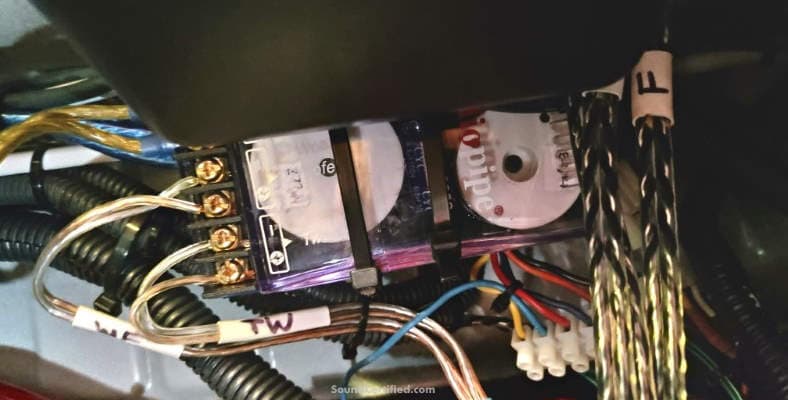
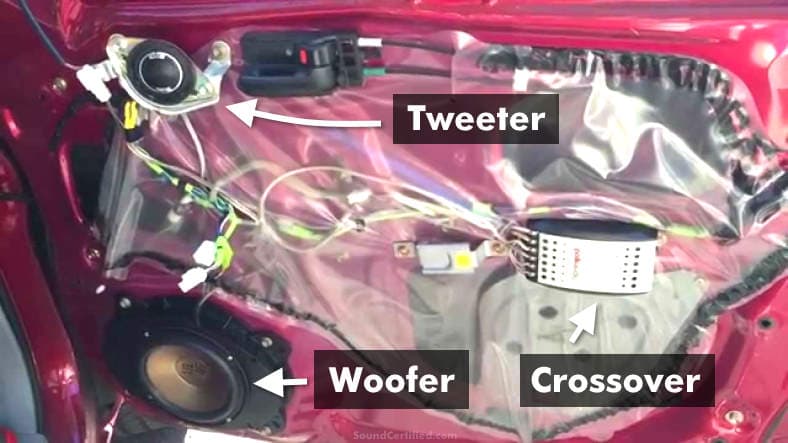
Shown: an example of how I used wire ties to mount a 2-way speaker crossover to the car’s wiring harnesses in the trunk. It’s not “fancy” looking, but still one of the easiest – and best – ways to install crossovers with a lot less hassle.
If you’ve ever bought wire ties you may have noticed that they’re often way too short to wrap around speaker installation parts. One of the installation tricks I use to solve this is by connecting wire ties to each other end-to-end for extra length.
This way, you can use any wire ties (6″, 8″, and other standard lengths stores may have) to get the job done.
I don’t recommend you bother with the small packs of 25 – 50 or so as you’ll run out of them quickly.
How to wire tweeters with built-in crossovers to speaker crossovers
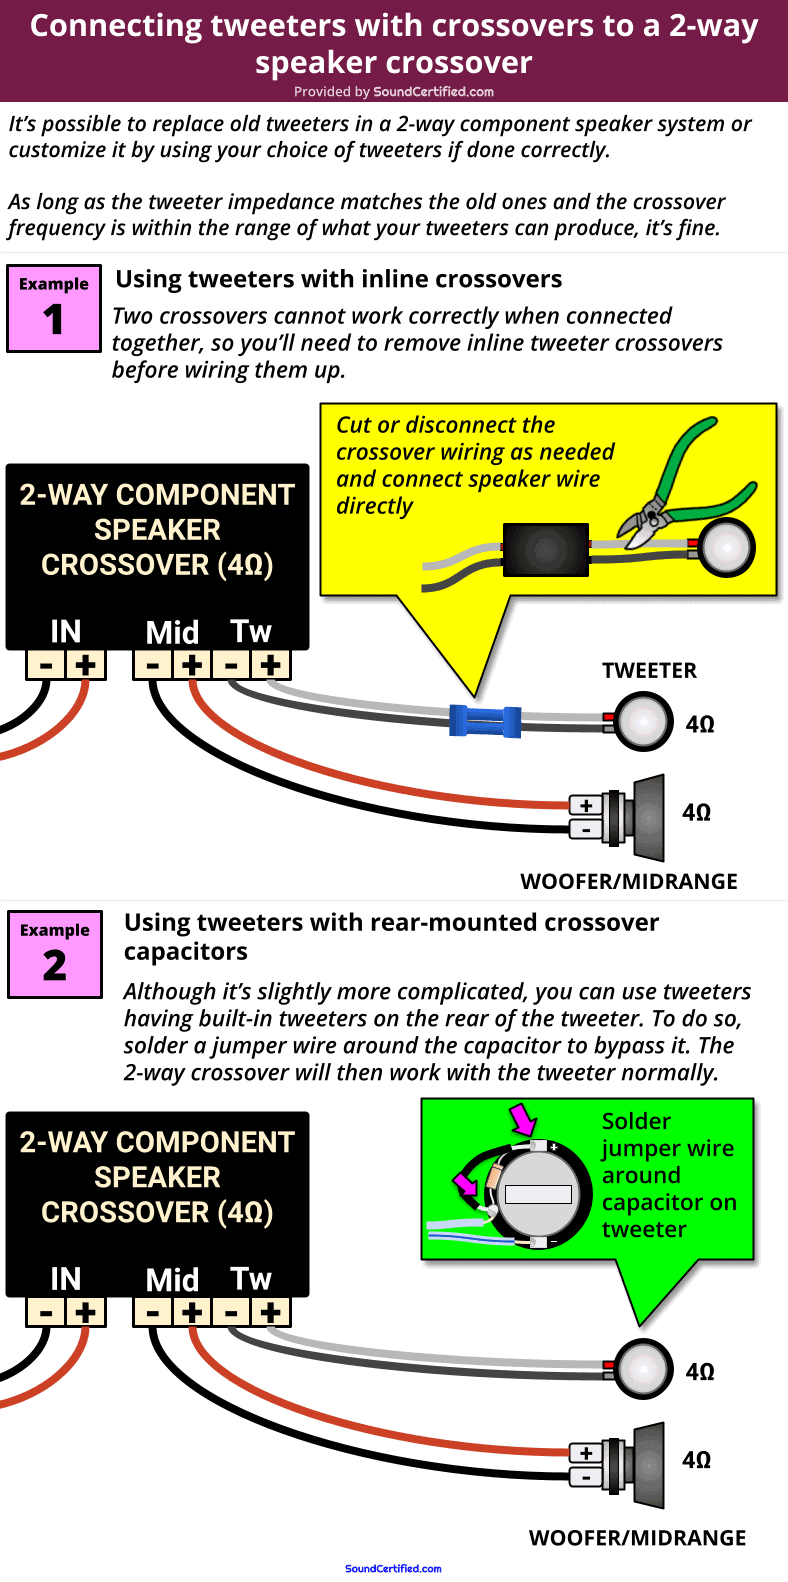
What about using different tweeters with an existing component set or making your own component speaker set using some speakers & crossovers you bought.
The good news is that in most cases if the tweeter impedance matches that of the 2-way crossover this can work.
However, the most important thing here is that you don’t use the built-in tweeter crossovers. You’ll have to remove and/or bypass those.
Generally speaking, most add-on tweeters have one of 3 kinds of built-in or external crossover:
- Low-cost 6dB/octave crossover (capacitor) mounted right on the tweeter.
- A single capacitor wired inline on one wire.
- A 2nd order (12dB/octave) crossover is wired in line with the tweeter wiring or connects to it.
For #2 & #3, you’ll just need to either bypass it and connect the tweeter to speaker wiring & the crossover directly. Case #1 is a bit trickier. You’ll need to either remove the capacitor and solder the speaker wire to the positive tweeter terminal, bypassing it, or solder a jumper wire around it.
Soldering a jumper wire around it will act as a short and the capacitor will no longer be seen by the crossover you’d like to use.
What happens if I use a different impedance speaker on a crossover?
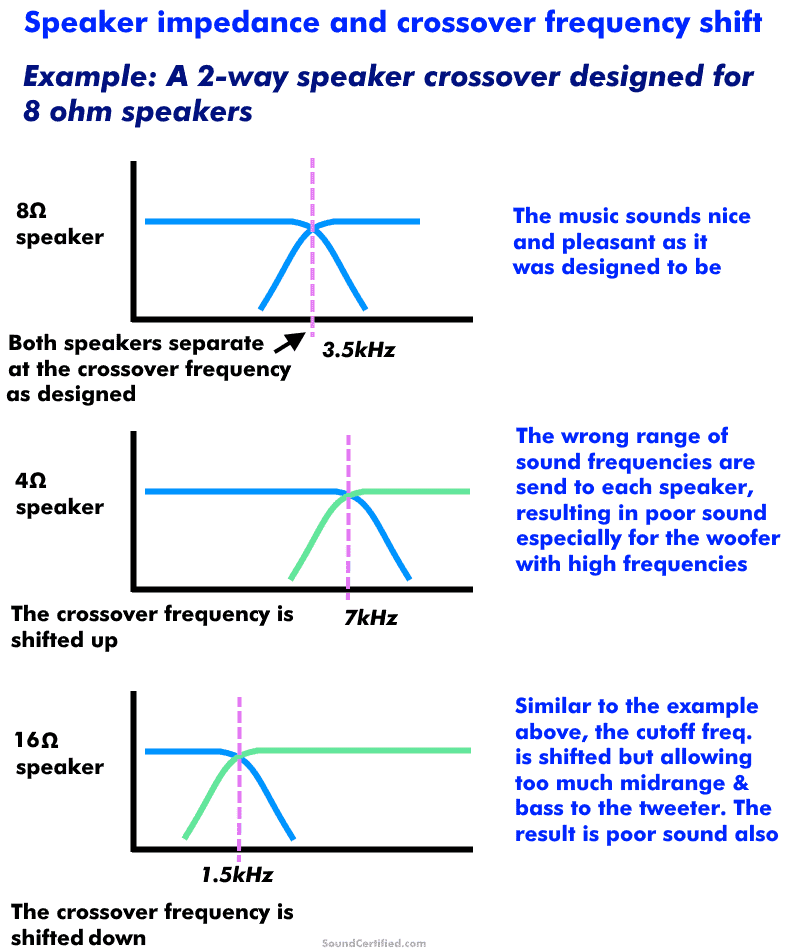
Diagram showing what happens when you change the speaker Ohm load connected to a crossover: crossover shift occurs. That’s because the crossover frequency is very dependent on the speaker load used. When that changes, the crossover frequency moves (“shifts”) accordingly.
Crossover shift when using different impedance speakers
As I showed earlier, crossovers are based on parts (capacitors and inductors) that work as filters according to the speaker load they’re connected to. Because of this, when you change the speaker impedance you change the crossover frequency and the sound.
You’ll likely notice some sound problems if you do it:
- A “harsh” sound from woofers or midrange speakers. Tweeters may sound distorted and begin to “break up” at a lower volume than they used to.
- A “thin”, weak quality to the music.
- Gaps in the sound ranges you should be hearing.
Speaker crossovers can only be used with the speaker impedance they’re designed for or they won’t sound the same.
As an example, wiring an 8 ohm home speaker to a 4 ohm car speaker crossover won’t work right. In that case the crossover frequency would shift downward 2 x the original value (example: a 3.5kHz crossover frequency would shift to 1.75kHz). That’s because the crossover is designed using math & parts based on using a 4Ω speaker load.
What happens to a crossover when I halve the speaker impedance?
When you change the speaker impedance connected to a speaker crossover it can significantly shift the crossover’s cutoff frequency. As a general rule:
- Halving the speaker impedance (ex.: 8ohms to 4 ohms) doubles the crossover frequency (Ex.: 3.5kHz goes to 7kHz)
- Doubling the speaker impedance (ex: 8 ohms to 16 ohms) halves the crossover frequency (Ex. 3.5kHz goes to 1.75kHz)
We don’t want this because it allows the wrong range of sound frequencies to pass to the speakers. In the case of tweeters, bass & midrange are bad because they can’t produce it properly. In fact, after a certain power level tweeters can be damaged when driven hard by bass frequencies.
Likewise, many woofers can’t produce high frequency sounds well and often sound really bad when producing it.
If you change the speaker Ohms you’ll have to replace the speaker crossover as well to match.