Bridging an audio amplifier can be confusing – but don’t worry! In this detailed guide I’ve got clear and easy-to-understand info:
- How amplifier channel bridging works and why it’s useful.
- How to bridge an amp that provides stereo channel bridging.
- What to do when your amp can’t ordinarily be bridged – all hope is not lost!
- Helpful amp bridging diagrams and wiring diagrams.

Contents
- DIAGRAM – What is audio amplifier bridging?
- DIAGRAM – How does a bridged amp make extra power?
- DIAGRAM – How to bridge an amplifier + more info
- Understanding the minimum speaker load (Ohm rating)
- Setting the crossovers on a bridged amp
- Can you bridge an amp without bridging built in?
- What is tri-mode bridging?
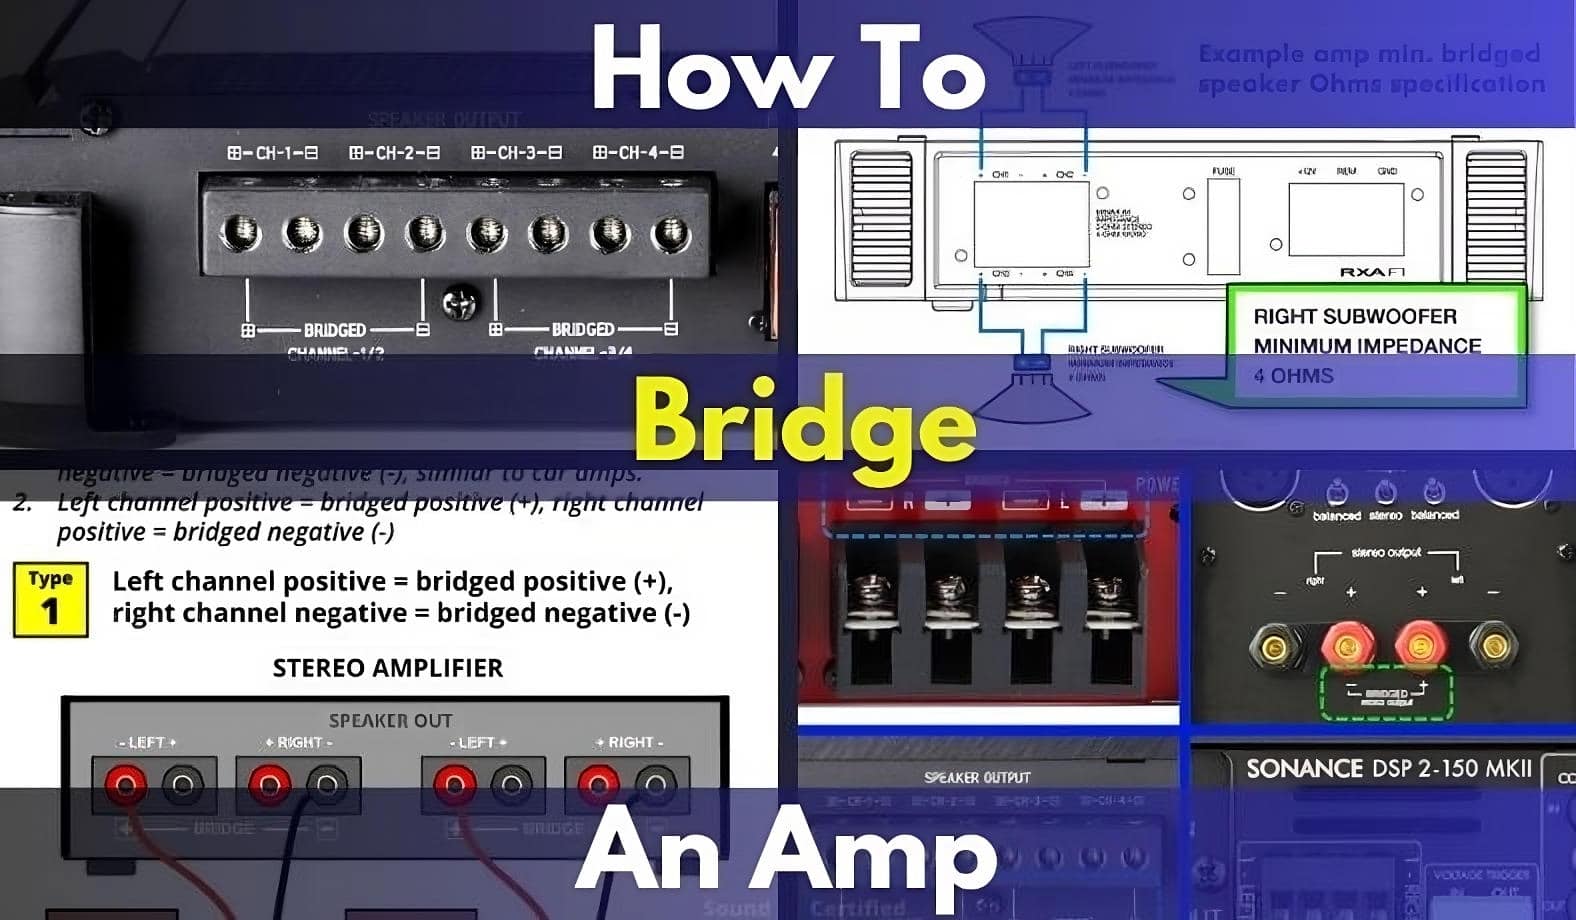
DIAGRAM – What is audio amplifier bridging?

Audio amplifier channel bridging is a built-in feature that allows two stereo amp channels to be wired as a single mono channel to provide maximum power. Bridgeable amplifiers usually use the positive terminal of one channel and a negative terminal from the other channel for the speaker wiring connections.
While this feature is extremely common in car amplifiers, you can also find some home stereo amplifiers, PA amps, and other power amplifiers. When a pair of bridgeable amplifier outputs are wired to a single speaker in bridged mode, the two channels work in a push-pull fashion, sharing the speaker load impedance between them.
The end result is effectively a mono amplifier with two times (or more) the power output of a single channel. This makes bridged amplifiers flexible for different speaker systems and especially for driving power-hungry bass subwoofers.
What are bridged power amplifiers used for?
In the case of car audio installations, some of the most common uses are:
- Powering both front or front and rear speakers and a single subwoofer from a single two or four channel amp.
- Using one 4-channel amplifier as a 2 channel amp to drive component speakers with more power and lower distortion at high volumes.
- Avoiding the need to buy additional amps if you’re reusing old electronics. A great example is using an old 2-channel amp to power a mono subwoofer.
For home stereo, public address (PA) systems, and general hi-fi, some of the most common uses are:
- Using two stereo amps to power a single speaker each for much more power output.
- Driving special speaker multi-setups like series or series-parallel designs for higher volume.
DIAGRAM – How does a bridged amp make extra power?

In the diagram above, I’m using a car amplifier as an example, although other types are generally similar.
Here’s how amplifier bridging is made possible:
- At the input stages, one channel has its line-level audio signal input inverted by an operational amplifier (op amp) integrated circuit. The input signal has its polarity reversed but doesn’t change otherwise.
- Each audio signal channel follows a normal path, carrying the musical signal to the power amplifier output stage.
- As the amplifier’s internal power supply provides a higher voltage supply, the input signal is amplified and capable of now powering the speakers connected.
- The inverted audio channel now has an inverted amplified signal. This channel’s output polarity is internally reversed.
- Each speaker produces the correct (in-phase, correct polarity) audio output when connected in stereo. This is because the inverted channel is connected in reverse at the terminals, resulting in a normal polarity to that speaker output relative to the other speaker. (The speaker terminal label shows the normal polarity as expected, meaning you’re unaware of it otherwise.)
- When wired in bridged mode, the voltage differential (the difference in polarity between the first channel’s output voltage versus the second channel) doubles the total output voltage. This allows more power to be produced: from about 2x to 4x the power possible from a single channel depending on the particular amplifier’s design.
Mathematically, a positive voltage minus a negative equals a positive plus a positive, meaning the output voltages sum together.
Here are a few examples to help explain how the math works.
As you can see, this can provide 2x to 4x the output power of a single output, depending on the particular amp in use. Note that not all audio power amplifiers are designed with an internal power supply that provides the voltage and current required to deliver 4x the 4Ω or 8Ω power rating (or 2x the 2Ω power rating).
However, it’s typically the case – it’s a good idea to always check in case rather than assume it’s true before buying an amp.
DIAGRAM – How to bridge an amplifier + more info

A bridgeable amplifier normally provides labeled speaker wire connections showing the bridged wiring positive terminal and the negative terminals for that mode of operation. Bridging is easy if you observe the correct minimum speaker impedance (Ohms rating) specified.
Bridged speaker wiring connections
For car amplifiers, the speaker wiring connection to use is typically, but not always:
- The speaker’s positive terminal connects to the left channel’s positive terminal.
- The speaker’s negative terminal connects to the right channel’s negative terminal.
For home stereo and hi-fi amplifiers, the bridged speaker outputs are usually of one of the following:
- Type #1: The left/channel 1 positive terminal is the bridged speaker positive (+) connection. The right/channel 2 positive terminal is the bridged speaker negative (-) connection.
- Type #2: The let channel positive terminal is the bridged speaker positive (+) connection. The right channel negative terminal is the bridged speaker negative (-) connection.

However, it’s important to remember that these wiring configurations aren’t the case for 100% of audio amplifiers. Some may be similar but use the right channel positive and left channel negative terminals.
It’s very important always to be sure before connecting speakers in bridged mode.
Are all stereo amplifiers bridgeable?
- Most car amplifiers sold today and some home stereo/high-fi amplifiers can be bridged.
- Generally, it’s typically not bridgeable if an amplifier is not provided with a mono (bridged) power rating.
Never assume you can bridge an amp! Always verify before buying one to be sure.
Don’t forget the crossover
When powering subwoofers, for good low frequency sound quality you’ll need a low-pass crossover. This is usually built into most modern car stereo amps but isn’t found as often in home stereo amps. Some AV receivers, however, do have the option built-in.
For cases where you don’t have an electronic crossover handy, you can add a passive (non-powered) low-pass crossover in line with the subwoofer enclosure.
Understanding the minimum speaker load (Ohm rating)

Shown: An example of measuring the speaker impedance (total resistance) in Ohms for a speaker’s voice coil.
Minimum speaker impedance in bridged mode
Bridged amplifiers normally need a bridged Ohms load twice the minimum speaker impedance rating for each stereo channel. Typically this would be:
- 4Ω minimum in bridged mode for a 2Ω min. rated car stereo amplifier.
- 8Ω minimum in bridged mode for a 4Ω min. rated home stereo amplifier.
Your amplifier should state in the owner’s manual the minimum required “impedance” (the speaker’s resistance load). This includes both normal stereo usage and a rating for bridge mode.
Min. speaker Ohms guidelines for bridging
Here are the basic rules for correctly connecting speakers in bridged mode:
- You can connect a SINGLE speaker of the required minimum impedance or higher.
- You can connect MULTIPLE speakers if the total adds up to the required minimum impedance or more.
- Dual-voice coil speakers can be used if they can be wired to give the correct amount.
Speaker bridging total Ohm load examples
For an amp that requires a 4 ohm load minimum when bridged use:
- One 4 ohm subwoofer
- TWO 8 ohm subwoofers wired in parallel ( 8 / 2 = 4)
- ONE dual 8 ohm voice coil subwoofer wired in parallel (gives 4 ohms)
- TWO 2 ohm woofers connected in series (2 + 2 = 4 ohms)
For an amp that requires a 2 ohm load minimum when bridged use:
- One 2 ohm subwoofer
- TWO 4 ohm subwoofers wired in parallel ( 4 / 2 = 2)
- ONE dual 4 ohm voice coil subwoofer wired in parallel (gives 2 ohms)
- FOUR 8 ohm woofer wired in parallel (8 / 4 = 2)
Example amp bridging wiring diagram

Here’s a diagram showing the most common wiring setups most people will use for typical amplifiers.
(Click to enlarge or click here to get the Adobe .pdf file you can download and print)
Setting the crossovers on a bridged amp

Image: Close up of a modern typical car amp with built-in crossover features. With adjustable sound range controls, this allows high-pass, full-range, or low-pass use.
For most bridged amp situations where the amp is connected to a subwoofer or set of subwoofers, this is what I recommend:
- Set the crossover switch to low-pass filter (LPF) or similar on your amplifier
- Adjust the LPF dial, if available, to the maximum level
- Play music containing bass you’d usually listen to
- Begin turning the LPF dial down until almost no voice or upper-range music is heard (note: for reference, a good rule of thumb is 80 Hz or lower in case you’re able to know the actual cut off frequency of your amp)
- Adjust the gain if higher-volume power is needed when the volume dial of your head unit is turned up
Can you bridge an amp without bridging built in?

Amplifiers without the built-in feature don’t make things easy, but the good news is that it can be done! Several solutions exist:
- Using a pre-built amp bridge tied load (BTL) preamp board.
- Building your own bridging module (read more here )
Using an amp bridging board

If you’re comfortable working with electronics, you can pick up a board like the one shown below at places such as AliExpress and other e-commerce websites with small electronics for about $10 to $15. An amp bridging board (also called a “BTL” board) is a small op-amp based circuit that allows using a non-bridgable amp in bridged mode.
It requires a separate dual-voltage DC power supply and connects to any stereo amplifier line level inputs. When a mono signal input is supplied, a duplicate inverted signal will be output on one channel and the other will pass the non-inverted signal.
When connected to an amplifier’s RCA inputs, the amplifier’s stereo speaker outputs can be bridged. Audio hobbyists with home stereo amplifiers sometimes use these as it’s possible to tap off the internal power supply in some cases (or a separate supply can be used).
What is tri-mode bridging?

Image: Diagram showing how to connect speaker wiring to a tri-mode capable amplifier with stereo speakers and a bridged woofer.
Amps with a “tri-mode” or “tri-bridgeable” feature are the same as other bridgeable amplifiers but can also be in bridged mode and wired to 2 speakers simultaneously. This makes it possible to keep a regular stereo pair of speakers connected while the amp is bridged and connected to a woofer or other speaker.
It’s a unique feature never used very often, but it can be handy in some speaker systems. However, it does have some pros and cons:
- Pro: This allows a 2-channel amp to connect to 3 or more speakers
- Con: for woofer use on the bridged output, an external passive crossover is needed – these are often large, heavy, and expensive for low-frequency speakers like subwoofers
- Con #2: The stereo speaker impedance must be higher than the min. rated Ohms load. For example, the bridged and stereo speakers should be no lower than 4Ω for a tri-mode amp.