Maybe you’ve got some extra speakers lying around or just want to know how to add a resistor to a speaker to change its impedance. Either way, you’re in luck!
In this article, I’ll show you:
- How to change (or match) speaker impedances using resistors (with great diagrams to follow!)
- The disadvantages of using resistors to change the speaker impedance
- What kind of resistors you’ll need
- What to do if you can’t find exactly the right resistors (there are some handy ways around that!)
- Where to buy the right resistors – without going broke, too!

Contents
- What kind of resistors should you use for changing speaker impedance?
- How to add a resistor to a speaker to change or match impedance
- What are the drawbacks of using resistors for changing speaker impedance loads?
- What if you can’t find exactly the right resistors?
- Where to buy resistors for changing speaker impedance load
What kind of resistors should you use for changing speaker impedance?

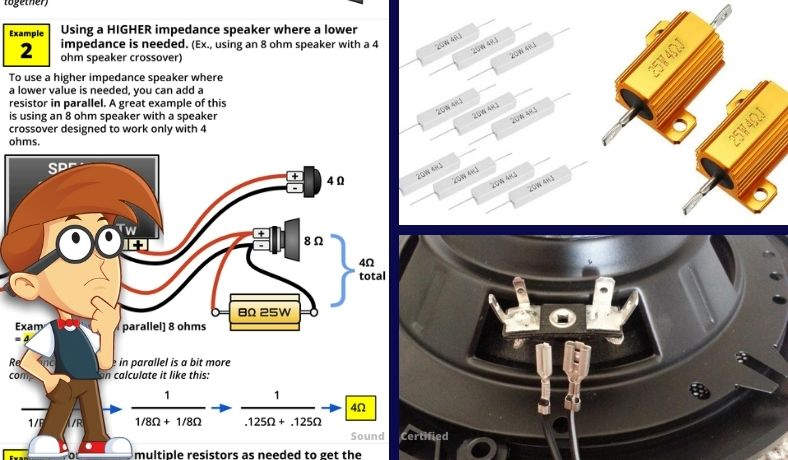
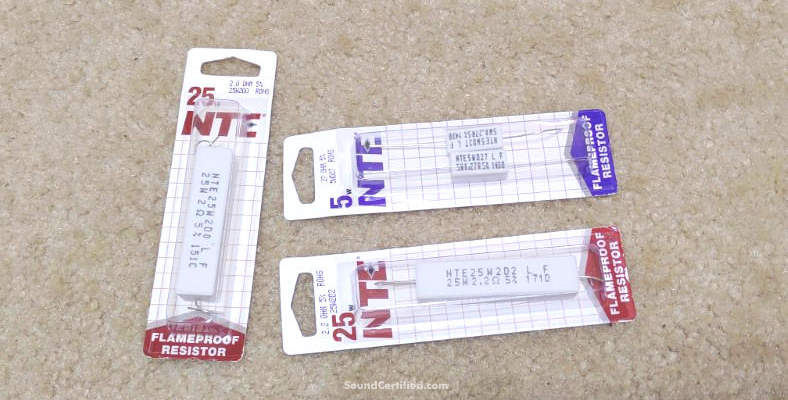
Examples of common “power” (high-power) resistors used for audio & speaker impedance needs. These are resistors built to handle the higher power levels put out by an amplifier or stereo.
To work with the higher output of amps and receivers, you’ll need to use power resistors when working with speakers.
A power resistor is just a larger-size resistor that can handle a lot more power & heat than the small ones commonly used on electronic boards. They’re actually fairly inexpensive, too ($5 or so for 2 to 4 in a pack), and are commonly used for custom speaker projects.
For speaker systems, I recommend using one with a power rating of 25 watts or more to be sure. For car stereos (not car amplifiers – those are higher power), you can often get away with around 10W to 15W.
Resistors to avoid
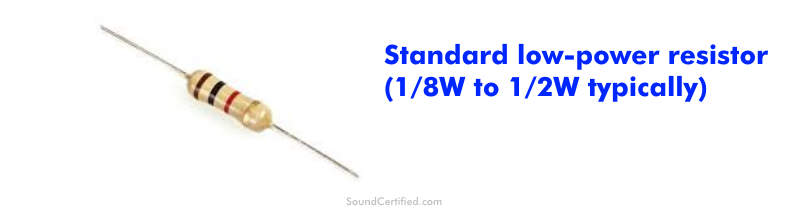
Shown here is an “axial” type resistor used for low-power electronics. These types of resistors aren’t suitable for working with speakers, audio, and other high power electrical circuits. Don’t use them for speakers as they can get extremely hot and potentially burn out.
While you might be tempted to try them, it’s important to avoid low-power (small) electronic resistors. These usually are rated for only about 1/8 of a watt to 1/2 watt. They’re simply too small to safely handle the large amount of heat that speakers and amps can dish out.
If you connect these to a high-power audio system they can become extremely hot, possibly causing burns or simply burn out altogether and cause failure (if you’re lucky) or even damage items they’re close to.
How to add a resistor to a speaker to change or match impedance
You can change speaker impedance with resistors for two situations:
- To use a lower impedance speaker than you normally could with an amplifier or stereo.
- To use a higher impedance speaker where a lower one is needed (for example: speaker crossover designed only for a certain Ohm rating speaker).
Of the two cases, #2 is a lot less common. However, it’s really helpful when using speakers with crossovers and a few other situations you may run into.
If you’d like to use a higher speaker impedance than required for a stereo or amp, that’s normally not a problem. As long as the speaker impedance is equal or higher than a stereo or amp’s minimum Ohms rating it will work safely.
1. Using resistors to increase the total speaker impedance load
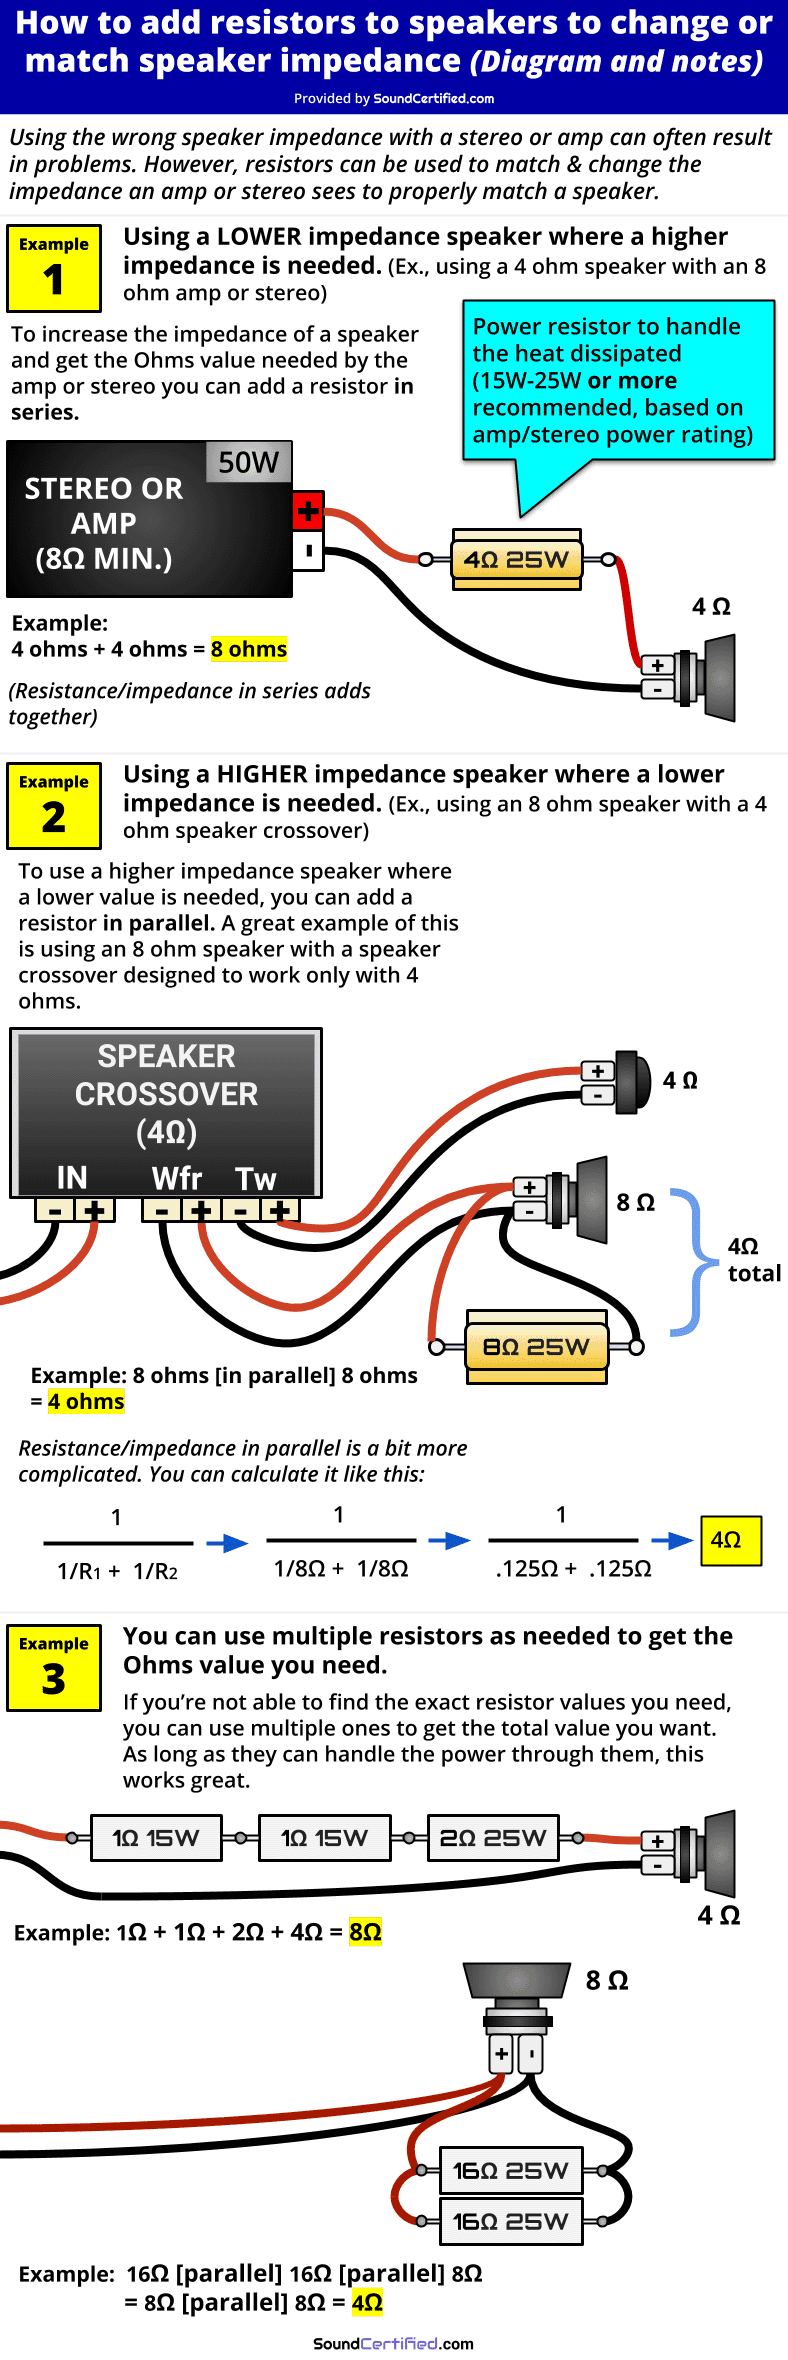
As shown from my diagram above, if you’re planning on using a lower impedance speaker you can add resistors in series in order to bring up the total impedance that the stereo or amp sees. This allows you to safely avoid overheating and burning out the electronics you’re connecting to.
To do so:
- Connect a resistor with the right resistance (Ohms) value to bring up the speaker impedance as needed, and with at least 1/2 the rated power of the stereo or amp’s power output rating. (Ex.: for a 50W/channel stereo, you’ll pick a power resistor with a rating of 25W or more)
- Insulate any exposed resistor leads so they can’t short to speaker wire or metal. Always make sure the speaker or resistor wire is fully covered & not exposed.
A resistor connected in series simply adds its resistance to the speaker impedance rating. (Ex.: A 4 ohm resistor plus a 4 ohm speaker = 8 ohms total).
2. Using resistors to decrease the total speaker impedance load
What’s great is that not only can you increase speaker impedance connected to an amp or receiver, but you can also effectively decrease it, too! This isn’t something you’ll run across very often, but there are some situations where it’s really handy to know how to do it:
- Matching a different impedance speaker to speaker crossovers
- Temporarily using extra speakers until you can get replacements for the original ones
- Replacing obsolete speakers with the next best ones you could find, but need to match the impedance
- Making use of discounted speakers you’ve gotten an excellent price on
In this case, you can decrease the total speaker load seen by connecting resistors in parallel.
To do so, it’s basically the same as connecting resistors in series but the main difference is that you’ll wire it in parallel:
- Calculate the resistor value you need, in Ohms (this is usually the same as the speaker: for example, to have a crossover see a 4Ω with an 8Ω speaker, you can connect an 8Ω resistor in parallel
- Add resistor to speaker wire & speaker: Connect the resistor to the positive and negative terminals of the speaker (you can do this using speaker wire – there’s no need to do it right at the speaker if that’s a problem)
- Insulate & fully cover any exposed speaker wire or resistor leads so they can’t cause a short-circuit to nearby wiring or metal
Resistance in parallel is a little bit more complicated
Resistance in parallel is a little bit more complicated to figure out as far as the math is concerned. However, don’t worry! It’s actually fairly easy once you understand how it all works.
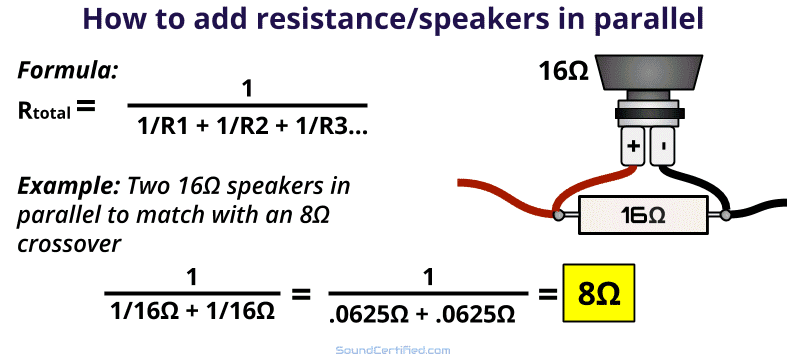
Resistance in parallel adds using this formula: R_total = 1 / [ (1/R1) + (1/R2) ]
However, for resistance/impedance in parallel, if the values are all the same you can just divide by how many there are.
What are the drawbacks of using resistors for changing speaker impedance loads?
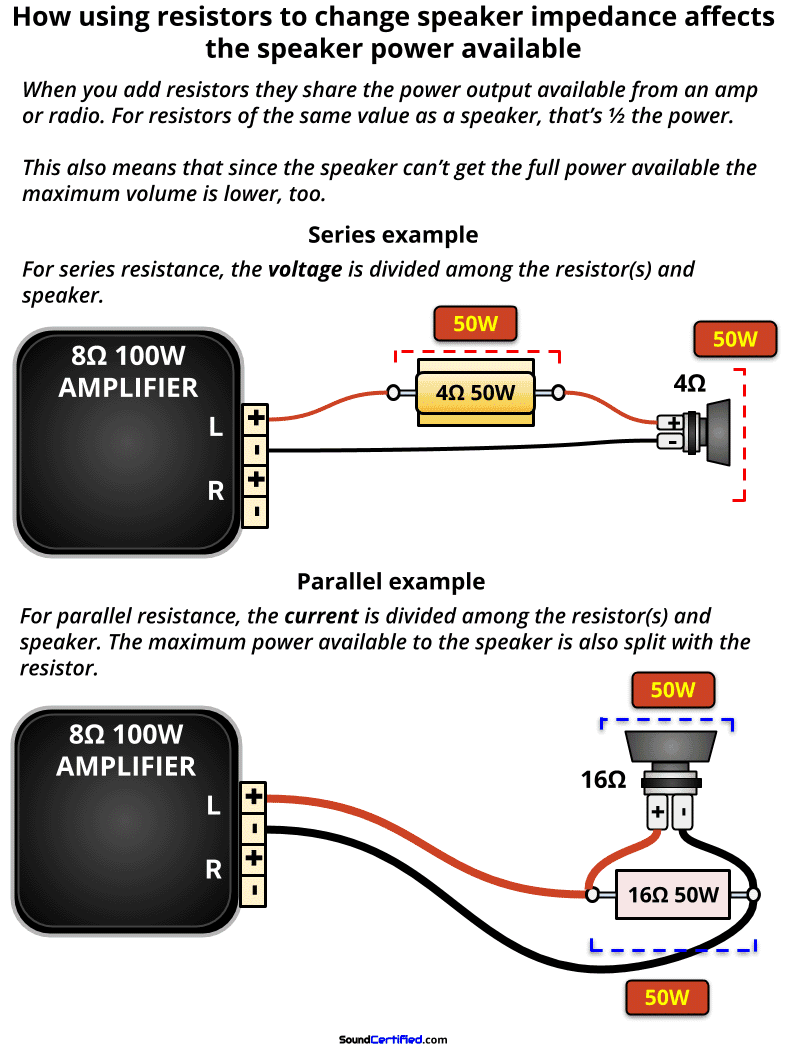
Diagram showing an example of how power is divided up when using resistors to change speaker impedance seen by an amplifier or radio.
One thing to be aware of that it’s not a perfect solution – there are drawbacks.
One of these is that when you add a resistor in series with a speaker, the power delivered is split between the two. The second one is that you can’t get the same maximum volume from your amp or radio as you could using only the correctly matched speaker impedance.
However, having a series resistor connected to the speaker means that each one gets only 1/2 of the total power delivered. That means when using a resistor to compensate for the wrong speaker Ohms value, you’ll always lose some power across it. That’s regardless of connecting before or after the speaker – that doesn’t matter.
Overall power available is reduced for parallel resistors, also
Similarly, when using resistors in parallel with a speaker to bring down the impedance the amp or stereo sees, they share power as well. For example, using an 8Ω resistor in parallel with an 8Ω speaker will give 4 ohms total. However, with a 50 watt per channel amp, the power is still divided between them, leaving a maximum of 25W to the speaker.
That’s because they share the amount of electrical current the amp can produce. It’s no longer fully available for only a single resistance (a single speaker).
Using resistors can sometimes slightly affect the sound
Speakers aren’t exactly like resistors – this means in some areas their impedance changes with the sound frequencies they’re playing. This is due to inductance and how the voice coil is affected by an alternating current (AC) musical signal.
This being the case, adding a resistor can slightly alter the sound as it can cause a speaker to behave slightly differently across the range of sound. However, for the most part, this isn’t normally a big issue.
Just be aware that if you notice a difference that may be why.
What if you can’t find exactly the right resistors?

Shopping for the right value & power rating of resistors can be a pain! That’s especially true when you can’t find the right values or if they’re out of stock
Here are a few tips for getting the right value resistors if you’re having problems finding what you need:
- You can use multiple resistors that add up the right value.
- They don’t have to be the perfect Ohms value – close is usually fine. For example, if you couldn’t find a 4Ω resistor, a 4.2Ω would be fine (as long as it’s ok for handling the power across it).
- You can use two resistors in parallel to get a lower value: for example, if you need an 8Ω one, you can use two 16Ω resistors in parallel to get 8Ω.
In my experience, not every electronic parts store carries what you need. You may need to get creative if you can’t find what you want.
Some of the most common Ohm rating resistors are values like 1Ω, 2Ω, 5Ω, 10Ω, and so forth which you can use to get fairly close to the value you need.
You can use multiple value power resistors with speakers to change their impedance. To do so, you can mix and match as needed to get the right overall value.
Where to buy resistors for changing speaker impedance load
Power resistors aren’t something you’ll find everywhere. A few places I’ve found them available are at:
- Fry’s Electronics (may be going out of business, however, so be aware).
- Parts Express – great supplier of many types of audio & speaker parts including resistors.
- Amazon, eBay, and other online sellers of miscellaneous parts.
That’s if you’re the USA, of course. For other countries, you’ll need to search a bit if you don’t already have a good source.
How much do power resistors for use with speakers cost?
Power resistors should be affordable. For example, I’ve paid as little as $1.99 for a pair and often have gotten sets of 2 or 4 for about $5 or so. This is for resistors with up to 25 watts power handing, in fact.
Hi Marty!
I need to use a resistor for different circumstances. I had to change the midrange speaker driver on my floorstanders (on both speakers) as one failed. Now, the new drivers seem to have higher sensitivity as they play louder than the old ones so I need to drop some DBs on them but without changing impedance. (the configuration I have is 8hm crossover/8 ohm tweeter/8 ohm midrange/2×4 ohm woofer equalling 8 ohm as well.) My crossover unit only has inductors and capacitors. Where should I place it? Just after the midrange driver? In series or parallel? What sort of voltage/resistance I don’t know either.
Hi Mike. This is easy to do. You will use an L-pad or resistor attenuation network, added after the crossover, and connected to the speaker.
I have covered this in nice detail here:
• General info + resistor value details: https://soundcertified.com/how-to-reduce-tweeter-volume/
• Attenuation calculator for getting any dB value you want: https://soundcertified.com/l-pad-calculator/
Typically people use this for tweeters, but it works just as well for midrange or other speakers.
Best regards!